My AZ Model Hurricane IID

AZ Model’s Box artwork for Hurricane IID

The obvious choices for my first RAF models for the 1943 project were a Spitfire V and a Kittyhawk. But I have always loved the Hurricane, and so I wanted one of those too – even though the type was on the way out in Tunisia, and does not seem to have played a significant role in the Sicily and Salerno battles. Hurricanes continued to be used until the end of the war in the Mediterranean, but apparently not in the major land campaigns.

I wanted to do the IID model, which featured two 40mm anti-tank guns underwing, and reduced machine-gun armament (down to two, firing tracer). One squadron of these was in operation in Tunisia (6 Squadron). This squadron played a significant role in supporting the advance of the Eighth Army into Tunisia, providing direct battlefield support by attacking tanks in particular, sweeping through in advance of the ground forces. This makes it particularly interesting from a tactical point of view – since mostly fighter-bombers were used for interdiction behind the lines. The IID was reported to be very effective in this role, and apparently referred to as the “can-opener”. There is actually quite a lot of controversy about how effective aircraft were at tank-busting in WW2 – extravagant claims by the crews are almost never corroborated by hard evidence (notably Typhoons in Normandy, using rockets rather than guns). There is no corroboration for the Hurricane pilots’ claims – though the psychological effect of air attack from tank crews should not be underestimated. The 40mm guns were awkward things, and hindered the aircraft’s manoeuvrability. The calibre (the same as 2 pdrs) was by then obsolete for ground use, but planes had the benefit of extra velocity coming from the aircraft, and the ability to attack from the side or top of the tank. They would have been useful enough against the Panzer IIIs that were the Germans’ main tank at the time. But after Tunisia the RAF used rockets for tank-busting. With battles in Sicily and Italy providing more cover for tanks, tank-busting went out of RAF repertoire. 6 Squadron swapped the guns for rockets, and used their Hurricanes against shipping – upgrading to Hurricane IVs in due course. The high-ups were always sceptical of using aircraft in close support, in spite of army pressure. Interestingly the Germans also used underwing guns of similar calibre, mounted on Stukas, in Russia. Extravagant claims of success were made for them too.

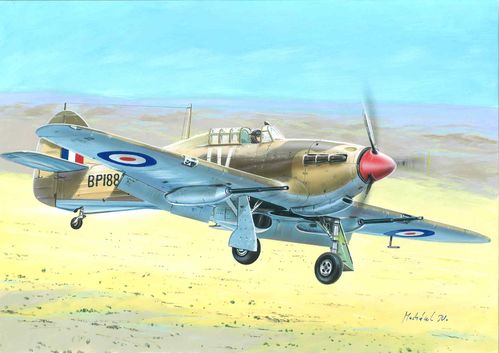
There seemed to be only one choice for for a 1/72 IID, from AZ Model, though a number of others manufacturers do other versions of the Hurricane II. Alas, I found that it was an poor model, especially compared to the Spitfire and Kittyhawk. It is now withdrawn. Starting again I would go for one of the other IIs, and try to model the underwing guns somehow – it is possible that one of the other kits has them, but doesn’t advertise it (there are often parts for other versions included). I have some guns from the Stuka, but I don’t know similar they are. The model often didn’t have proper pins or recesses for the parts to fit together in right place (the two halves of the fuselage had to be glued together free-form – a bit alarming); detailing was weak though perfectly adequate for my purposes. The fit of parts wasn’t great. It came undercarriage down, and without a pilot. The undercarriage doors needed a bit of work to fit into the recesses to model the up position – and I couldn’t make the side struts to the door work at all, so just plugged the gap with plasticine (I’m not stressing on the detail for these models). There were few resin parts, including the pilot’s seat and the radiator. It was very hard to get these off the sprue without damaging them. In fact I lost the seat in the attempt, and had to replace it with a spare from the Kittyhawk. The cockpit was too small for the PJ Productions model pilot I had (I have a stock of these) – so I used the Airfix one form the Spitfire, with a bit of filing, as this was a bit smaller, though not especially nice. The whole interior was quite hard to do. That didn’t matter too much because the cockpit canopy is quite small, and you can’t see much from the outside. I also managed to blur up some of the canopy interior with excess glue. Anyway, I pressed on, and here is the result:

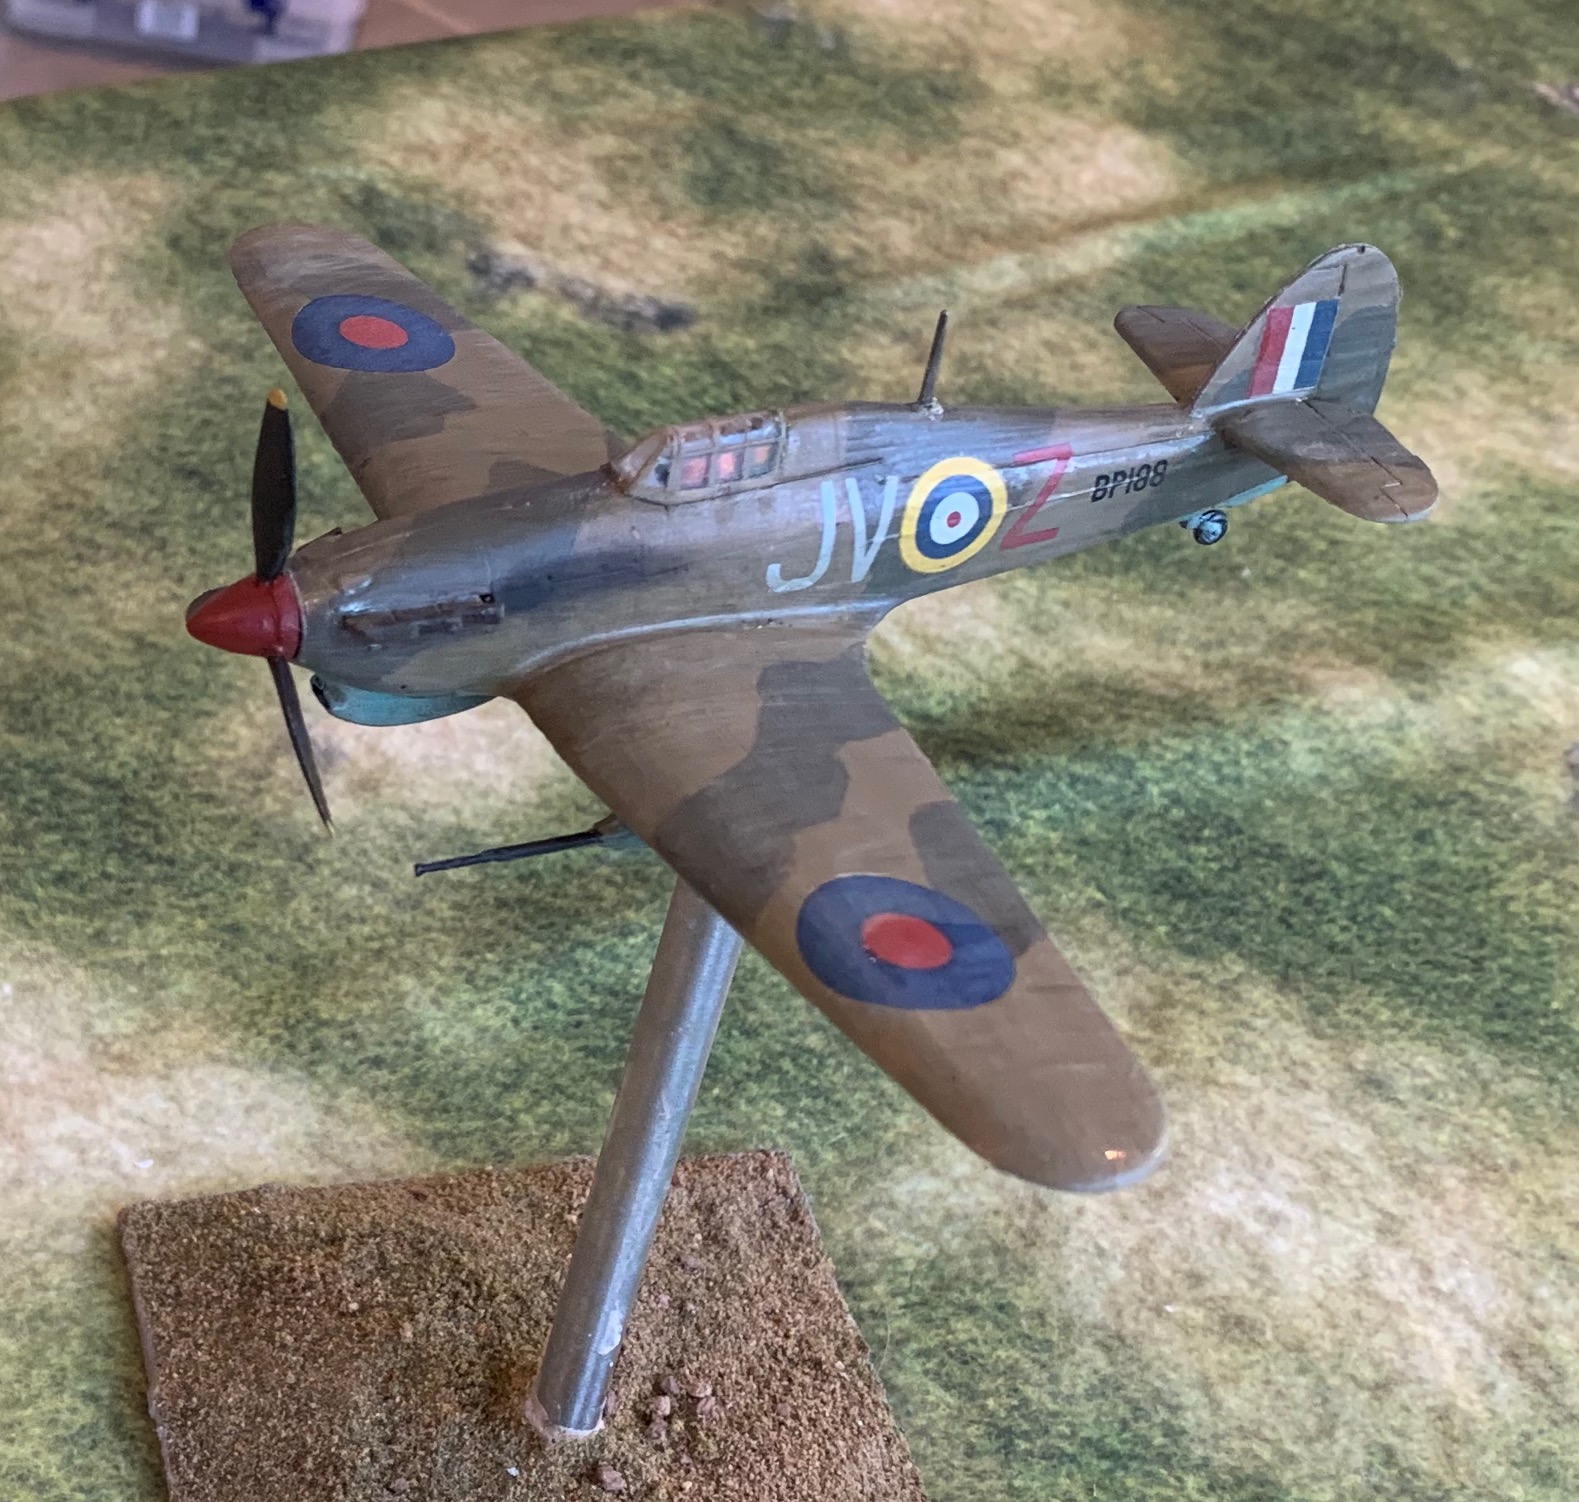
It Is OK considering, apart from the colouring. The underside has been heavily weathered partly because I wasn’t very happy with the underlying paint colour – at once too chromatic and too light. In any case the undersides of the aircraft got pretty hammered from the dust airstrips – though I don’t have a good picture of what they actually looked like.

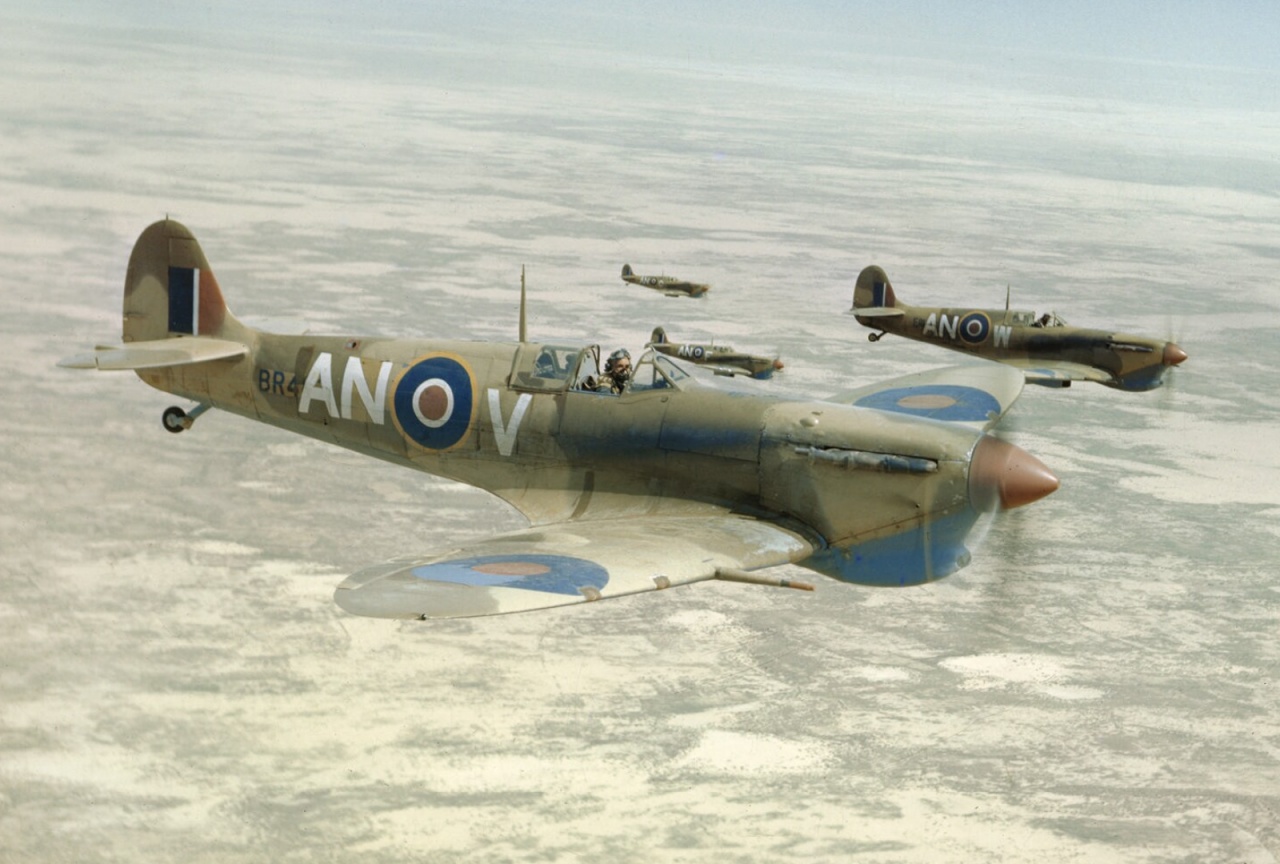
Here is a picture of the actual aircraft (apparently over El Alamein in 1942):

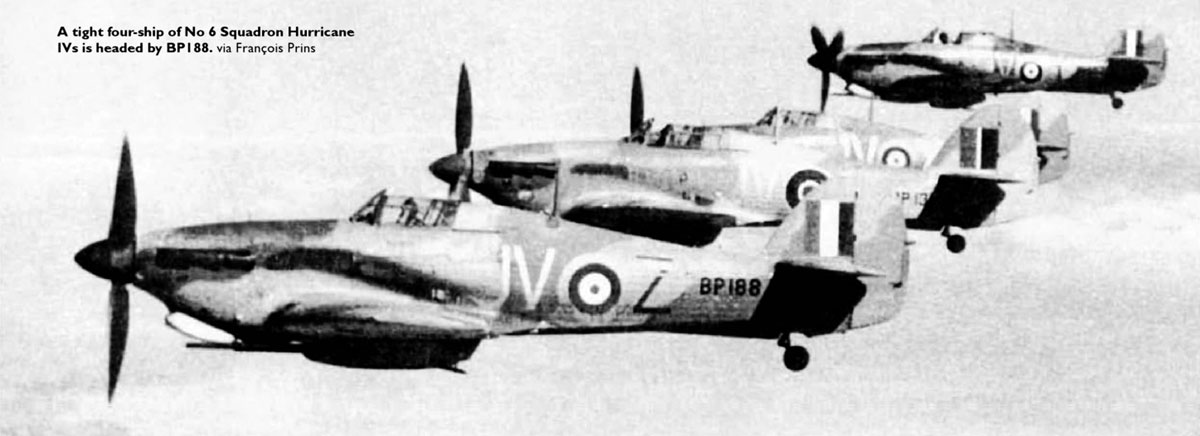
Could be worse! The decals weren’t that great – with lots of flash on the lettering and numbers. The tail flashes seemed too big compared to the box illustration – but seem to fit the photo OK. The exhaust stain should be much bigger. And if this aircraft survived all the way to Tunisia (doubtful), it would have looked even more weathered. In fact two of my supposed 1943 planes turn out to belong to 1942. This is in fact evident from the roundels and fin flashes, which were changed in July 1942. The above photo shows the newer version on the second nearest plane, which gives authenticity to the Alamein date (July to November 1942).

Unfortunately, the more I look at colours on this batch of models, the less I like them! This model will be fine to use on the wargames table, but less for display. But while I will consider doing another spitfire V and Kittyhawk, the hurricane is too minor a player for me to consider doing another one. Still, the model does look like a Hurricane – not particularly beautiful, but iconic.

Three British planes for 1943

My Spitfire, Hurricane and Kittyhawk

So this is my first post of 2022! I have spent a lot of time refining my Napoleonic big battle rules, but that is a hard thing to blog about while you are doing it. But earlier this month I returned to my modelling project on WW2 aircraft, based around my 1943 theme, featuring the Tunisia, Sicily and Italian campaigns. This is a return to aircraft modelling after a break of 35 years or so. I started with a single American P-47 Thunderbolt, a bit after 1943, but in Med colours. I then did a batch of three German aircraft for Tunisia. My next batch was three British Aircraft: – a spitfire VC, a hurricane IID and a Kittyhawk IA. Alas on a number of counts the results are rather flawed.

The idea is that I complete the models up to wargames standard. They need to look good from a distance, and have undercarriage up and pilots in place. They would not pass muster for keen aero-modellers, who would include much more close-up detailing. For this batch of aircraft I wanted to focus on the model-making and painting, so I decided to use the decals in the box, rather than the palaver of creating something different (which I did for the P-47 and two of the German planes).

Why are the results flawed? The biggest problem is that I got the colours wrong. The planes look as if they are carrying the early north European scheme of Dark Earth and Dark Green; only the blue underside (not very visible from the picture) gives the game away.. This is a sorry saga with a clear moral. Do your research first! I thought I had understood what was required as I mixed the colours for the airbrush. First I mixed the Azure Blue for the underside. I started with Azure Blue Rowney artist’s paint, dulled down with a bit of white and brown. Too much white: while this is consistent with what some artists show, photos show it to be quite dark. And then I thought it also looked too green – that may be as a result of the white, which causes a bit of a clockwise shift on the colour wheel for some reason (blue to turquoise, red to magenta, etc.). By then the Mid Stone had already gone on. I based this on the brown colour in the German tropical scheme, which I based on Raw Sienna. It should have been yellower, and actually lighter than the Azure Blue. Next I put on the Dark Earth, which I though should come out a bit redder than the Mid Stone. I mixed this based on Burnt Umber. I then looked at this colour photo of a plane in theatre:

Spitfire VBs over Tunisia, presumably in 1943

This shows a distinctly greenish hue to the Dark Earth (which intros picture is generally quite weathered – it fades in the sun quite quickly) and not the reddish one I had. I remixed, using adding in some green, and overpainted. Too much green – though I was probably being led astray by the Mid Stone being wrong. When done I actually thought it didn’t look too bad (it is easy to misjudge colours out of context). But I thought I would tweak with some glazes mixed from oil paints and linseed oil – to make the underside darker and bluer, and the topside paler and less red (which means a bit greener). It took a few days to be dry enough for decals. At this point I just pressed ahead. Alas the Mid Stone looks more like Dark Earth, and the dark Earth looks more like Dark Green! And the Azure is still too pale.

I will profile each individual model separately. But here are some notes on the general technique. I first assembled and painted the interiors and pilots. I then assembled the models apart from the cockpit canopies. I filed, fillered and sanded to smooth over the worst cracks while trying avoid damage to the panel detailing. Then I added the canopies and masked them. I did think about leaving this to later, but thought it was better this way. Apart from the Spitifire I did not attempt to leave the canopy struts unmasked – I would paint them later. But I struggled a little with this, and applied a bit too much superglue on the Hurricane and Kittyhawk – this meant that the canopy fuzzed bit on the inside. And by the time I discovered it the canopies were so secure that I didn’t dare to try and remove them.

After this I airbrushed with white primer. The plastic really needs this step. Then the saga with the paint started. This was my first attempt with RAF camouflage. I sprayed the all the upper surfaces Mid Stone. And then I used Blu Tac and magic putty to mask the Stone areas. This took literally hours to form the rather complicated shapes, and even then I made several mistakes. The magic putty is easier to apply and remove, but it flows – so can’t be left for long, and I needed it to last for days. So I couldn’t use it for the edges – just infill. I won’t do this masking again. After the masking came off and I realised my mistake on the colour, I decided to overpaint with a good old paint brush. I did this with many thin layers – not too hard as the acrylic paint dries fast, so I could do it all in one session. That worked fine – so in future I’m going to use the paint brush for the overpainting. After the paint I put on the oil glaze. the idea was to correct a colour imbalance. It did improve things, but it’s much better to take a bit of trouble to get the colour right in the first place. Ideally all the main colours need to be mixed at the same time and tested before application. I have relished the challenge of mixing my own colours – but my experiences shows how difficult this is – and I don’t think I’d recommend it to anybody isn’t an artist (and I’m not!).

I am making slow progress with airbrush technique – the critical thing being to get the paint consistency right. I have also learnt how to clean the brush more quickly, so I can do it more often. It produces a lovely, delicate finish, which looks really good on aircraft. But good conventional brush technique is just as fast and the results are pretty good. Actually I think the airbrush might come into its own on vehicles, where the smooth finish is not as important, but the nooks and crannies take forever to paint with a brush – and aren’t good for brush health either. So far I have not learned how to do fine work with the brush – so I have to mask – which is clearly an issue! This is partly because of the brush – which isn’t designed for fine work, but mainly its because I don’t think I have set the brush up properly. As for masking, Tamiya standard tape is lovely. I also have 2mm tape which is meant to do bends, but it’s no good for RAF camouflage patterns, and it doesn’t stick all that well after a few months.

After the glazing and detailing the canopies, I went on to the decals. I didn’t think the decal softener was working properly as they weren’t melding properly with the surface. But as they dried, it mostly worked very nicely. Unfortunately I managed to dislodge some of the carefully positioned decals on the Kittyhawk, which required some corrective action – which I’ll describe on my piece on that model. The only surface prep on the decals was using decal fluid, which blobbed a bit on the glazed surface. I didn’t seal the decals afterwards either, as I did on my first model.

After the decals were dry I used the oil paint patination technique of putting small blobs of paint on the surface, and brushing them in. This caused a near-death experience with my German aircraft – but I did not make the mistake of doing this on top of a layer of matt varnish this time. My technique is improving and this step was quick. It really helps integrate the decals, which can be a bit saturated and stark, as well s giving the aircraft a bit of a used look. The glaze left quite a glossy surface, so I applied layer of matt varnish after this. I used the LifeColor airbrush varnish for this, but applied it by conventional brush. This is quick on the smooth surfaces of an aircraft – and I did not want to mask the canopies again. I did not want a deep matt finish, so I didn’t think of using the Winsor and Newton aerosol. The varnish blobbed a bit, so it was a bit trickier than I thought it would be – just as well I didn’t try the airbrush, as the standard brush would have been needed anyway!

Finally I finished with a bit of powder scraped from pastels. This was mainly to create the exhaust stains. But I applied small quantities more generally to give a slightly dusty look. You can’t really tell from my picture above – but closer up pictures will be come with my later posts.

So disappointing. The RAF tropical scheme is hard to get right. I have seen many horrible-looking jobs on restored aircraft, models and artwork. There’s usually an error somewhere. The pre-mixed paints often don’t get it right either. Still my first attempt doesn’t measure up. I plan another batch of models in this scheme later – and I promise they will look much more like the picture above. I may also do another Spitfire V and Kittyhawk anyway, as these models aren’t quite right for other reasons – more later!

Big Napoleonic battles

A view of a recent Albuera based game with Prussians standing in for Spanish. Albuera is not a big battle by Napoleonic standards, and not all the forces are in view – but it gives some idea of the visual effect I am heading for.

It is one of the strange aspects of Napoleonic wargaming that historically the main focus is on big battles, with over 50,000 men on each side (and on occasions over 150,000 and once double that), while the games themsleves are generally designed to represent much smaller encounters. The January and February issues of Wargames Illustrated feature articles which explore this paradox, from veteran games designers Sam Mustafa and Bill Gray. But my approach to this conundrum is different again from these.

This strange situation is readily explainable. The fashion in the early days was to design games from the bottom up, based on the known capabilities of men, horses and weapons. This led quickly to the basic unit being the battalion, which in turn tied the games to the myriad of accounts of the wars written by the men who took part. There is a lot of drama at this level, and it makes for a cracking game. From a wider perspective it also made a bit more sense than it might first appear: one of the innovations of the age was the use of the division as a manoeuvre element and semi-independent locus of command – and the division was the higher level of organisation around which battalion-based games naturally focused.

So far, so good. But this sort of game makes fighting the big battles, like Waterloo or Borodino impossible without doing strange things – like the practice of “bath-tubbing” – making each battalion stand in for a brigade or division. And the big battles, incorporating the works of the big celebrity generals, like Napoleon, Wellington or Kutusov, are one of the era’s main sources of interest. You are told that you can step in the footsteps of Napoleon, and then given no more than a dozen battalions to play with! It gets worse. One of the attractions of the era is the variety of troop types, and especially elite troops. It’s hard to bring these into an honest division-level game without losing much of the drama that surrounds their use. And you might be able to work in one unit of Imperial Guard, or one of Cuirassiers. But both? And then there are tactics such as massed cavalry or massed artillery that are also very hard to do at divisional level.

And so was born the brigade-unit game. Sam started this with his Grande Armée rules, and then his current Blucher system. Bill did so with his Age of Eagles, based on the Fire and Fury system for US Civil War games. Many gamers are understandably not interested in these systems, so wrapped up are they in the dramas of battalions. It’s simply not Napoleonic without them they say. But for people like me, drawn to the drama of bigger battles, these rules were manna from heaven. For a long time GA, and especially its fast play variant, were my go-to systems. For a number of reasons I outgrew this system, which had weaknesses that Sam himself recognises, and were the reason that he replaced it with Blucher. Meanwhile I developed my own brigade-based system, which I used for my Vitoria game in 2013. These rules were quite innovative – using playing cards instead of dice for example, and did well representing Vitoria, which we played as a four-player game.

But I had a serious problem with brigade games, acknowledged by Bill in his article. The units are too small – and indeed the time interval for a move is too short too – for properly big battles. There are too many units and too many moves to make them accessible either to two players in a day, or to multiple players in an evening – which are the typical formats for most games. This is actually less of an issue with Blucher than Age of Eagles. Blucher is highly abstracted and slick, and a number of its systems are designed to speed up play. I can say similarly for another highly abstracted brigade system – Horse, Foot, Guns by Phil Barker. I have successfully had two player day games with HFG: Salamanca and a stripped back Waterloo (a version that ignores the Prussians but takes out Lobau’s command and the Young Guard). I have played Blucher about three times in evening games with made-up scenarios very loosely based on the core forces at Ligny. But there is something about both the game mechanisms and the look and feel of these games that I don’t like, but that I can’t really articulate. Visually I don’t think they work well with my 15/18mm figures. More seriously they start to get more difficult when the battles get bigger – Salamanca and Waterloo redux are medium-sized battles.

I decided that I had to bite the bullet and use the division as the base unit. Bill says about this: “You lose so many painted miniatures from your visuals that I’d suggestion might as well simply play a board or video game.” Actually the aim is to have the number of miniatures about the equivalent of a normal battalion-based game – say 250-500 a side for 15mm. But he has a point of course – reducing a division of 5,000 men down to a group of 24 miniatures is a stretch. It is probably more tolerable with 6mm or 10mm figures, but that is a road not taken a long time ago for me.

I have encountered two systems with division-sized units. One was by Sam, and based on his GA system. This has a very long distance scale, and large units, represented on standard 2-inch or 3-inch squares. In my one trial game we did Waterloo incorporating most of the Prussian approach march on the table. This produced an interesting game, but it is too scaled down for me. It also suffers many of the faults of the GA system. Then came Bloody Big Battles by Chris Pringle. This is based on Fire and Fury, but is much more scaled up and stripped down than Bill’s game. The system is aimed mainly at mid-19th Century battles, and especially the Franco-Prussian War of 1870-71. But many have used it for Napoleonic. The scaling was exactly what I was looking for though – with 25/30mm square bases representing 1,000 to 1,500 men each, organised into units of three to six bases, usually. My first trial of the system was a solo game between Prussians and Austrians in the 1866 war, using Napoleonic figures. This gave a cracking game with fortunes swinging back and forth wildly. If I start up in this era – and I’m very tempted to – these are the rules that will use (but I’ll use 10mm or 6mm miniatures). It helps that Chris has produced a whole heap of interesting historical scenarios ready to play.

But, as I’ve said a few times here already, BBB does not transfer well to Napoleonic battles. One reason is that the fighting takes too long to resolve – I think because infantry firing is so restricted without long-range firearms. Second is that the command/activation system is very haphazard, so that things can freeze up too quickly in core parts of the battle. This may represent mid-century wars quite well. Central battle control tended to be weak, while local corps and divisional commanders were more used to taking the initiative than earlier in the century. The randomised activation system models this dispersion well enough, but in Napoleonic times the army command tended to be stronger, but lower levels were weaker. The battle flowed quickly in the areas where the army command focused, but tended to be slower elsewhere. Blucher and HFG model this well (HFG overdoes it in fact) – but not BBB. Finally cavalry was much more important in the earlier era, and its role much more distinct from the infantry.

And so for all these reasons I started the journey of writing my new rules with BBB as the jumping-off point. This has produced a series of false dawns, and I’m still not there yet. Partly inspired by Lasalle 2 I have now finally abandoned the I-go U-go turn system. There are other features that I have copied from these wonderfully designed rules. There will need to be more trials before I have anything fit to release, even as a beta.

But one thing is very clear from my journey so far. You lose a lot of the detail with divisional-sized units, and so rely a lot on random combat factors to give a realistic variety of outcomes. This came home forcefully when I tried a thought experiment of recreating d’Erlon’s attack at Waterloo in terms of my rules. The historical outcomes are all possible within the rules, but the route can be a bit indirect at times. But, of course, if you are going to reduce a big battle into something that two players can play in a day, it follows you have to lose a lot. The high randomisation and abstraction is bound to put many off. But it might draw as many others in.

A trial game with Lasalle II

I have read a number of excellent review of Sam Mustafa’s latest game, an updated version of his Lasalle rules, for Napoleonic divisional level games. So I splashed out and bought a copy. I have just tried it out on a solo game. What are my impressions?

As I have said many times here before, Sam Mustafa is one of the top wargames designers currently in business. His games are always elegantly designed, properly tested and clearly explained. However, since his first Napoleonic game, Grande Armée, I have taken a dislike to his various systems – they just didn’t provide kind of feel of game that I have been looking for. That was the case for his first edition of Lasalle. I found them too abstract and “gamey”. There was too big a gap between the way the game was played, and how battles were actually fought. I am very interested in the historical simulation side of the game, rather than it being just a game for toy soldiers. This is a balance, of course: I don’t have much patience for complex mechanisms and piles of detail these days – so a lot of abstraction is essential. And Sam does pay a great deal of attention to the history. The balance wasn’t quite right for me.

Lasalle II never promised to be more than a highly abstracted game for toy soldiers, albeit one that is heavily grounded in the history. However it intrigued me because I would like to have the option of this sort of system for shorter games and club play – in order to give my miniatures time on the tabletop and provide entertainment. This set of rules looked as if it could fill that gap.

What’s more they can quite easily be adapted for use with my miniatures. These are in 18mm and (mainly) based on 25mm (one inch) squares, with six infantry or two cavalry to each base. Lasalle uses standardised units of four bases (for infantry and cavalry). I thought this would look good with my figures, even though typically shallower bases are used. The most popular base width seems to be 40mm for 18mm figures (and this base width is used for 28mm as well – and for 6mm too, albeit with different base depths!). Like most of Sam’s current systems, all distances are given in base widths (BWs); since 1BW equals an inch, I have no need for specially made rulers.

I don’t want to describe the Lasalle II system here – there are plenty of online resources that do that for those that are interested. Suffice to say that it is everything you might expect from a great games designer like Sam. And it’s very abstract. What I want to do is talk about my game and the particular issues that came up for me.

My test game was based on the trial scenario in the rules, but replacing the Austrians with my Prussians (my beloved Austrian army is in a sad state at the moment). That actually changed things quite a bit. The Austrians don’t have the “Attack Column” trait, but did have some high-class cavalry. My Prussians do have “Attack column”, like the French, but five out of the eight infantry units were Landwehr. I still gave them three cavalry units, but these were bog standard quality dragoons and hussars, with the same characteristics as the two French units, of hussars and chasseurs. But I did get the points to balance! I also had to adapt the table layout so that I could use my Albuera table, which I haven’t taken down yet.

Half way through my game. You can just see the discrete pins that mark the edge of the playing area, and how cramped it is becoming for the advancing Prussians

The game length is meant to be eight moves – but mine ended in the fifth, as the Prussians reached their break point of four units lost. This was mainly because I misread the rules on artillery, so that the longer range “bombardment” fire was using the number of dice for canister “volley” fire. The French quickly set up two batteries together, and blasted away the Prussian horse battery before it could let off a shot, and then trashed one of the Prussian infantry units, which had seized the village, followed by one of the Prussian dragoon units. Both of these units were subsequently finished off by close combat, though the Prussians managed to retake the village, and it took a few moves before the cavalry was finally routed. The one Prussian battery to get going did manage to make a mess of one of of the French infantry units before I realised my mistake – and this was duly polished off by a Landwehr unit. This was all aided by good dice throwing; the third French battery did not manage to achieve much – until later. The final battery (Prussian) was never deployed as this was part of an over-ambitious Prussian turning move and it got crowded out.

The Prussians sent their strongest “brigade”, with two line and two Landwehr infantry, one cavalry unit and a battery, on a big turning manoeuvre, through and round a wood. This succeeded in giving them the initiative (in battle rather than game terms), messing up the French plans, and forcing their left brigade to come to the aid of the right one. But one prolong move was enough for them to swing round their battery just enough to face the threat, while there wasn’t enough table space for the Prussian cavalry to get round the rightmost French infantry unit, which formed square and bottled it up. The Prussians decided to risk everything on a charge on the French battery with its leading Landwehr unit (the same one that had routed the French infantry). Because the French had wisely held their fire, this meant that the Prussians had to endure one round of canister before they could close. With some fine French throwing, this time within the rules as written, they scored four disruptions (all the infantry and cavalry units have a strength rating of six, which is the maximum number of disruptions they can endure). The Landwehr rallied and pressed on – but the rally move succeeded in only pulling back one of the disruptions. The battery stood its ground and beat off the attack, inflicting more disruption. A series of charges by Prussian attack columns on the French infantry were also beaten off, and there was some largely ineffectual musketry between the sides – the musket power of attack columns (and squares) is quite limited. But the musketry did manage to finish off the very battered Landwehr unit, and the Prussians had lost their four units.

That was a fair verdict. The Prussians were running out of steam, and didn’t even have the space to deploy their third battery. Quite apart from misreading the rules on artillery fire, there were a lot of mistakes arising from the lack of familiarity wit the rules. In particular my usual method of rapidly throwing in attack columns without bothering much with musketry didn’t really work – and the congestion problems the Prussians had clearly had their root in unfamiliarity too. But there were a number issues that surprised me a bit, and might not be so obvious from the write-ups you see. These aren’t problems with the system, so much as warnings about how they work.

The first issue was space. One inch to a base width gives you a very compact table. The rules recommend a playing area of 24BW by 36: just two by three feet for me (60 by 90cm). I followed this for my trial game wanting, not to spend too much time in the game in early manoeuvring. That meant the playing area was a bit cramped with the suggested armies (8 infantry 2/3 cavalry and 3 artillery unit a side). Both sides were constrained by the opposite table edge. It didn’t help that my wood and crop field were a bit big – the official trial game would have had them smaller. My bases are quite deep, of course, which made them take up quite a bit of space. One-inch bases are doubtless more typical of 10mm or 6mm miniatures on shallower bases. That would still have led to problems with the table depth – and I didn’t even use the suggested unit labels, which are quite big. But this problem has an obvious solution – I have plenty of space to use a bigger playing area. But if you are using a 40mm BW I would recommend that you have a full 4ft by 6ft playing area (1.2 by 1.6m, rather than 0.96 by 1.44m), and space nearby for the routed units, reinforcements, etc.

A second issue is skirmishers. This is a problem that Sam has struggled with for a long time – they were historically important, but are very hard to represent in game terms without making the whole thing too fiddly. Sam has abstracted them away, so that while they have an important effect on the game, no models on the table. Each infantry unit has a number of skirmish points. These are totalled up at the start of each turn and a die thrown for each (an awful lot of dice incidentally) – a 6 is required to sore a “hit”, and this determines who goes first, and may give you extra “Momentum” (MO) points, which drive the game. This is very clever, and further ideas are incorporated into the advanced rules. I would still like skirmishers to be on the tabletop, even if only as markers. At first I thought that I could put one base on the table for each skirmish point, and just use them as decoration. But there are far too many skirmish points for that, in an already crowded table. One base per hit would be fine, but since these have no significance beyond who goes first and MO points, this looks pointless. In fact one of the Advanced rules does give a role for skirmish markers, and adopting this rule is probably the best thing to do.

A third point is that the rules for built-up areas are too abstracted for my liking. At this sort of scale – one base width is something under 40m – you should be able to differentiate streets from blocks of buildings, and so start to represent how street fighting actually worked (it was almost all on the streets, with buildings used as strongpoints only occasionally – otherwise they were just used by skirmishers). I guess the problem is that most wargamers like to use buildings that are “in scale”, and this means the are far too big to leave enough room for streets. On the plus side built-up areas confer no cover or defence benefits unless the defenders have taken time out to “garrison” the block. This is a much more realistic treatment than you usually see in wargames, though the garrisoning is maybe a bit too easy (just a formation change, albeit one that costs two MO rather than the usual one).

But overall this is an excellent game system, fully justifying the rave reviews I have seen of it. The turn play system – both sides interact without the use of phases or player-turns – is especially clever and works really well. There are intricacies which you can miss on first play, but generally the rules should be very quick to pick up. When I get back to club play (some way off – I haven’t found a nearby club yet in my part of East Sussex), I will certainly be trying to introduce these. They are a great way of getting the miniatures onto the table for a bit of fun. The high level of abstraction means they will not be to many tastes, but they are the basis for an absorbing and entertaining game. And the reference to history is much more than a token one, even if it is highly abstracted.

My latest Albuera game – how did Army rules do?

The allies have re-oriented they army as the French attempt to outflank them

At last another game, as my friend Rob was kind enough to visit! I had to put together a scenario quite quickly – and one that could use Rob’s British and allied Minifigs. I decided on Albuera 1811. It is a battle I know quite well, has plenty of action, and the terrain is relatively straightforward.

I have used this as a scenario at a club game using my big battle rules – but I was concerned that this would not be a big enough game for up to five hours of table time. So I decided to scale down (or up?) the rules to halve my normal figure ratio, so that the main units were brigades rather than divisions. Each infantry base was 600 infantry, 200 cavalry or 8 guns. I have just bought Sam Mustafa’s Lasalle rules, and funnily enough each base corresponds to one the standard-sized units in that ruleset. The only adjustment I made to game play was to extend the artillery bombardment ranges by 3 inches. Developing a version of the rules at this scale is certainly something I want to do, but at this stage I am not thinking too hard about what other changes might be needed. The ground scale is 75% of normal, so that each inch is 112.5m, or 150 paces in contemporary military measurement – over 14 inches to the mile compared to under 11. This meant interpreting the 50% figure ratio as relating to footprint rather than frontage.

The game starts at 8am. The French are lined up along the road from Seville that you can see on the left-hand side of the table. The allies are behind the village, with three units off the table on their way. There is a lot of empty space on the top right of the table. As I was setting up the game I realised that I had made a mistake in my previous versions of the game: the road from Badajoz is the one disappearing off the bottom table edge, rather than the one going off to the right. This is the critical campaign axis and the French objective, and the route along which allied reinforcements were coming. If I had appreciated that I would have shifted the table one foot up to have more space along this road, and less at the under-used far end. That would have crimped the French deployment, but that is surely not a fatal problem.

I chose the set-up because I wanted to give the French player the choice of carrying out the historical flank attack, or of something much more frontal, which tends to be the way the French player goes when I run it as a club game. The problem is that if the French do opt for the flank option, as I did this time, the allies have too much time to reorganise. I tried to give the French a head start, with a free move at the start, though one they couldn’t use to mount an attack, as well as the first move in the next turn. Though the French manoeuvred with impressive speed, the allies had little difficulty in repositioning their army to face the threat though. In practice I think the Spanish allies were harder to move around than they were in this game, when I gave them a -1 on the Activation throw. But there may also be a problem with the battle account that I have been following. The French main army may have deployed from the road before 8am – which was when the firing started.

The first few moves were taken up with manoeuvring, and some skirmishing around the village. These early exchanges did not go well for the French, so I did not press them. The photo shows the situation as the allies more or less completed their repositioning, after about two or three moves. After this the French continued their turning manoeuvre, led by the cavalry, and assembled the artillery in a grand battery. As historically, but in a different position on the field, Zayas’s Spaniards took the first brunt, and were pushed back. The grand battery (not a historical tactic in this battle) successfully caused consternation among Ballesteros’s Spaniards (there were some bad throws), and forced it out of the line. But the British troops plugged the gap, and weathered the artillery without difficulty. The game ended with the French hurling their infantry forward across the line into British and Portuguese troops; I needed some lucky dice, which were not forthcoming. By now it was 5pm, we were tired, our wives were back from a day’s exploring the shops in Lewes, and we called it a day. Here is the situation:

At the end

The Allied line has been bent right back, but the French would have to be very lucky to push the British troops back much further. Some units were looking a little worn, but remarkably few had been knocked out of play (the British heavy dragoons may have been the only one). We had played about 9 turns in roughly four hours. The game had started an hour late because of a navigation mishap by my guest.

The scenario clearly needs more work, but it makes for a good game – even if difficult for the French to win. As the French player I probably needed to get stuck in more quickly with the infantry while the cavalry tried to pressure he flank. Unfortunately there does not seem to be a good way to bypass the Spanish troops so the French run the risk of wearing themselves out on the poor troops before taking on the good ones.

How about the rules? This was a very good test of game play, as all arms got a good look-in and there was opportunity for manoeuvre. More work is needed, unfortunately. The good news as that they played quite quickly, but the combat needs to be more decisive. The armies need to be crumbling at the stage we ended the game. The ability to recover from one or two disruptions may be the issue, rather than the rate at which disruptions are handed out. My new rule mechanism for “pinning” – causing the responding side to “borrow” moves from its following turn – proved a damp squib. I also think the combat and casualty mechanisms need to be more intuitive. Command and control also needs more thought. While the French army moved fast enough, the allied army had it too easy, even with not very strong command resources. The game needs to move a little closer to the “PIP” system where the action follows from command focus, which can’t be across the field. It is probably too easy to get two or three actions on the activation throw without intervention from senior command – but probably OK for one action. One idea that did work was limiting artillery to six shots – this made players think more carefully about how to use guns, and limited the temptation to keep blasting away forever.

I will be thinking hard about revisions to the rules – which also need to be a bit clearer in places. What a long journey rule-writing can be!

Using caulk for roads and rivers

Another view of my Albuera table

Last time I posted about the first stage of creating a wargames table for my Albuera game – which I dealt with by placing a fleece mat over a contoured surface of extruded polystyrene. Next come the roads and rivers. I have been trying out new techniques on this – by using decorators’ caulk.

I am not a fan of the standardised lengths of road or river that you can buy commercially. Nature doesn’t usually conform to these shapes, and there are lots of joins. All this is fine for an evening club game when you need to set up in minutes, and the game is usually quite generic. But you should aim higher for historical battles. Hitherto my technique has been to use masking tape, painted over with tempura. But these don’t handle bends well – especially in rivers and streams, and painting the edges of the tape means a bit of spillage onto the terrain mat, which also softens the edges. That was OK for my old felt mat, but not my lovely new printed fleece. So I decided to try a technique described on the Altar of Freedom website – using caulk. This is meant for 6mm terrain in the American Civil War, but my features aren’t that much bigger.

Two types of caulk are needed: opaque for the roads, and transparent for the rivers. The material needs to be paintable – so you need acrylic caulk rather than silicone. For the opaque sort I decided to use coloured material rather than the standard white. It would still need to be painted, but any gaps and damage would be less visible. I bought Unika ColorSealant on Amazon in medium oak. It comes in tubes designed for use with a “gun” – which I also had to buy. It proved trickier to work with than I hoped.

First off I tried spreading it on an old plastic document wallet (I have dozens of these) – but one of caulk’s properties that makes it so useful in DIY is adhesion – and it was impossible to get it off the backing cleanly. I experimented by spreading it on jay cloth that had been pre-cut. That was fine, and gave a more robust product, but a bit of a faff. I also tried wax paper – as recommended by Altar of Freedom – and I found that I could peel it off that with a bit of care. Once off the backing though, the product was a bit fragile and retained a slight stickiness. It is unlikely to survive most types of storage, so it will usually need to be remade each time a table is put together. One thing I learnt on my experiments is that this stuff hates water – which dilutes it rapidly. I tried spreading it on damp jay cloth (so that it was nice and flat) – which was a bit of a disaster.

Transparent acrylic caulk is much harder to find, and (usually) pricier. Most transparent caulk is silicone, which can’t be painted. Eventually I found some on Screwfix – No Nonsense All Weather Clear. This is very different stuff from the opaque material: it is less adhesive, dries quicker and is much harder to paint. Spreading it on plastic document folder was fine, but painting the underneath afterwards not so much.

So much for the experimentation. I want to describe what I did for my Albuera table. I decided on using wax paper. It can be rolled out nice and long, and it is transparent enough so that you can trace felt-tip markings through it. The first step was to trace out the course of the roads and rivers in felt-tip on the XPS base board. I could then mark up the lengths required (using the felt-tip) by tracing through the wax paper. The river bottom was then painted onto the wax paper, over the felt-tip. I then spread the caulk. This means laying beads onto the paper from the caulk gun, and then spreading it into a reasonably flat surface with a spatula. And then I applied paint to the road sections. I did this all in a single session of one to two hours, which meant laying things down before the previous stage was fully dry. The sequence, after the tracing, was: paint the rivers; lay the caulk for the roads; lay the caulk for the rivers; paint the road. A bit of wet on wet is fine, so long as there is no water. Small traces of water in the paint I used for the road (student acrylics) caused issues, though fortunately not fatal. Acrylic paint blends well with he caulk, though, and white caulk would probably probably have been fine. This is how it looked when I left it overnight:

I came back after nearly 24 hours. The river sections peeled off fine, with the paint sticking to the caulk rather than the wax paper, as planned – a bit of wet-on-wet probably helped; the sections just needed a bit of trimming with scissors. Alas the roads did not peel off as nicely as they did in the experiment. In the end I had to leave the backing paper on and cut them out. At least that made the end product a bit more robust, though less flexible. I found that there was a bit of spreading on the road, as a result of water in the paint mixture; in some cases this created a slight ridge at the edge – actually quite a pleasing effect!

There was no time to do more work. The roads could have done with a bit of dry-brushing, and perhaps painting the edges in a contrast colour, or even flocking. It would have been nice to do something with the river margins. Both look a lot better than using tape, though, and the more complex features, like junctions, come out nicely. The rivers are fine by wargames standards, but still aren’t very realistic. The grey colour was a bit of an accident – I mixed too much blue in with the brown – I had wanted something browner. Watercourses should run in a bit of a depression – but that could only be achieved with a lot more cut XPS. In fact rivers and streams (especially in Spain) look more like strips of green than blue, grey or brown, as the banks are vegetated, and this tends to dominate the usually trickling flow of water. I could potentially achieve something by using flock while the caulk is still wet – though I would need to be careful about bridges and fords. But as already mentioned, caulk terrain is not robust, and it is best regarded as throwaway – so it is not worth investing too much in it. Flocked margins would make storage even trickier. On the table, the pieces did have a slight tendency to be knocked out of position. Pinning down with tree models may be a solution, but they should really be a bit wider to accommodate this.

I will try to store these pieces, along with the cut pieces of XPS, so that I can run the game again, but my expectations are low. Anyway I’m sure I will be using some variation on the technique for my next project. Once the basic techniques are mastered, this is very quick and easy -the wet on wet technique in particular saves a lot of time. I will post about the trees and villages on another day!

A table for Albuera- fleece mat and XPS

Apart from reading, much of my recent hobby time has been devoted to the long-neglected aspect of terrain. I focused on one-third of the field of Waterloo, representing the line of advance of the Prussian IV Corps on Plancenoit. Pretty much all aspects of my terrain needed work, and this is still unfinished. Meanwhile my friend Rob offered me a game. This was not just a chance for me to road-test my new wargames rules, but also an opportunity to try out some terrain ideas.

I picked the Peninsula battle of Albuera. This is on the small side for my rules – suitable for an evening game, but not for the day game we planned. I decided to scale it down, with each base being 600 men or 200 cavalry, and the units being brigades or regiments for the most part. The game-design aspects of this are another story. For now I’m going to look at the table. Albuera was fought in Spain, near the border with Portugal, on terrain that was remarkably empty. It has just one significant habitation, very gentry rolling hills and two streams that merge. This was quite easy to put together quickly – and a good test run for some of my new ideas.

The first problem was how to shape the table. I wanted something between the two extremes of beautifully sculpted boards as seen in exhibition games, and the rapidly assembled table from standard bits that you use for a club game. I decided to go for contoured rather than sculpted hills, at least for the gently rolling terrain that most of the battles I’m interested in were fought on. This is much simpler to assemble, and its flatness makes it much easier to put things like models of buildings on. The big problem is that I want to represent the sweeping shape of valleys and ridges, and not just plonking a few hills on hill pieces on the table, or just leaving the whole thing flat – which are the normal wargames solutions. The technique I have been working on is to place a mat over cut polystyrene. The mat softens the sharp edges of the contours, as well being the fasted way to get a respectable looking surface.

This time I retired by well-worn green felt mat, replacing it with a modern printed fleece mat produced by Geek Villain. I picked their “Sicily” mat, which has the muted colours I am looking for and enough pattern to break things up, without dictating the shape of the terrain. You can see it in the picture. One side is mainly beige, which fades into mainly green. This suits Albuera well, as one side of the table is lightly wooded, and the other dry, featureless farmland. The green is a little strong for my liking, but I think it is as good as it gets when buying off the shelf.

The next innovation was to abandon the lightweight expanded polystyrene (EPS) for the denser extruded polystyrene (XPS). EPS is cheap, and a common packing material (lots of it comes free when you buy stuff), but quite hard to work with. XPS is mainly sold as insulation, and cuts easily with a knife – so long as it is sharp. It is much nicer to work with. It is pricier though. I have been buying off Amazon. My first attempt was a pack of six sheets (10mm thick) of 60cm by 100cm in bright yellow. This cost £40. As I decided I needed more, I found a pack of 5 sheets of 60cm by 120cm (fewer sheets but same area overall) for just £26. This stuff is designed for hiding under floorboards, not for craft use, so the sizes are not precision, and the surface is not always smooth – but as I’m putting a mat over it, that doesn’t really matter.

One thing I had learnt from experiments though, is that it is very useful to be able to stick pins into the board. That means you need a bottom layer covering the whole table – the main reason I needed two packs. That bottom layer can be re-used for different projects, though. Another thing I have learnt the hard way is that to represent gentle terrain you need to keep the number of layers a minimum – preferably just one on top of the base – and represent only the critical features. That means you can’t just work it out from a contour map; it is more art than science. For Albuera the critical terrain was a low ridge passing the length of the table. I had enough bits of board to put in another feature on the top left of the photo. Strictly there should be another low feature running along the right of the table – but this has no game significance, and I decided to save material. I stuck the top layer to the bottom with masking tape and put the mat on top. The fleece forms beautifully over the XPS sheet, and there was no need to use pins – which is what I needed to do when I experimented with my Sorauren table, which has much bigger hills.

The next big task (at least so far as this narrative is concerned – I actually did it before the contours) was the roads and rivers. That will be my next topic.

David Rowland’s The Stress of Battle – quantifying the human factor

This is an astonishing book, first published back in 2005, with a second edition in 2019, which recently came into the Caliver bookshop. Despite the subtitle the book is not aimed at hobby wargames – more the sort of thing armed forces would run. But there is a lot of interest for us hobbyists. Like a lot of highly insightful works, what it says is bloomin’ obvious once you have read it, but somehow it changes the way you think about things profoundly – in this case the behaviour of men in battle conditions.

The book describes a journey in what is called “Operational Research” in the context of analysing military combat. It started with trying to understand why the combat performance of weapons was so far below what went on in the firing rage, and to quantify this “degradation” and the various factors that affected it. It describes a journey of analysing progressively more complex situations, to get a better understanding of the components of weapon and human effectiveness.

The main journey started in the 1970s with trials using real (British Army) troops in staged battles using laser pulse devices mounted on guns and sensors on the vehicles and people to simulate fire without risk of injury. The first set were tank battles, and then there were a series of infantry battles with armoured support. The tank exercises revealed a number of interesting insights n how battles evolved, and quickly descended into mini-battles with just a few tanks on either side (or one to one) – this was staged in Germany in classic rolling terrain. The infantry exercises showed huge amounts of degradation – reduced weapon effectiveness compared with the effective maximum on shown on firing ranges. Rifle effectiveness was just 5%, and machine-guns 21%.

The next step was to look at historical data, using the trial data as the basis for estimating some of the variables (such as the relative effectiveness of rifles over machine-guns). They looked at the effectiveness of defence fire against an attack, starting with the simplest situation of attacks in the open. They used data going back to the US Civil War, on the basis that the dynamics of small arms fire have not changed much since the rifle replaced the musket. Still, later wars tended to provide more usable data, so WW2 tended to dominate. They progressively added complexities – preparatory bombardments, suppression fire from tanks, prepared defences and so on. They moved on to consider fighting in built-up areas, including the effects of rubble, and woods. Overall they found a further degradation compared to laser-simulation trials of 90%. In other words rifle fire was at just 0.5% of theoretical effectiveness (depending on various conditions), and machine-guns 2%.

The researchers were clear that this degradation had a lot to do with how individuals responded to danger. Two observers from WW2 were particularly on their minds. The first British Lt-Col Lionel Wigram, who went to Sicily in July 1943 to observe infantry behaviour:

His principal finding was that in every platoon there were “six gutful men who will go anywhere”, with “twelve ‘sheep’ who will follow that short distance behind if they are well led”. But there were also ‘”four to six who will run away”. It made uncomfortable reading and apparently General Montgomery suppressed it on the grounds that it would be bad for morale. In addition, Wigram himself lost his temporary rank and was posted to a battalion in Italy as a Major, only to be killed.

David Rowland’s Stress of Battle p61-62

Also quoted was Lt-Col SLA Marshall of the US Army who was commissioned study to infantry behaviour immediately after the war. He observed that only on average only 15% of men took an active part in battle with their weapons, and rarely more than 25% even under intense local pressure. The average was higher for heavy weapons. This was based on battles in NW Europe and the Pacific; he claimed the rate of participation was much higher in Korea. This analysis was pretty subjective but it clearly pointed to an important truth.

All this became clearer in the next phase of the research, when the team looked at battles involving armour. This started with looking at the effectiveness of anti-tank guns against tank attacks, as these data were easiest to make sense of. Their data came initially from encounters by British guns in the Western Desert and Tunisia. Unlike infantry battles, they were examining relatively small numbers of weapons, and the individual performance of weapons was more apparent. They saw that the results were heavily influenced by what they called “heroic behaviour”, which usually resulted in a gallantry award. This covered 20-30% of guns. To cut a long story short, they found support for a model closely approximating to Wigram’s observations for infantry. There were three groups of men: “heroes”, those with degraded performance, and those who took no part at all. The ratios were consistent with Wigram’s observation (18:55:27). Incidentally Wigram’s ratio of ‘gutful” is quite high; anti-tank crew performance tended to be led by the best performer in the group, who was usually at least sergeant rank – Marshall’s ratio of 15% would be typical of infantrymen. I think Wigram was following the British 78th Battleaxe division, who were veterans. There was some variation of performance within each group, but these were minor compared to the variation between the groups; there was no continuum of individual performance. The heroic group operated at a similar level to the soldiers in the non-lethal trials, the “followers” (my terminology) operated at about 30% of this level, and the “shirkers” did not participate in the battle at all. They picked out examples from the battles that they studied, of some guns killing over a dozen tanks, while other guns from the same unit were abandoned without firing a shot. Looking more closely at the heroes, they found that this correlated strongly with rank. A much higher proportion of NCOs than other ranks, and higher proportion of officers to NCOs. Doubtless the causality of this worked both ways.

The studies went on to look at progressively more complex situations in armour combats, and then to look at the effects of surprise and shock, but the three classes of behaviour was the critical finding. There were a number of other findings that will be of interest to wargamers. Two were very striking:

  • Defenders of urban areas proved to be at a substantial disadvantage to the attackers, usually suffering very heavy casualties. The most effective strategy for defence was to hold back forces in reserve and launch a counter-attack. This runs contrary to the expectations of those who aren’t infantrymen, but I think that experienced soldiers knew this. The Germans at Salerno seem to have understood this, for example, in their defence of Battapaglia. This does not apply if the built-up area has been reduced to rubble, which turns it into a more normal battlefield – though not if the bombardment is just before the attack, when the shock can have a major effect. Wargamers rarely understand this dynamic over built-up areas, suffering something of a Hougoumont complex – treating all built-up areas like the heroically defended farm complex at Waterloo (and its neighbour La Haye Sainte). It doesn’t help that in larger scale games a village is often represent by a single building model. While this result was derived mainly from WW2 data, I think it is timeless.
  • Anti-tank guns proved two to three times more effective than tanks at destroying tanks, in spite their lack of mobility and protection. Mobile anti-tank guns (portees and self-propelled guns) had similar performance to towed guns, and even the open-turreted M10 (generally highly disadvantaged in wargames) was more similar to its towed equivalent than tanks. The authors explanation is equally unexpected: it is because they had a higher proportion of “heroes” manning them, specifically they were more likely to have an officer or senior NCO in command, or an officer could easily move from gun to gun and exert influence (or actually take over the firing himself). They had no need to look for alternative explanations, though they were able to dream up a few.

For me the dog that didn’t bark was differences in troop quality. Of course the data was seldom good enough to produce different estimates for different types of troops. It was drawn overwhelmingly from battles between British, American and German troops. These men came from similar societal backgrounds, were trained in roughly similar ways, and they were mainly conscripts. So, although modern writers like to talk up the superior quality of German troops, it shouldn’t be so surprising that when you get down to platoon and company level the troops behaved similarly. On two occasions did the researchers try to distinguish elite units. When looking at troops defending rubble they noted that the defenders on several occasions were German paratroops (Monte Cassino loomed large, but there were other battles covering 40% of the data). Allowing for their greater allocation of machine-guns, the researchers found a slightly better performance for the paratroopers, but not a significant one. The also looked at the performance of Gurkha troops, and found a slightly higher proportion of gallantry awards, indicating a higher proportion ‘heroes”, and so better combat performance. The effects were not decisive.

The three types of behaviour in combat, and their rough proportions and linkage to seniority is timeless, I think – and much of the art of warfare is based on managing this fact, from the invention of the Greek phalanx onwards. I have often said that the relatively lacklustre performance of Austrian troops in Napoleonic times came down to a lower ratio of cadres in their large companies. When a period of campaigning had increased the cadre ratio (attrition affects the cadres less), they performed better, such as in 1800, when they nearly ended Napoleon’s career at Marengo. Elite units are created to increase the proportion of “heroes” and eliminate the shirkers – though possibly at a substantial cost to the rest of the army.

And for wargamers? In most games we use large figure scales and we can average out the effects. Even in WW2 games, where the figure ratios are often 1 to 1, we like to group people together in teams, so that the individual behaviour is averaged, and let the dice do the rest. But this works less well for armoured warfare, where we tend to assume all vehicles are crewed by heroes. This produces a better game, given that tank numbers tend be quite low, and so an only one in four chance of the tank being fully functional can easily take the fun away. Still the examples given of a single 6-pounder destroying multiple German tanks (mainly Panzer IIIs I think) could not happen if those tanks had been manned by fully functioning crews.

This book has been around for a bit, and it must have influenced some rules writing. I can see its influence on the Too Fat Lardies offerings, especially I Ain’t been Shot Mum and its Big Men. But generally our games work more like those non-lethal trials with laser-pulse weapons.

This book isn’t a particularly easy read. It uses a lot of technical language and even for someone like me that knows a bit about statistical analysis, it is quite to follow at times – the blurb suggests that its many charts help make things clear, but they didn’t for me. But you can skip through those bits – and I don’t hesitate to recommend this book for anybody who wants to understand land warfare better, especially WW2.

Napoleon and the World War of 1813: Lessons in Coalition Warfighting

It’s been a while since I have posted anything. I’ve been reasonably busy on the hobby front, but I’m getting a bit bogged down on improving my terrain – which involves many parallel paths with a rather distant endpoint. Meanwhile I have been reading a bit, and I’m reporting back on this book by Lieutenant-General Jonathan Riley (or J.P. Riley) published back in 2000. I remember reading a review of it in The Economist, and I eventually picked it up at a bookstall in Salute a number of years later; it languished a number more years before I eventually read it. Since my Napoleonic hobby projects are increasingly focusing on 1813, after 1815, it struck me as relevant.

The book is a high level account of three campaigns in 1813: in Central Europe, with the decisive battle of Leipzig, in Spain (with Vitoria as the centrepiece) and in North America, especially in Canada as the War of 1812 played out. The nominal theme of the book is the study of how multinational coalitions work in warfare, where he draws out parallels from later wars, right up to NATO. The coalitions are self-explanatory in the case of the first two campaigns (and include Napoleon’s armies in Central Europe, albeit that the French allies were highly subordinate); in Canada the British side is presented as a coalition between the British government, French and British colonists, and the Native American tribes (which he, back n 2000, is able to call “Indians”, though his account does accord them full respect). The narrative and the commentary on coalitions don’t integrate entirely satisfactorily though – the narrative tends to take over, and it is not especially penetrating on his main subject. I read a very interesting study of coalition fighting a few years ago which was based on a research thesis by an American military academic, which used the Russian-Prussian alliance in 1813 as a case study – and which got much more into the weeds of coalition warfare. It was able to do this because the researcher got behind the mainstream campaign accounts and into some of the telling details. An example was the complaint that Russian generals were a bit too free and easy with exposing their troops to artillery bombardment, according to their Prussian subordinates.

General Riley does hit on some important insights, though, showing features of coalition warfare which military historians tend to present as command failures. It is the nature of coalition warfare that campaigns only continue for as long as common objectives remain agreed. For example as the allied armies reached the Rhine at the end of the year they stopped; some commentators (starting with, at the time, Jomini) regretted this as a wasted opportunity, as Napoleon was vulnerable. But the allies had never agreed to enter France as a coalition, as some members (notably Austria) had reservations about what might happen next – they liked the idea of a reasonably strong France, and were not signed up to a restoration of the Bourbons. The coalition simply had to stop to consider their next move, and see if Napoleon would come to terms. This in turn delayed Wellington’s invasion of France. This is not unlike the first Gulf War after Kuwait was recaptured more easily than many thought. The coalition could not simply proceed to Baghdad.

I was a bit disappointed with the campaign narratives for Central Europe and the Peninsula. The book was never meant to deliver anything special here, but it is very British Old School, based on secondary sources in turn derived primarily from British and French sources. Doubtless this was under the influence of the great historian David Chandler, who contributed the forward. His work was largely where I started my serious history reading back in the 1970s, but we’ve moved on. The Central Europe account is very much centred on Napoleon, with the deliberations of the allies treated very superficially – a big weakness for a book on coalition warfare. I am still none the wiser as to why the allies did not withdraw after the first day of Dresden, for example. And he keeps to the generally accepted story that Napoleon nearly beat the Army of Bohemia on the first day of Leipzig, with the day being saved by the intervention of Tsar Alexander. I simply don’t think that Napoleon had enough hours in the day to accomplish what he needed to do to win the battle, and this story has evolved from the typical French historian’s downplaying all Napoleon’s failures. The allied armies of 1813 were very resilient, had plenty of cavalry, and were very hard to beat properly. But I don’t know enough about the events of this day to present a convincing case – or any opinion on the Tsar’s intervention. The focus on Napoleon and the French also brings forward the lack of initiative shown my most of his senior commanders – and this is discussed as a downside of his highly centralised system of command and control. This is fair enough, but the obverse is not commented on. This is that the allied subordinate commanders often showed good judgement and initiative – something that had not been noted earlier in the wars.

I had similar problems with the account of the Peninsular campaign. Here the problem is the tendency to shoehorn the account onto a very standard British stereotype, of the French coming on “in the same old way” at steadfast British infantry, and increasingly steadfast Portuguese and Spanish, with every encounter being on a ridge. I have only researched Vitoria properly, where General Riley does underplay the French tactical successes, without being seriously wrong on the overall narrative. For Sorauren I noted that he did not follow Oman’s somewhat more nuanced narrative, and went for a very old-school version that this was a typical encounter – though I don’t think the overall distortion matters all that much in the end.

General Riley’s account of the War of 1812 was much more interesting, as this was something I knew little about. The actual campaigns are not all that interesting in themselves – though doubtless a good source of small scale encounters of the sort that make interesting wargames without all the difficulties large scale battles bring. The interesting bit was the differing interests of the various groups, from American settlers to Canadians to native Americans. I hadn’t appreciated that one of the big issues that drove the original conflict between the colonies and home government in America was that the colonists wanted freedom to displace the Native Americans – which is why the latter sided with the British. It goes to show just how ethnically-centred the concept of freedom was that drove the American revolution.

Overall this a flawed book that hasn’t aged well; I wouldn’t recommend that anybody buy it. The subject matter is interesting, but we can surely do much better these days. Good military history demands confident coverage of the big stuff – the bigger context and politics – and a willingness to look hard at the small stuff. General Riley does the first part well enough, but is disappointing on the second.

Two books on Sicily 1943

My 1943 project focuses on British troops in the Mediterranean that year. I started it as a teenager in the late 1970s, but suspended it, like so much else, when I left home in 1979. I have so far focused my research on two campaigns: Tunisia in January to May (and especially the First Army) and Salerno in September. Between these two comes the battle for Sicily in July to August, which I have neglected. I bought these two books to start to fill the gap.

The first is James Holland’s Sicily ’43. Mr Holland seems to be one of the most popular British historians of WW2 at the moment, but this is the first of his books that I have read. I am impressed. This is how history should be written for general consumption. Wargamers will find that it lacks detail, but it should offer inspiration for further research – or may put them off trying to recreate the combats on the tabletop altogether – more of that later.

The 38 day battle for Sicily (starting from the date of the invasion itself rather than the pre-campaign, as the cover of the other book does) has been somewhat neglected by historians – along with the rest of the subjects of my 1943 project. In between the battles of the Western Desert 1940 to 1942, and Normandy and north west Europe 1944 to 1945, and the Russian Front 1941 to 1945, Tunisia, Sicily ad Italy don’t get much of a look-in. Inasmuch as historians have dealt with it, they have tended to be very critical of the Allied command. They have suggested they were too cautious, and should not have let so many Germans and their equipment get out at the end. Mr Holland seeks to set the record straight.

In this he is mainly convincing. Only on one issue do I think he needed to say more – could the Allies have succeeded with a smaller invasion launched earlier? The Axis defence was in disarray at the start of the attack, and things would have been even worse if the attack had been conducted earlier. The key is the Etna area in the north east. This was very easy to defend, and the Germans managed to do so successfully with reinforcements sent in shortly after the invasion started – and most of all with airborne troops. The Allies would have had to get there very quickly to head this off, across terrain that made movement difficult. It probably was too risky, at a time when the Allies did not want defeats – but it would have been worth exploring this a bit more by looking at the resources available to both sides. Incidentally one of the interesting aspects of Sicily was the use of airborne forces. Theses were an innovation for both Allied powers, who learnt the hard way the difficulties of inserting them directly into enemy territory. There were disasters, especially for the British glider troops, and the shooting down of many American transports by friendly fire by the navy. The Germans showed that they had learned the lesson by using airborne forces for a rapid insertion behind their own lines, mostly landing the troops in airfields. It turned a rout into a hard-fought battle which bought time and cost the Allies many casualties.

Mr Holland’s style is to range from the top command to the front line, not neglecting the experience of civilians caught in the middle. He looks at all participants sympathetically – this is the best way to draw out telling insights. Too many histories just look at one participant (based on the sources most readily accessible to the author); this can be good for drama, but not so much for understanding what was happening and why. Another mistake is historians being too eager to criticise the decisions of participants. My rule of thumb when doing historical analysis (which I developed as a history student) is that unless you understand how you yourself could have taken a decision, especially a bad one, you have not understood why it was taken. That requires a sympathetic approach. It also makes more enjoyable reading – though that may just be down to my personal taste. Mr Holland scores well on both counts. It is fluently written too, another plus in an era when history writing is often badly edited. I found some clichés, such as the frequent use of “to say the least”, a bit annoying, but that’s small stuff.

The second book, which is shorter, and which I read first, is not so well-written: Eagles over Husky by Alexander Fitzgerald-Black. It concentrates on the air campaign, and plays to my increasing interest in the use of air power in support of military campaigns. It too seeks to set the record straight – as a number of authors criticised the Allied air effort in the campaign. The air forces were accused of fighting a private war and not supporting the armies well enough, and then letting the Germans get away at Messina. Mr Fitzgerald-Black has little difficulty in putting the counter-arguments. For my taste he overdoes it; Mr Holland comes to the same conclusions, but with much less argument. Mr Hamilton-Black feels it is necessary to take apart the criticism line by line, showing how it is not based on facts. This is a bit tiring for readers like me, as it just seems to give air time to nonsense.

That’s my only real criticism of this work though. It draws heavily from sources on all sides to give a convincing picture. Like Mr Holland he combines a strong strategic narrative with many vignettes of the action. He makes an interesting case that the Allies forced the Germans to make a similar commitment of resources to this theatre as the eastern front (while Kursk was going on) and the north (where the Allied strategic bombing had got going), but suffered vastly more losses than in either other theatre. The campaign was an important step in the breaking of the Luftwaffe across the whole continent. Perhaps that argument can be challenged – but I’m not the person to do it!

So what is in the Sicilian campaign for wargamers? There is quite a bit of interest at a strategic level – but his can only really be tackled in a board game (which I think has been done). A Rommel-style grand-tactical game may be feasible, most easily for the Axis counterattack against the Americans at Gela, where you even get to use a unit of Tigers. (Incidentally Tigers proved hard to use in the difficult terrain and primitive roads – they mostly broke down through being over-worked). The early battles are pretty unsatisfactory from a gaming point of view though, one or two episodes excepted. The defence was very disorganised; the Italians have little stomach for a fight, and the Germans lacked decent leadership; the main challenge for the Allies (and it was considerable) was logistics. Later the fighting got much tougher; a Rommel game would encounter the sorts of problems with mountain warfare that I described for Longstop Hill in Tunisia.

Tactical gaming is more promising, but a bit limited in a different way. There are a lot of important clashes at company and even platoon level, as it was hard to deploy larger formations in the terrain. The problem for the Allies was crossing open (but rough) terrain which exposed their troops to concealed weapons and indirect fire, while canalising them onto mined roads. Their trump card was plentiful artillery and air power. I don’t think this makes for a great tabletop game. There is much less of the Normandy-style fighting in close terrain. Still you can create a game with orchards, olive groves, farms and villages. It should really involve hills and rocks too. A battle for a hilltop village could be visually very attractive, if much harder to recreate than a bit of bocage country. You get to use German paratroops too.

As for air power the key is finding a game where the player chooses between air superiority, interdiction and close support – out of scope for a tactical game, but a possibility in an expanded Rommel-style game perhaps. Air superiority was settled very quickly though.

I have not settled on rules for my 1943 project. I have just bought a second-hand copy of Chain of Command, and this looks very promising. There are other good systems for one-to-one games (Battlegroup and I ain’t been shot Mum) which I’m a bit less convinced about. Rommel also looks quite exciting – but hard to use out of the box in this theatre. I would like something in between – Rapid Fire! and Fistful of TOWs nominally fill that space, but I’m not that happy with either. The long journey continues.