Another quiet month, hobby-wise. Alas no games – I was unavailable for both the club game and the Beckenham group one. Most of my hobby time was spent on the secret aircraft modelling project that I will not report on yet! This isn’t quite finished.
My second project has been to develop some hex-based fast-play rules for Napoleonic games. The first draft is pretty much there – but they need a solo play test before I move onto a more robust playlets with other gamers. I’m call them Command and Discipline – a riff on Valour and Fortitude, the system on which they are largely based. In the absence of much else solid to report on, I will take this opportunity to offer some thoughts on the VF system – with the huge caveat that I haven’t tried it in action.
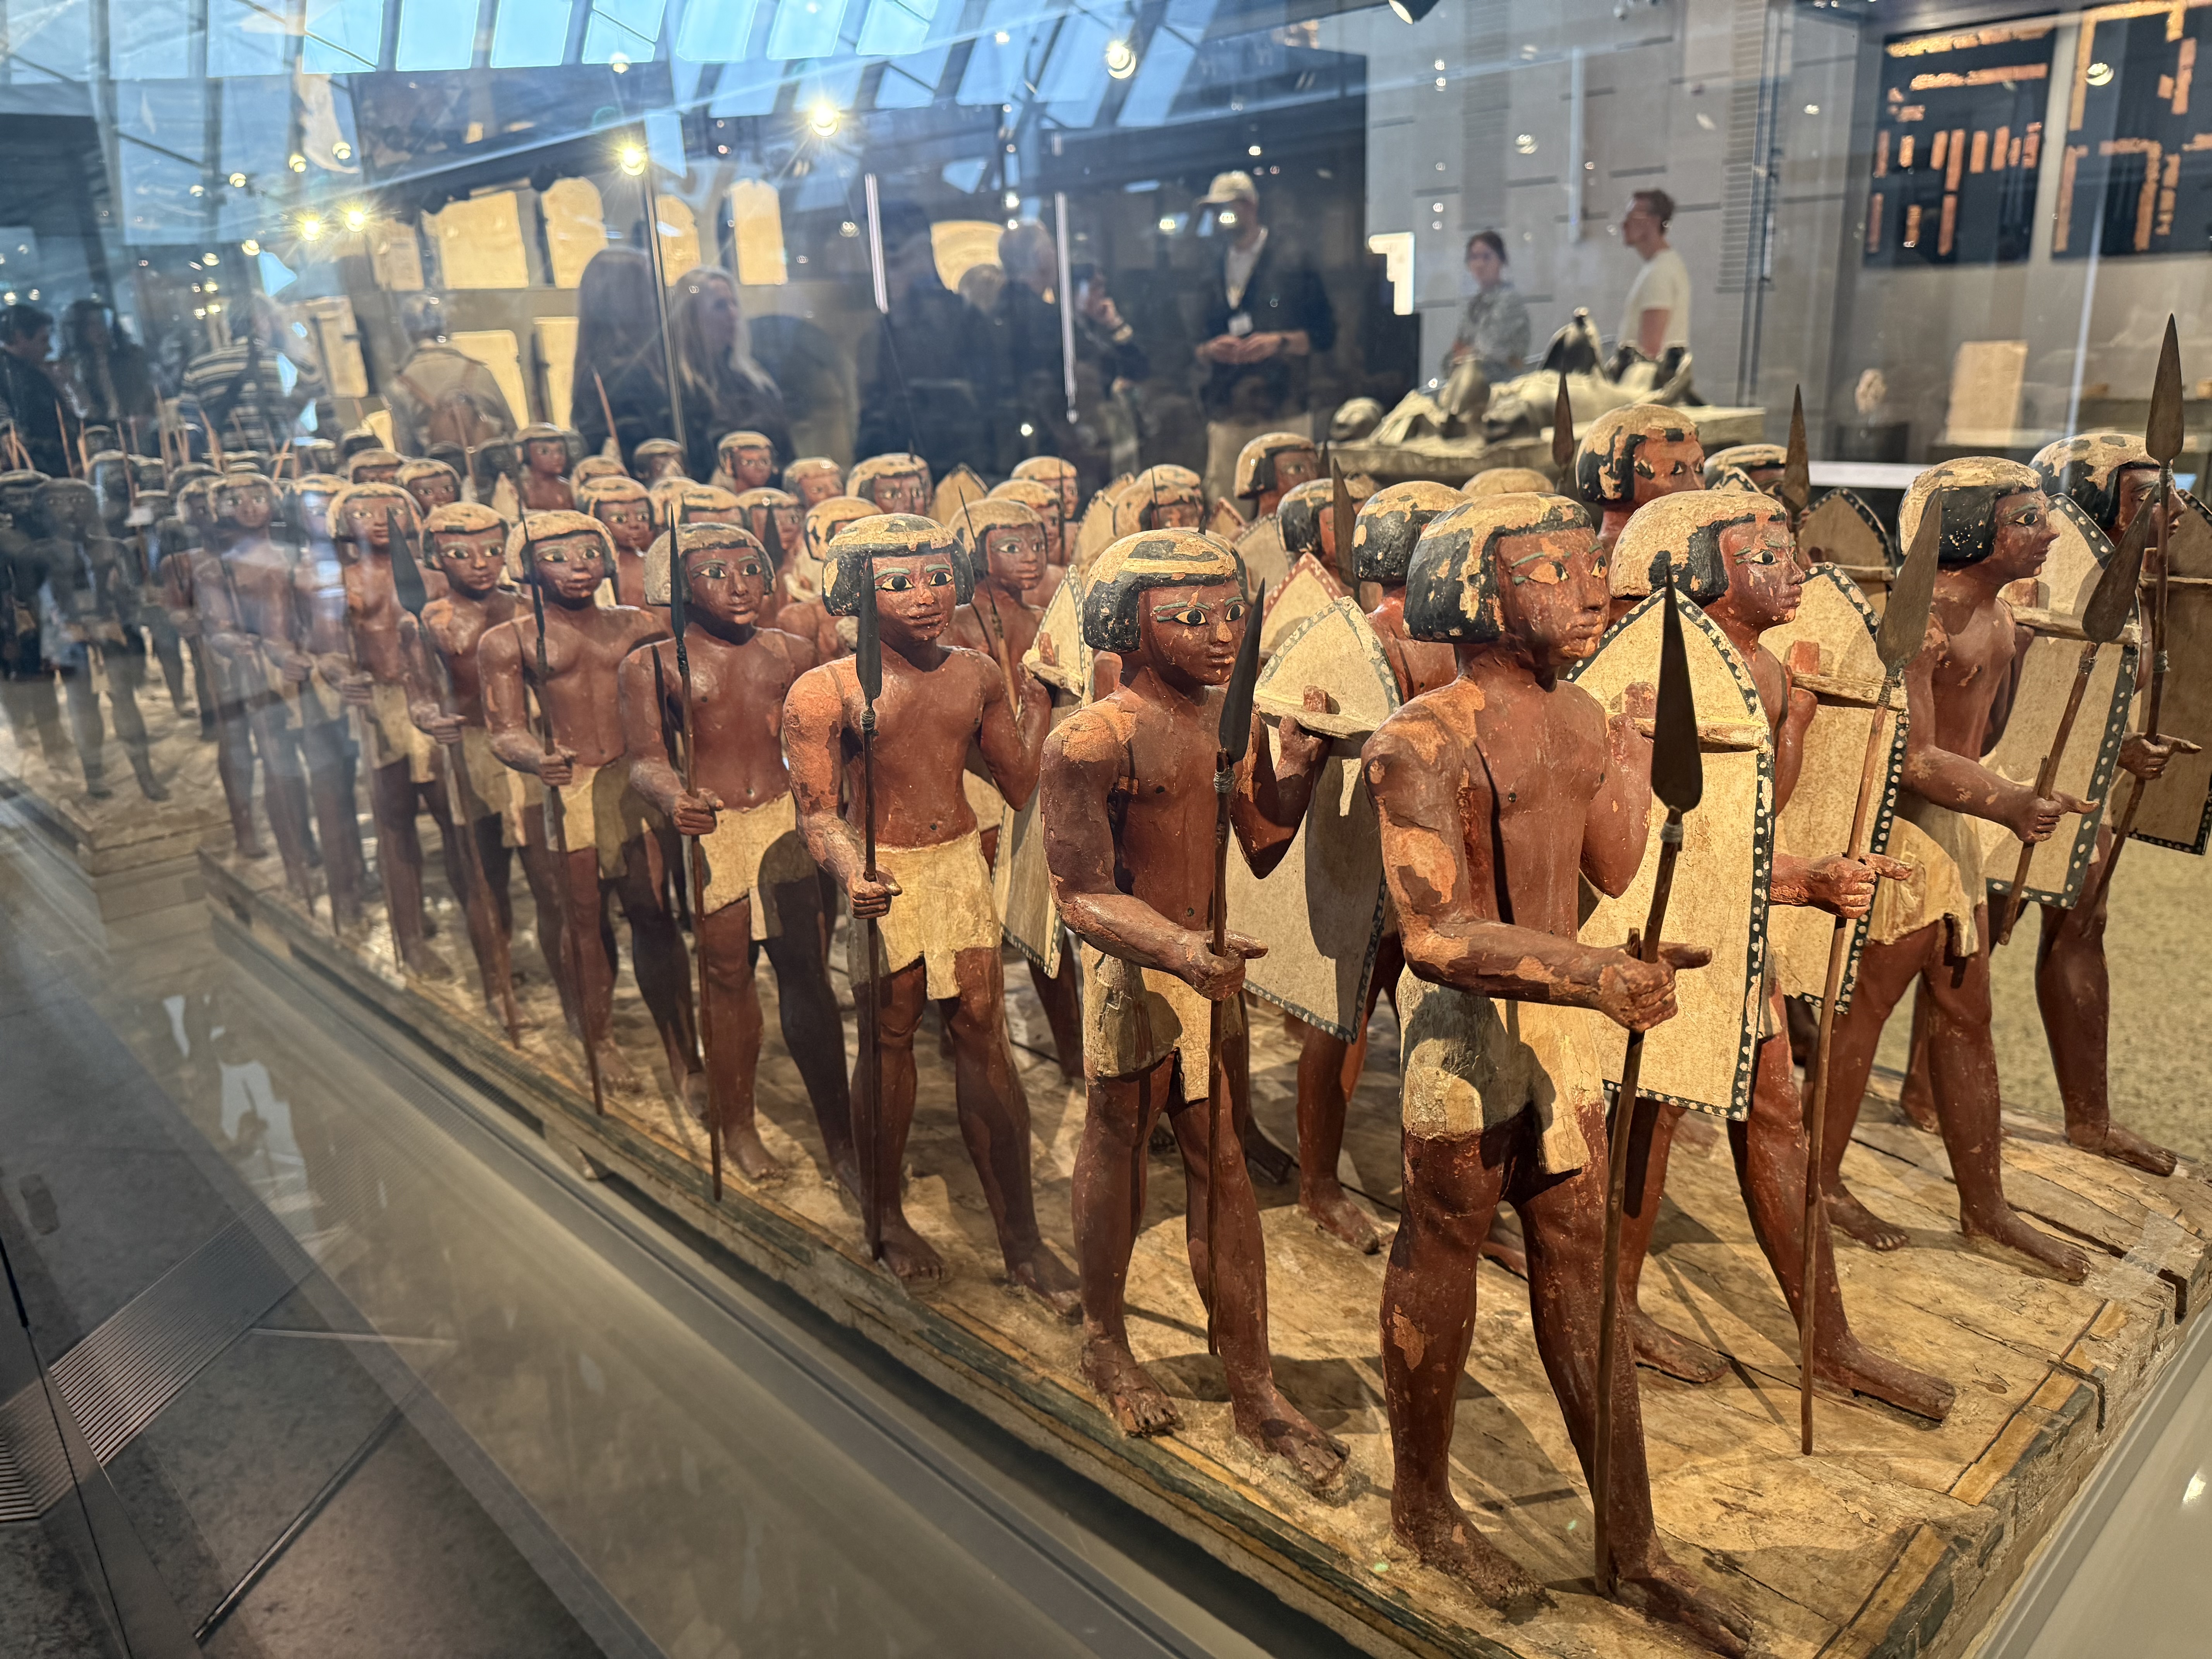
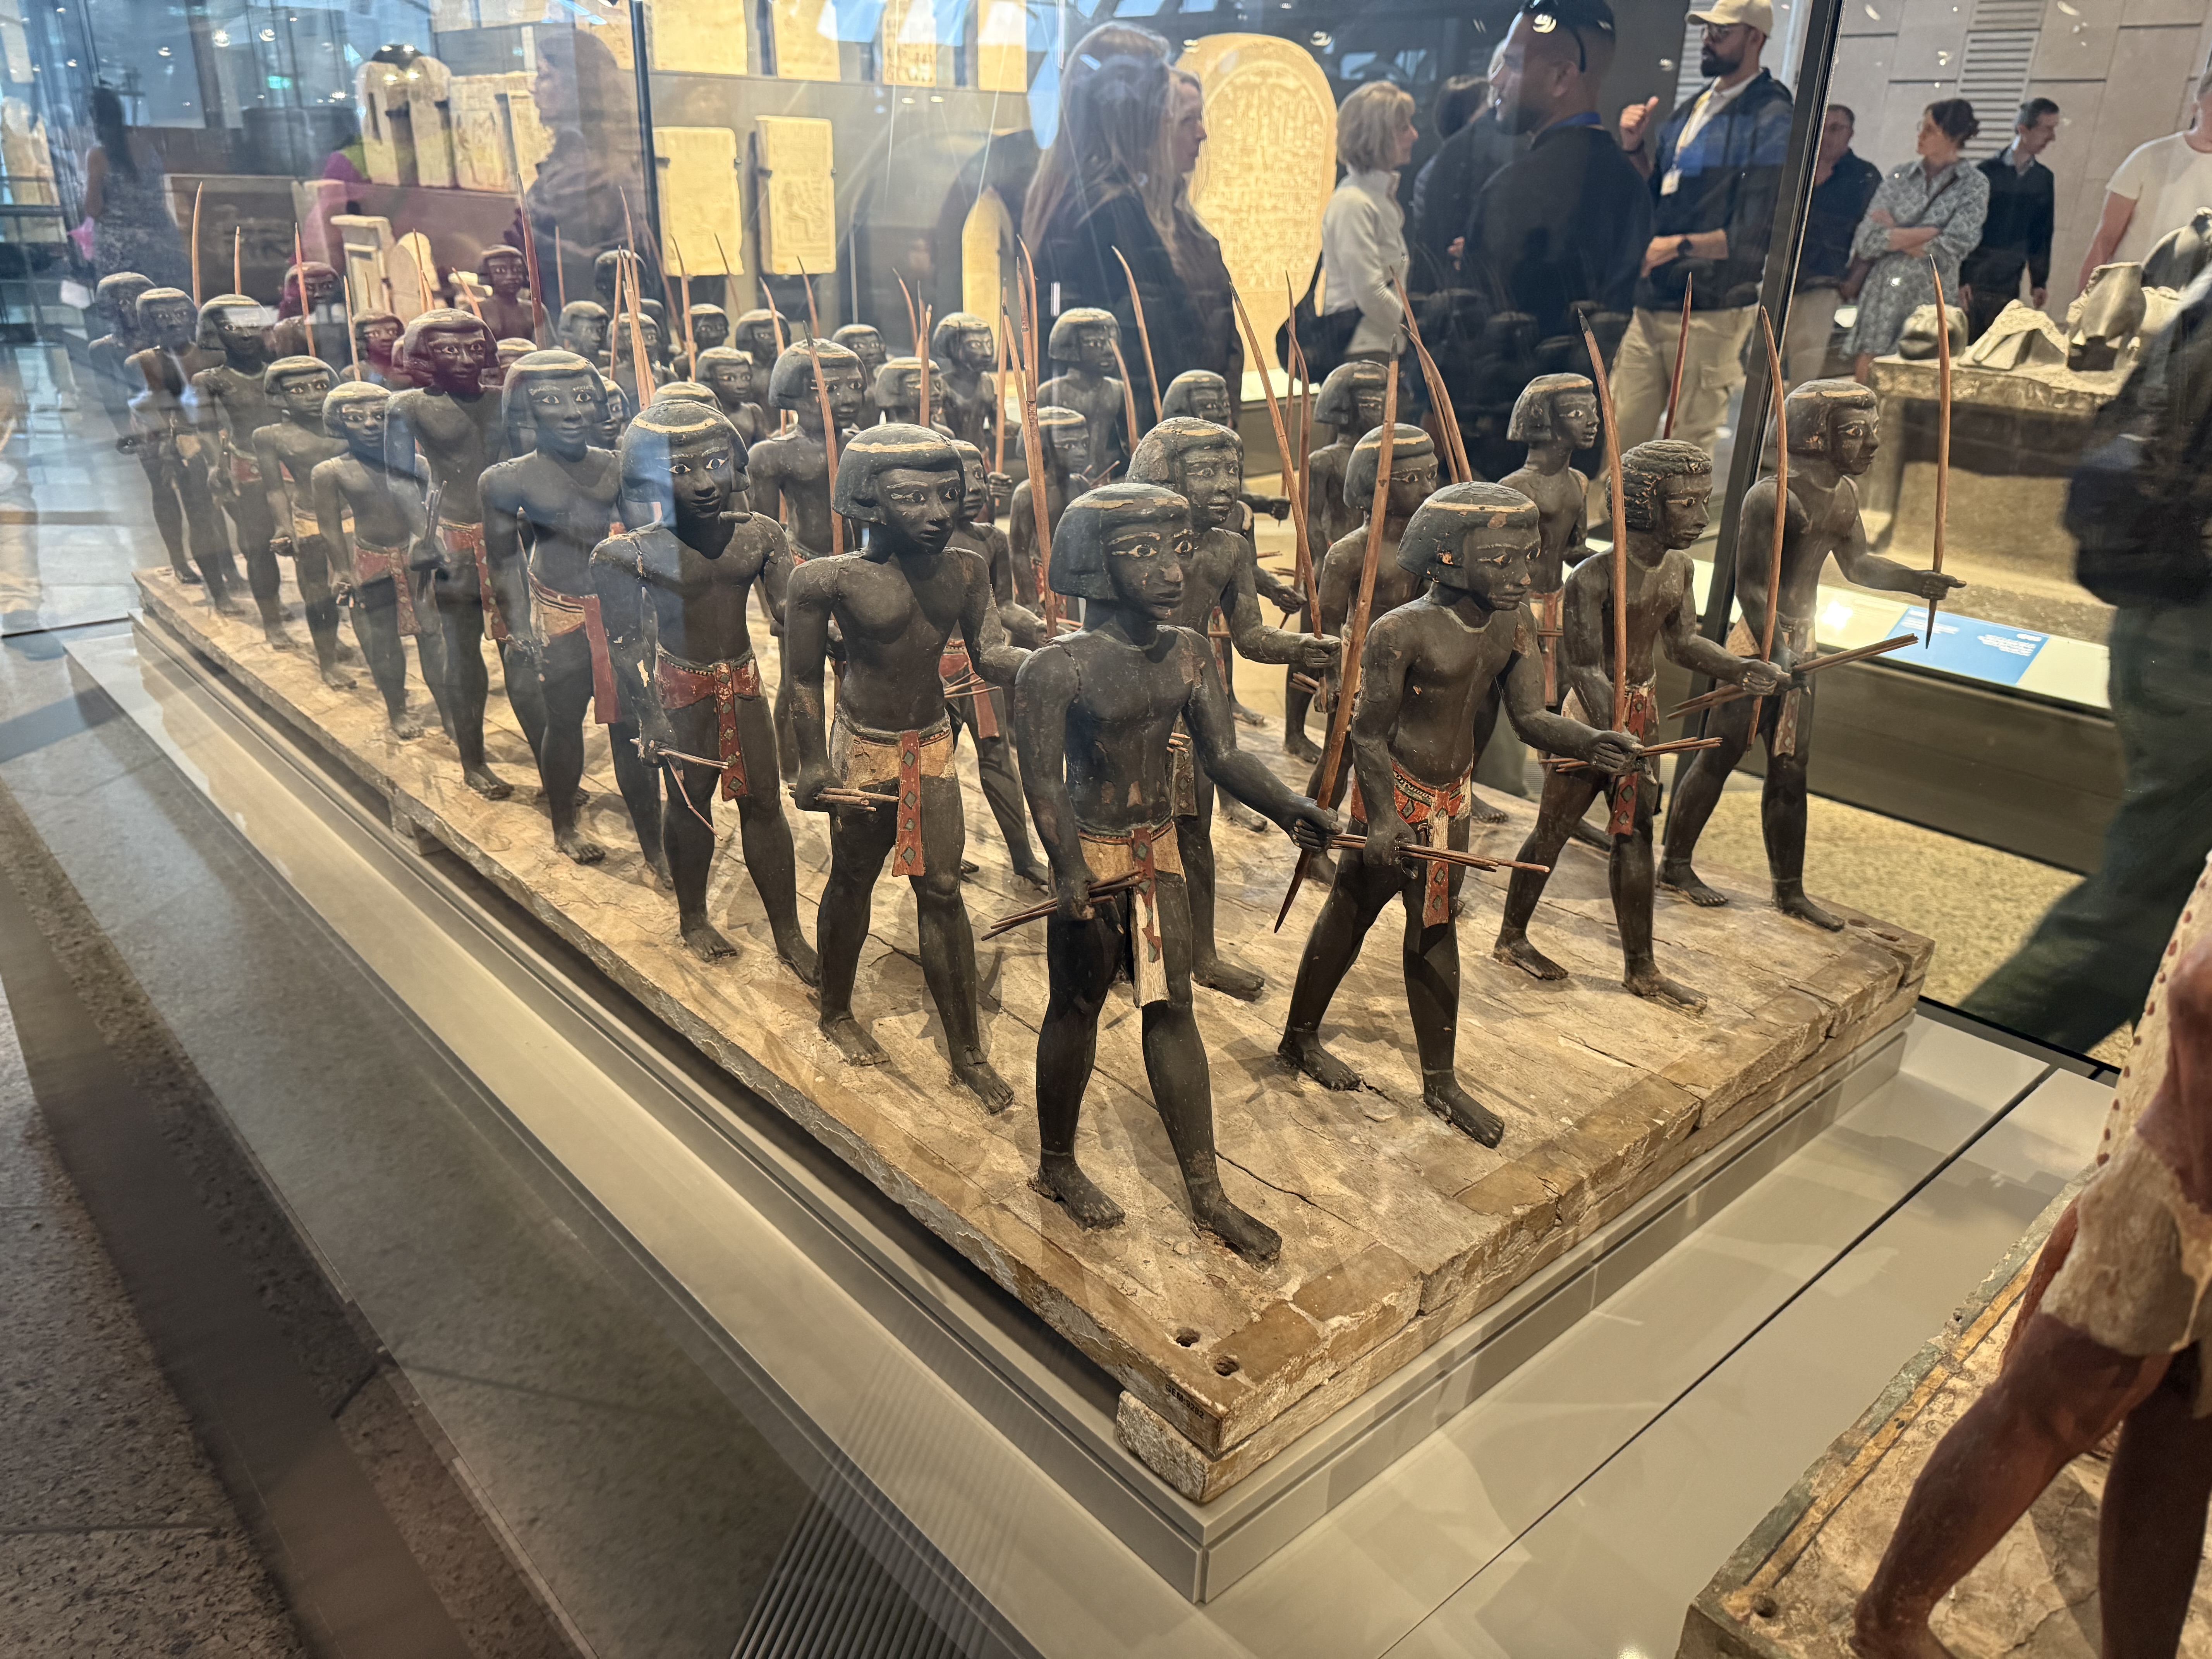
We also visited Egypt during the month. It was a seven-day crash tour, including four nights on a river cruise boat. Nothing much of hobby significance to report, but I was blown away be this exhibit in the new Grand Egyptian Museum:
The first picture shows Egyptian infantry, the second Nubian archers. They come from a Middle Kingdom tomb dated about 1900BC. It is more than rare that we have such a full colour contemporary representation of how soldiers looked from ancient history. It was notable that the figures are of different heights – but they are all marching in step. It is a wonderful combination of individuality and uniformity (the shield patterns on the spearmen are all individual, seemingly representing cattle skin). It almost made me want to go out and paint up an army featuring these troops – options are available in 15mm and 28mm. Alas this army is tactically not very interesting – their opponents (the Hyskos) had chariots and composite bows. One of the reasons the Middle Kingdom fell. The later New Kingdom is understandably more popular with wargamers.
Valour and Fortitude
I have mentioned these rules before. They are published by the Perry brothers, and they were written by Jervis Johnson, with the Perry twins also credited – and can be downloaded for free. They are designed with Perry miniatures in mind. The photos and videos published alongside feature gloriously painted 28mm miniatures on sumptuously dressed tables. In fact they look easy to adapt to any scale. Their scope is all of the horse and musket period (the Perry range is extensive!), though they started life with Napoleonics. There is a four-page set of core rules. Each period is covered by two-page army sheets, which give both period-specific rules (e.g. for Napoleonic squares) and army-specific ones (e.g. one for French élan). This compact writing is a welcome contrast to the tend to much longer rules – where it can be hard to find specific rules, and where sometimes the rules a re pad out with chat. The dense writing can be a little hard to understand sometimes, though.
The game structure is an old-school I-go U-go system, with separate phases for firing, movement and mêlée. This is doubtless to ease multi-player format games, though each phase is structured highly sequentially between units (you fire with one unit it, then move on to the next, etc.) – this is no great obstacle to parallel activity in different parts of the table. There a lot of single D6 tests – a bit like the old Wargames Research Group horse and musket rules.There are more modern features too. There is a “Fate card” system, where each side draws a card at the start of their turn from a set of 13 specific to their army (using conventional playing cards), which can then be played later in the game to boost your own side or thwart the enemy. Movement rules are also highly flexible – without the careful wheeling and oblique movement of traditional rules. The system for losses and morale rather resembles Sam Mustafa’s Disruptions in Lasalle (both versions), rather than old-school casualty removal and morale tests.
But there is a very old-school feel, overall. These rules seem to be in a “Grand Manner” tradition, dating back to huge games played of old at the Wargames Holiday Centre, which inspired so many. This comes up in some of the details the rules choose to pick up on – that French élan for example, and cavalry skirmishing with carbines. Not having played any Grand Manner games (I do have a copy of the rules, but I never used them), I might be wrong on this. It just comes over from the look and feel of the games in the pictures. Rules on command friction are very limited – the Grand Manner tradition is that the players generate plenty of command friction without any help. It is also reflected in the language – “valour” and “fortitude” being examples of an attempt to create period feel with period language.
This boils down to a different conception of Napoleonic warfare from Général d’Armée, the system that I am currently using It seems a bit old-school: in which the French do well in charges, and the British in musketry. The example play video (featuring a French attack on a British brigade), while instructive, did not inspire any confidence about historical authenticity. Strangely, though, skirmishers are abstracted away, except certain light infantry units adopting open order. GdA2 comes across as being more serious, with a stronger historical base – but much more complicated.
My current project is to translate VF into a hex-based game, that I can use with my Beckenham friends, for whom the complexity of GDA2 is a disadvantage, but where we usually play two to three a side. At least that was the original idea. In fact, in a topic that I am so deeply marinated in, Napoleonic wargames, this is impossible. I can’t help fiddling with it to fit my own ideas of Napoleonic warfare and game play. The Fate cards are out – players should be playing their troops and not a hand of cards in my view (though you can do very interesting things with cards). In its place I have put a basic command system, where players must decide what to do with their command figure – whether to intervene directly in events or stand back. I have also introduced a Discipline test for troops undertake certain actions in close proximity to the enemy. I have brought in a system of brigade skirmishers (I think these are important to the visual feel of a Napoleonic battle, if nothing else). Hence my new name: Command and Discipline. Alas I fear that I have added complexity – though my basic rules (which include period specific rules for Napoleonics) run to just seven pages so far, and the quick reference sheet is comfortably contained within a page and a half (compare four pages for GDA2).
The hex system can be used to sort out a lot of traditional tabletop nonsense, however. This includes columns ganging up on lines (the explanatory video suggests this could be an issue for VF). It’s will be interesting to see how well all this works under tabletop conditions!
Looking ahead
I will miss the next club game, which is on Easter Sunday. That would never have been on for me, even if we weren’t visiting friends and family. I should get a Beckenham game, though. My secret modelling project should be done by next week. That will allow me to get on with my 10mm Austrians for 1866, which are now ready for basing. And Command and discipline will get a solo tabletop excursion. Unfortunately, the garden is pressing for attention too…
After having a lot of hobby time in January, February was a slower month – though I did get some gaming in.
Games
Our medieval game in Beckenham
I managed have three gaming sessions since my last report: two were with my Beckenham friends. A group of up to six of us meet monthly to play a variety of games. At the end of January we played a hex-based game using medieval armies, using rules compiled by our host, Pete. There was nothing particularly historical about it, but it was good to get together as usual, and it provided an absorbing contest. It is interesting how when using new rules you move on from thinking that the rules need tweaking, to developing the tactics required to be successful. The rules were loosely based on Lion Rampant. We lost a lot of the heavier uniss to missile fire, mainly bows and crossbows. The instinct is to suggest that these missiles should be made less effective in the rules. But tactics are another solution. By holding the heavy forces in a compact mass, with light troops at the front, the problem might be solved. This is actually how they fought, as far as I understand it. Especially with home-grown rules, there is too much temptation to tweak the rules rather than develop tactics.
We didn’t finish our January game, so we finished it in a second session in mid-February. We reckoned it a score draw.
I managed a game with my usual gaming partners at the club too (Tunbridge Wells Wargaming Society). I hosted a game of Général d’Armée 2 using a Lasalle scenario but forces based on Lützen, 1813. The main interest was that I tried rewriting the command system based on some ideas from members of my old club (South London Warlords) – credit Iain Fuller. I think these produced a better game experience, but there is more work to do. Here’s a picture of the game in progress:
This was another score draw, but we still need the game to go faster.
Painting and modelling
I finished my six new battalions of French infantry by the end of January, and used them in the GDA2 game. These units represented Dupeyoux’s brigade of Habert’s division (Vandamme’s corps) in 1815. This brigade had a quiet Ligny, so not an immediately obvious brigade to model (unless refighting Wavre) – though I have it in mind to model Habert’s clash with Tipplelskirch’s brigade (which I have already modelled) at Ligny. Dupeyroux’s brigade seems to have been held in reserve and not used in the class, though it would need to be available in any wargame. I chose it mainly because it includes the single battalion of Swiss troops in the French 1815 army. Back in the 1970s when my brother and I bought Airfix Waterloo soldiers to start wargaming, we were attracted by the uniform, and so painted up this regiment. One of my ambitions is to produce all the units that we painted up at that time in my current armies – so I wanted to include this unit.
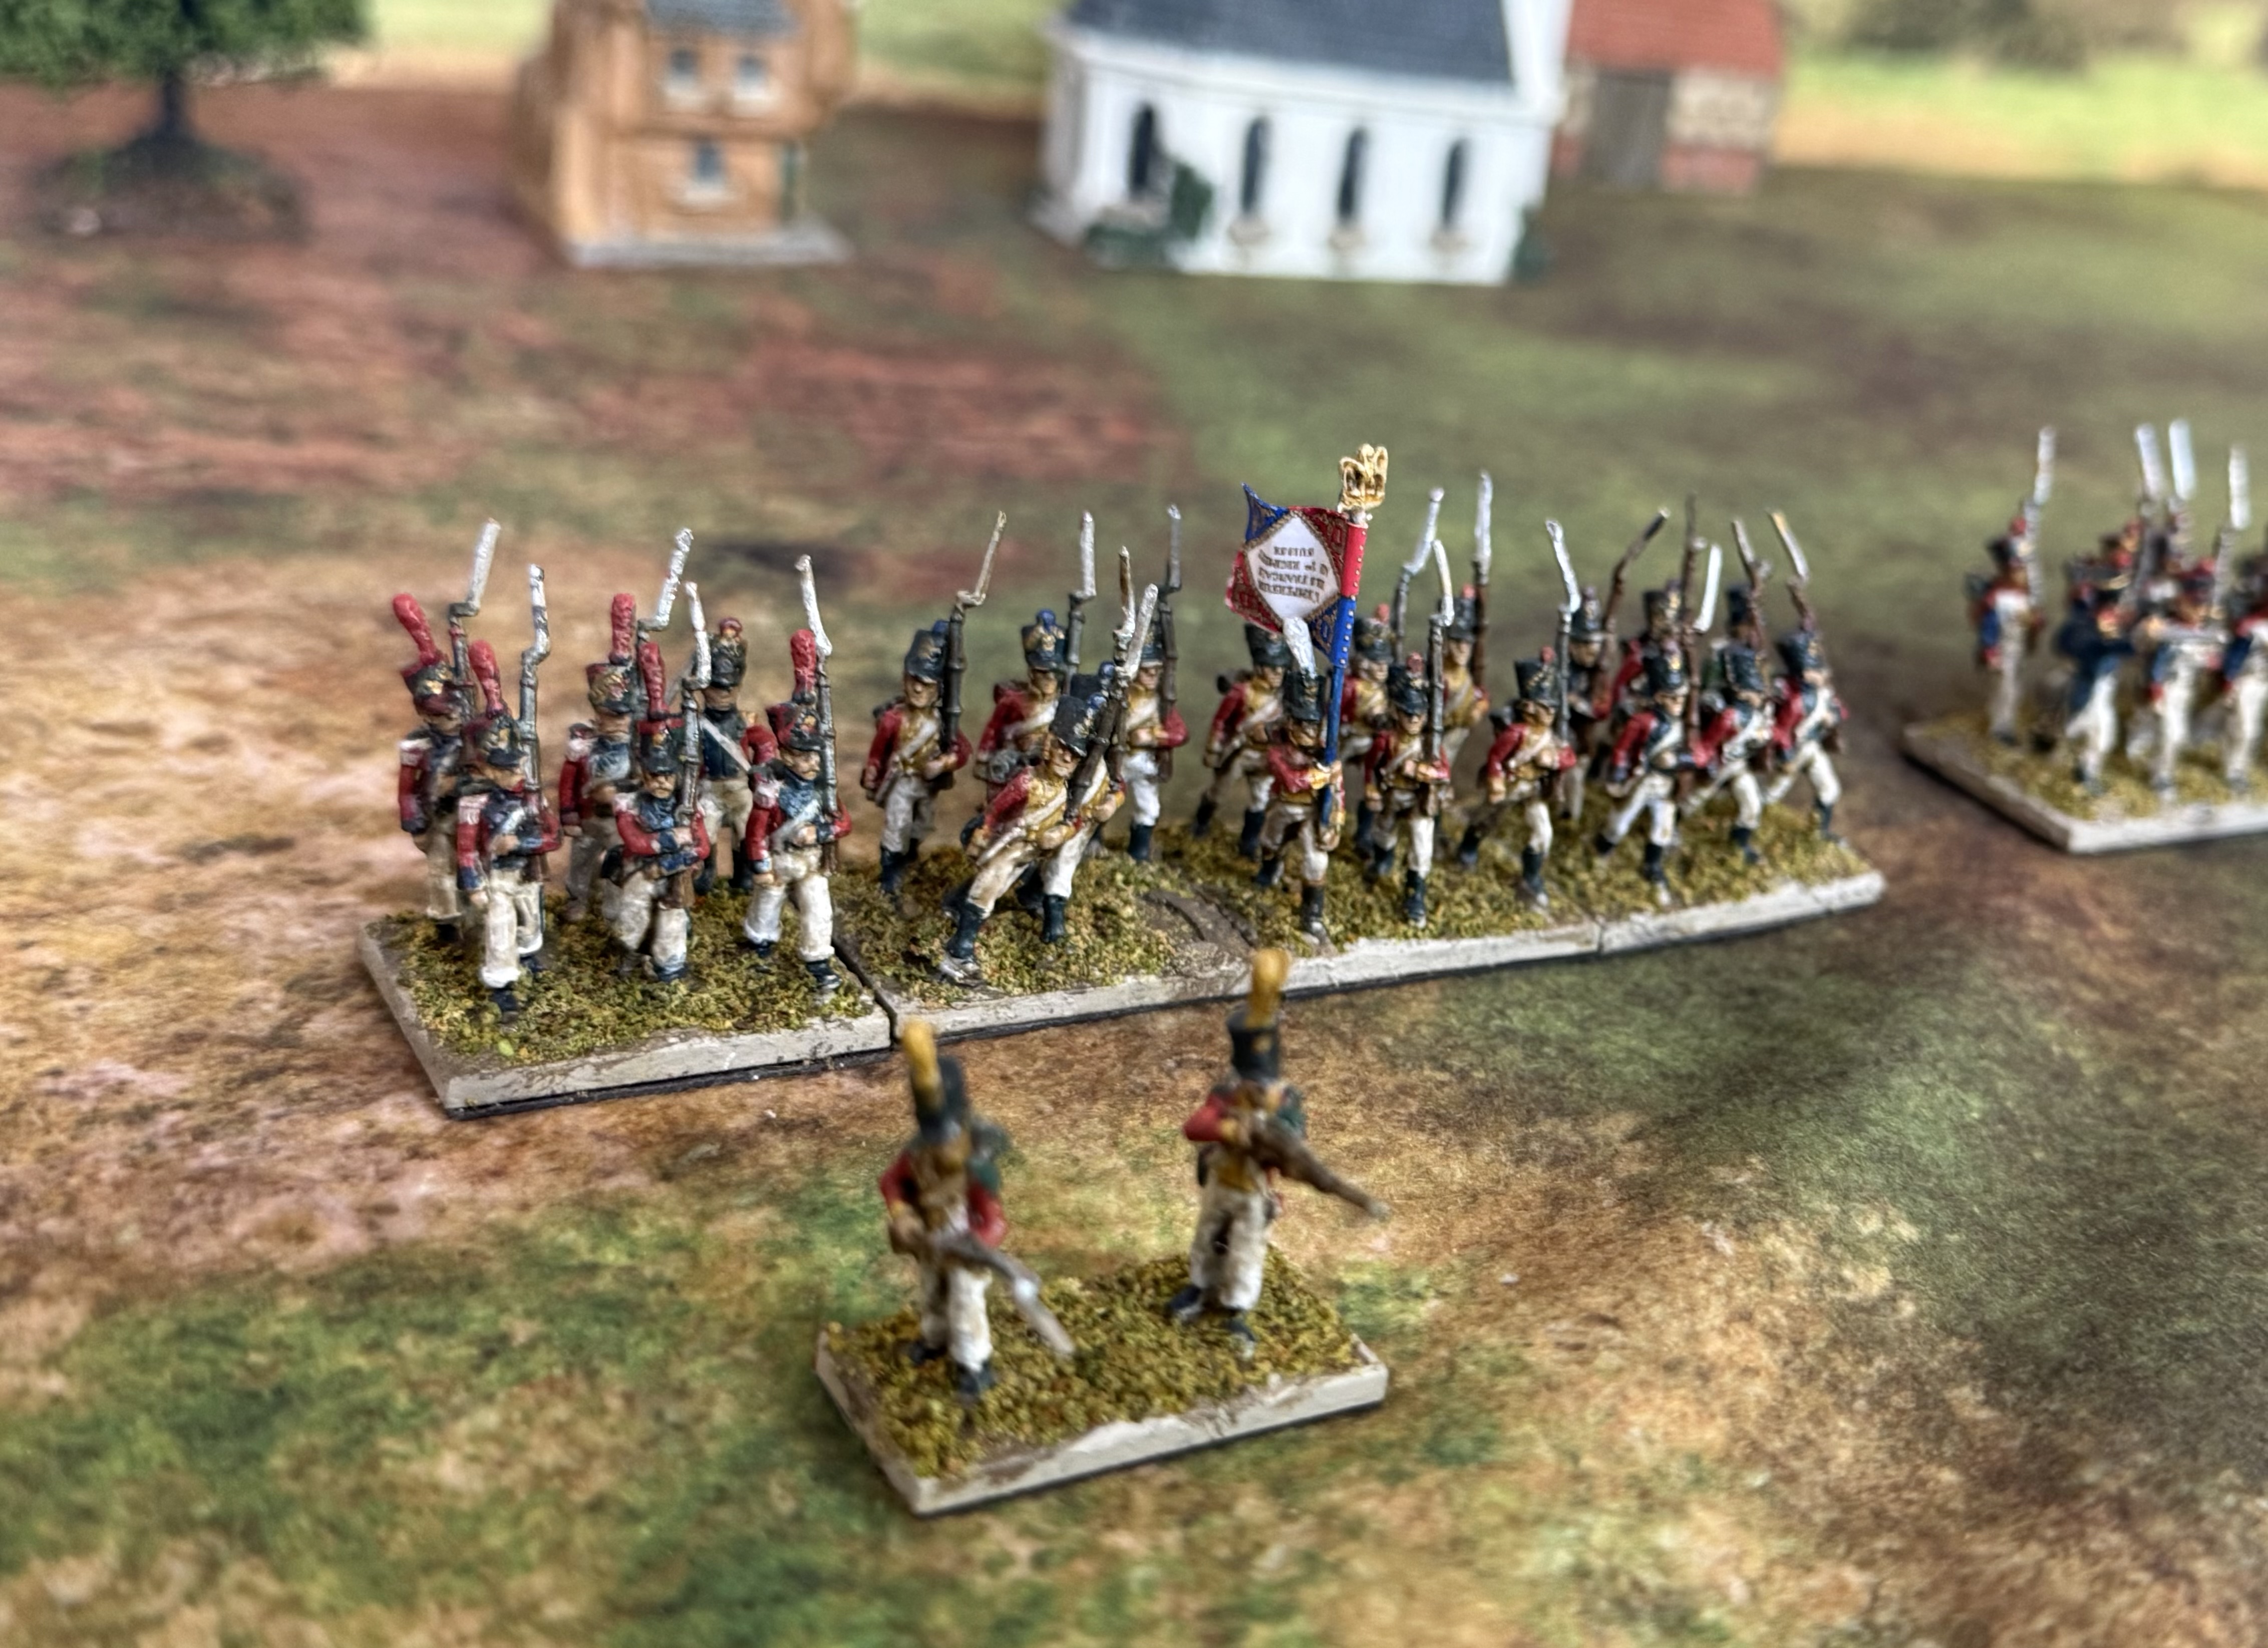
My Swiss. The deuxième port-aigle is missing, and one of the men is dislodged, which I don’t notice until later. I used two different facing colours – something I will explain another time! These are Eureka 18s.
There’s more I want to say about this project, but I’ll leave it for another post. What I will say is that I really enjoyed painting these figures. The AB figures (used for the five French battalions) are lovely, and a pleasure to work with. I have now ordered the miniatures for my next batch of six battalions. These will be two battalions each of French line, French light and Young Guard Voltigeurs.
My current project is some aircraft modelling, which does not have a wargame role. It’s a bit of a secret so I won’t say any more until later in the year.
Meanwhile I am assembling my 10mm 1866 Austrians ready for my Custoza project. This will be a big project, and not as much fun as painting up AB Napoleonic 18s.
Rules
Writing rules is one of the things I enjoy about the hobby most. Mostly my creations don’t go anywhere, but the process is fun. My next project is to create some Napoleonic hex-based rules for my Beckenham games. Pete likes hex grids, and GDA2, my go-to rules for Napoleonics, aren’t a good fit for the Beckenham crowd, where we can have up to three a side, and the demand is for simple mechanisms. I am using the Perry Brothers’ Valour & Fortitude rules as the starting off point. But they will be substantially rewritten. That is proving an interesting journey, and I will write about it in a future post.
And that’s it for the month. In March we are going to Egypt for a week, which will slow things down hobby-wise. My aircraft modelling will also take up a bit of time. And I will miss both club and Beckenham games. Not such a productive month in prospect.
In my last post I expressed a some frustration with GDA2 rules, which I have now been using for some time. This moves on to the question of house rules to improve the system. But the rules are widely used and are comprehensive. Messing around with them is not to be done lightly. So I am writing this piece to try and clarify my own thinking.
What I like
But first we need to get this into some perspective. Why do I like GDA2? I was previously using Sam Mustafa’s Lasalle 2 rules, which are in roughly the same game space. Each side has typically 5-6 brigades of 3 to four infantry battalions or 2-3 cavalry regiments, each typically consisting of four bases, with two bases for an artillery battery. For my 18mm miniatures they can be happily played out on 4ft by 6ft table. Each set has been thoroughly thought through and play-tested by the designers, who both have a deep understanding of Napoleonic warfare.
But the period feel from GDA is so much better than it is for Lasalle. That comes at a considerable cost. Lasalle rules are simpler and so play faster; Sam has put a huge amount of thought into explaining the rules in the simplest possible way, giving them an exemplary clarity. But they are very abstracted and “gamified”. The role of commanders and skirmishers, for example, is abstracted almost out of existence. I, and my fellow gamers, much prefer GDA.
How do the rules achieve this Napoleonic feel? Two things stand out for me. First is the system of “Taskings” and “CinC commands”. These confer specific powers or bonuses to the brigades to which they are awarded. If the rules were written by me I would not use the word “tasking”, which is not a widely used word in English (it means “taskwork” in my dictionary, which is “work done as a task, or by the job” – definitions that don’t really apply here). I would call them “orders” – though that isn’t quite right either. But whatever you call them they do give the feel of a Napoleonic commander directing his troops, without all the problems of doing so more literally on the tabletop. The CinC commands – which are limited to two per game – also reflect the more dramatic interventions that senior commanders sometimes made, and are referred to in battle accounts. The command mechanisms in Lasalle 2 are very clever, and to be fair are better at reflecting move-and-response dynamics, but they feel more like a game than battlefield engagement; they are also harder to adapt to a multi-player format.
A second aspect that works really well is only allowing only one unit from each brigade to conduct a charge in the same move – which may be supported by other units in the brigade. This is the first time that I have seen it in wargames rules, and it really helps give a realistic feel. It stops the common wargame practice of two or more battalion columns bunching up and attacking a battalion deployed in line. This happened to devastating effect in one of my more recent games of Lasalle. It didn’t happen historically – one of those things that look simple on the tabletop that are impossible to accomplish in real life. This changes the dynamics of the battle in ways that give it a more authentic feel.
There are other things. The system has found a way to represent skirmishers that is consequential but not too fiddly – another rare accomplishment. Brigade commanders are represented on the table and have a role. Rules for built-up areas achieve a realistic balance that few systems achieve (though Lasalle 2 isn’t too bad either, unlike its upscale cousin, Blücher).
Minor quibbles
Overall then, it’s an excellent system. I am not tempted to try and design my own system to replace it – which, alas, I often am with rules, though rarely successfully. But there are things I don’t like. Not so much on the detail – I think they are harsh on the firepower of columns, for example – but even there I know that things are the way they are for a reason, based on deep knowledge of the period and experience of game play.
I would be tempted to redo the troop classification system, and change some of the names (e.g. grenadiers ranking below veterans). I would replace the six main categories with four: elite, professional (=veteran & grenadier), conscript (=line) and militia (= reservist & recruit). I would then add a number of special characteristics that could be overlaid (such as “drilled” already in the rules, which I might extend to rapid formation changes as well as firing). I haven’t completely got my head around to the many different sorts of cavalry classification, but I’m sure that could be simplified too. I would be tempted to give 8-gun batteries more resilience (or 6-gun ones less). But I won’t do any of this as it is sure to create more confusion amongst my fellow players, while not really changing anything much.
Another issue I discussed in my previous post is the slow speed of movement of troops outside the immediate combat area. I was a little frustrated by my attempt to move cavalry from one flank to the other in the last game. Of course you might react that it served me right for posting them in the wrong place to start with! A more serious problem is bringing up reserves for an attacking side. The table edge can be a long way from where the troops need to be deployed. These are things that I think are worth fixing with house rules, but that is quite straightforward.
Command system
That leaves two more serious problems: command friction and rules layout. To take the second, the rules are quite detailed but they aren’t laid out very clearly. If you want to refer to a particular rule that you know you’ve read somewhere, it’s often hard to find it in the rulebook (though there is an index which helps enormously). There are four sides of quick-reference sheet on two separate laminated pieces of paper. When trying to find something it is common to pick up the wrong one first, and, especially when a bit tired, it takes much longer to find things there than it should. I am in the process of putting together my own version of the QR sheet, though whether that will work any better remains to be seen. I have already put together my own version of the main rules (but not including the tables in the QR sheets), which is much more compact than the original, which a number of my fellow gamers like, but I still find myself usually going to the main rule book to look things up. All this slows the game down, though as we get more familiar with the rules, this is less of a problem.
Which brings me to the command system, which I discussed at length in my previous post. One issue I didn’t discuss is a problem with rules for bigger battles (of six brigades and more). There is a system for a corps battles, which I’ve read up, but never used. This involves a system of Corps Orders, which are quite detailed and not intuitive. In a big game this year I was asked to command the Austrians at Castaglione – which involved supervising three other players, each with their own GDA divisions. So I read up these rules to be ready – but I was relieved when the games master decided not to use them. It’s an added level complexity that could easily slow the game down. What the games master did instead was to reserve the CinC commands to the army commanders, including the limit of two per game. That worked fine, as it operated within the players’ rules knowledge.
But this points to a curiosity. The typical larger game is played using the divisional game rules as if each side was a large division. That is how the scenarios in the GDA scenario books are set up (though that is based on GDA1 – I don’t know if the Corps game rules are in them). The armies actually consist of two or more divisions. That was the case for the Lützen scenario we played for the Prussians (Ziethen and Klüx)(the French divisions and brigades of the time were large; each brigade was split in two for the scenario, and the infantry all came from the same division). It is true that the typical corps of this period were bigger than this, though. Still, the officer coordinating the battle on each side would surely have been a corps commander, even if there had other troops not on the table to look after as well (Blücher in the case of the Prussian at Lützen). What is more, the CinC commands correspond quite well to the sorts of intervention this corps commander might make (as I pointed out in my previous post). The roles of divisional commander (who would typically have two brigades and a battery) is not represented separately – it is simply integrated with the brigade command roles.
This represents a widespread game design problem. On the wargames table, with the players’ helicopter vision and compressed spaces, representing the full command hierarchy is often impractical. And it is the divisional layer that is usually skipped. But these feature historically important commanders. How to solve?
The Napoleonic command system
I think it is helpful first to reflect on the actual historical roles of generals in this era. Let’s start with the brigade. This was the basic unit of battlefield manoeuvre, consisting usually three or four infantry battalions, or two cavalry regiments. For the Austrians it was bigger: typically two infantry regiments, or six battalions. The Prussians in the later wars operated a more flexible system, with ad hoc groups of battalions being the main battlefield unit, and brigades being the equivalent of divisions in other armies (with 9 battalions and artillery). Earlier in 1813 (including Lützen), Prussian brigades look more typical, with often four battalions. But as reserve and landwehr regiments became incorporated, the brigades got larger.
Brigades would typically be commanded by a Major General (Generalmajor in German) or Général de Brigade for the French (renamed Maréchal de Camp in 1815). Colonels were often brigade leaders too. The Prussians were short of senior officers, so we often find brigade level formations led by Lieutenant- Colonels or even Majors. This is also the case for Hanoverians and other German allied armies in 1815 – doubtless for similar reasons. Note the lack of the rank of Brigadier-General (let alone the 20th century one of Brigadier – a field officer rather than a general). It did exist in the British army at the time, but it was not widely in use in the field, for reasons that I don’t know. “Brigadier” more usually referred to a French NCO. It is interesting that wargamers usually ignore ranks. Of course rank in this era was hardly a guarantee of tactical savvy – but it did convey authority. I think that lower level Prussian tactical leadership was often a bit lacking in 1815 – and the relative lack of seniority of the officers does point that way. This is rarely reflected in wargames rules. Since rank is widely available information in orders of battle I think this is a lost opportunity.
But I digress. The brigade (or perhaps the regiment where brigades comprise six battalions) was the critical tactical element in battlefield organisation, and wargames rules do a good job of reflecting this. A brigade commander would surely spend pretty much his entire time directing his battalions or squadrons. Overall I think GDA does a good job of representing command at this level. It does try to reflect quality of brigade commander (with provision for bold or poor ones) but in the games I have played we tend to ignore this. This is supposed to be determined at random at the start of a battle. The reason I don’t bother is a prosaic one. It’s an extra complication and I don’t have a good way of discreetly labelling it – my labels are typically printed a long way in advance of the game. There’s plenty of random friction in the command system anyway. It would be one way to reflect variations in command quality though – so perhaps Prussians in 1815 would have a high share of “poor” ones. However it would easier to do this by defaulting all an army’s brigade commanders: I haven’t had the courage to do this yet!
Divisions were a major innovation of the Revolutionary-Napoleonic era. Their main role was as a manoeuvre element on campaign, consisting typically of two or three brigades and an artillery battery. It would usually be led by a Lieutenant-General or French Général de Division – but it wasn’t uncommon for the more junior ranks to act up. The Prussians used over-sized brigades instead, consisting, eventually, of three regiments (nine battalions), but typically commanded by a Generalmajor. The battalions were then organised into groups of two to four ad hoc task groups, with the different regiments usually mixed up. These should form the wargames brigades.
A divisional general would typically have only a small staff, but operate in close proximity to his troops. His job was to receive and implement instructions from his superiors, and to communicate back to them. It would also be his job to maintain a wider situational awareness than would be the case for the brigade commanders. They would make direct interventions fairly frequently, often delivering orders in person.
And then we have the corps d’armée, which consisted of a variable number of infantry divisions, together with cavalry support and reserve artillery. These would be commanded by a senior general, in the French case often a Marshal. This was meant to be able to operate as a self-contained army, if need be independently of the main army. There would usually be a substantial staff. The French were the first to adopt this system, but the Austrians, Russians and Prussians had caught on by the mid-war period. Indeed by 1813 their corps commanders were rather more effective than the French ones, in my view. The system never caught on in Wellington’s armies. In the Peninsula he did create what were effectively corps under Hill and Graham, but the main body remained under his direct control. There was a nominal corps system for Wellington’s army in 1815, but this was long way from proper grand-tactical system of other major power armies. On occasion the French dispensed with the corps system too: for example Marmont’s army in 1812, which was organised in a very similar way to Wellington’s.
The problem for GDA is that games are typically bigger than a division but smaller than a corps. The solution is to pretend that the smaller ones are just large divisions, and to have a special corps superstructure for the bigger games. I don’t think this really works, and I want to try and imagine how this might work differently.
GDA command system reimagined
The starting point is that there would be no distinction between divisional and corps games. All games are corps games, though they may not represent a complete corps d’armée, but are played using the Divisional game as a basis. There is a CinC, who might be a corps commander, a divisional officer taking the lead, or even the army commander.
We need to recognise the divisional role. Each side would be divided up into a number of divisions and independent brigades, following the historical order of battle. Divisions would have a divisional commander represented on the table. My inclination is that batteries would not be not treated as part of brigades but as separate parts of a division – unless assigned to support an independent brigade. This needs thinking through, though. Corps reserve batteries may be formed into their own independent brigades of up to two batteries, with a brigade commander.
Start the turn like the Divisional Game. Throw a D6 for each allocated ADC across the whole army. The CinC player then allocates these to divisions and independent brigades, and decides whether to use one of his CinC commands. The Chief of Staff operates at Division level, but all others are brigade interventions.
Players controlling the divisions then throw a D6 for their divisional commanders, unless the division or one its brigades is subject to a CinC command. A score of 3+ means that they may intervene. This means that they are committed to one brigade (or battery), which automatically obeys orders, unless Faltering. This counts as one ADC for Taskings, but no Brigade Attachment tasking is required. In the case of a Faltering brigade, add one to the Command roll die. It replaces the Divisional morale ADC. In this case a Brigade Attachment tasking is allowed (costing a further ADC), and this allows a re-throw.
What is the ADC allocation? I think keep this at the current level, with a maximum of six (dependent on quality). This is clearly more generous than in the current game, as each divisional officer (there are likely to be two) becomes a super-ADC. However, I am proposing to treat batteries as a separate “brigades”. The maximum limit represents the fact that corps commanders could be stretched, and would struggle to manage more complex operations. There is a case for giving the attacker a bonus (or defender a penalty) at the start of the game – perhaps lasting until the move after the first time the defending side wins the initiative.
What about officer quality? There are four grades for CinC, though I hate their names (Blusterer, Commissariat, Campaigner and Incomparable). It is not just personal ability that should reflect this grade: seniority, staff resources and off-table responsibilities (i.e. trying to manage a bigger battle than the one represented on the table) affect this too. Which category should be clear from the historical context. Perhaps rename the categories: Passive; Tentative; Active; Exceptional. I would be inclined to be a bit more generous with the CinC interventions (add one). Or perhaps allow a one ADC interventions to ensure that a particular divisional officer or brigade commander is under control.
For brigades I think that leaders belonging to divisions should be rated as poor (i.e. capable of a single tasking only when left to themselves). Independent brigades would be standard, or bold if the historical context pointed that way. Occasionally they might be poor – perhaps a reluctant attachment from another formation.
Which then leaves divisional leadership. It is doubtless a good idea to represent different levels of effectiveness – and easiest to copy the nomenclature for brigade commanders. Simplest is to vary the score required on the activation die. A poor leader activates on a 4, as they spend more time on dithering and in displacement activity. A bold divisional leader may be activated on a 2. Each of these categories should be quite rare
Which leaves us with the question of initiative. There is no necessity to change the existing rules, which can be based on the number of Hesitant/Faltering brigades. However this is one of the aspects that annoy some gamers. What does it represent? I suppose an army with lots of hesitant brigades is less likely to seize the moment – but there’s an element of that old wargaming vice of double jeopardy there. Isn’t it enough that the brigades are hesitant? Besides some of those hesitant or active brigades may be quietly sitting in the rear or on an inactive flank on standby, not affecting the wider battle. A better idea (one of a number of suggestions from my friend Malc) is to base it on a single die throw based on the CinC rating. So this might be a D10 modified by quality rating (the system used in Age of Eagles, apparently). Or use different types of die depending on quality (a D10 for Active, D8 for Tentative, etc.). This might be modified upwards if the CinC is using Post of Honour, or Scouts and downwards for other CinC interventions (in these cases best to be a die modifier rather than move the quality rerating). Draws preserve the status quo, except Turn 1, which goes to the attacker.
A lot to ponder there. I will let you know how it goes get on!
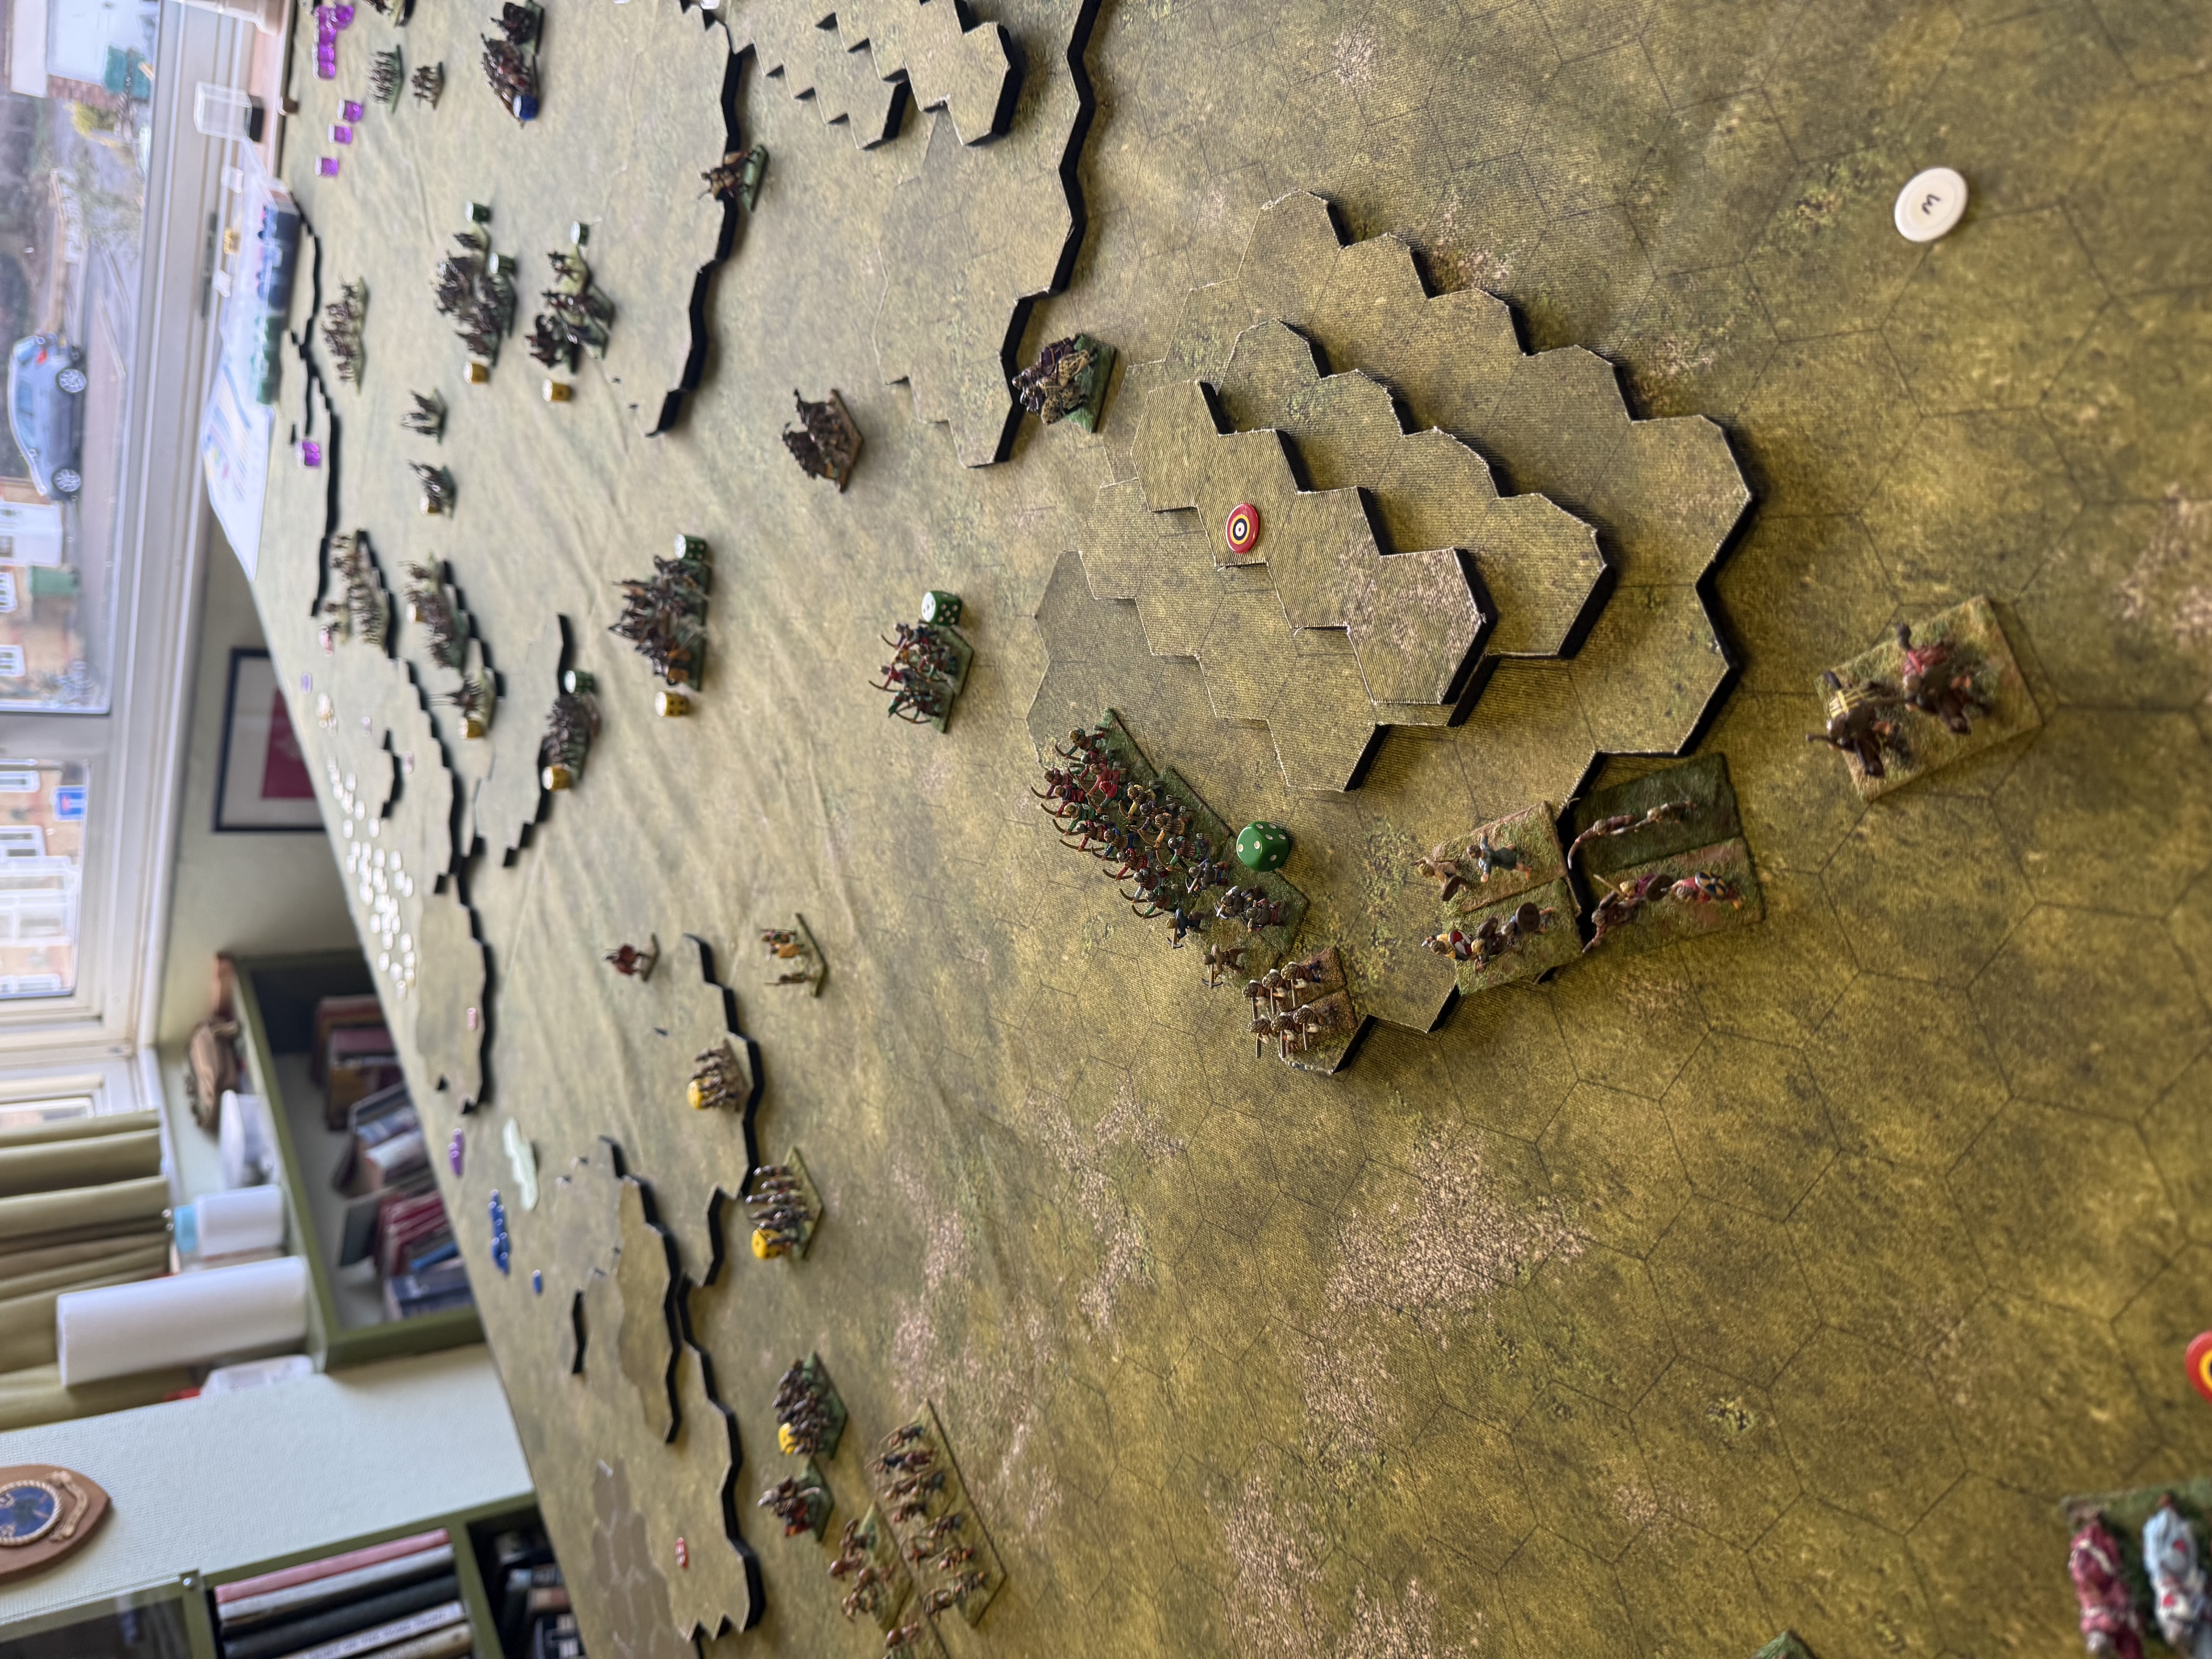
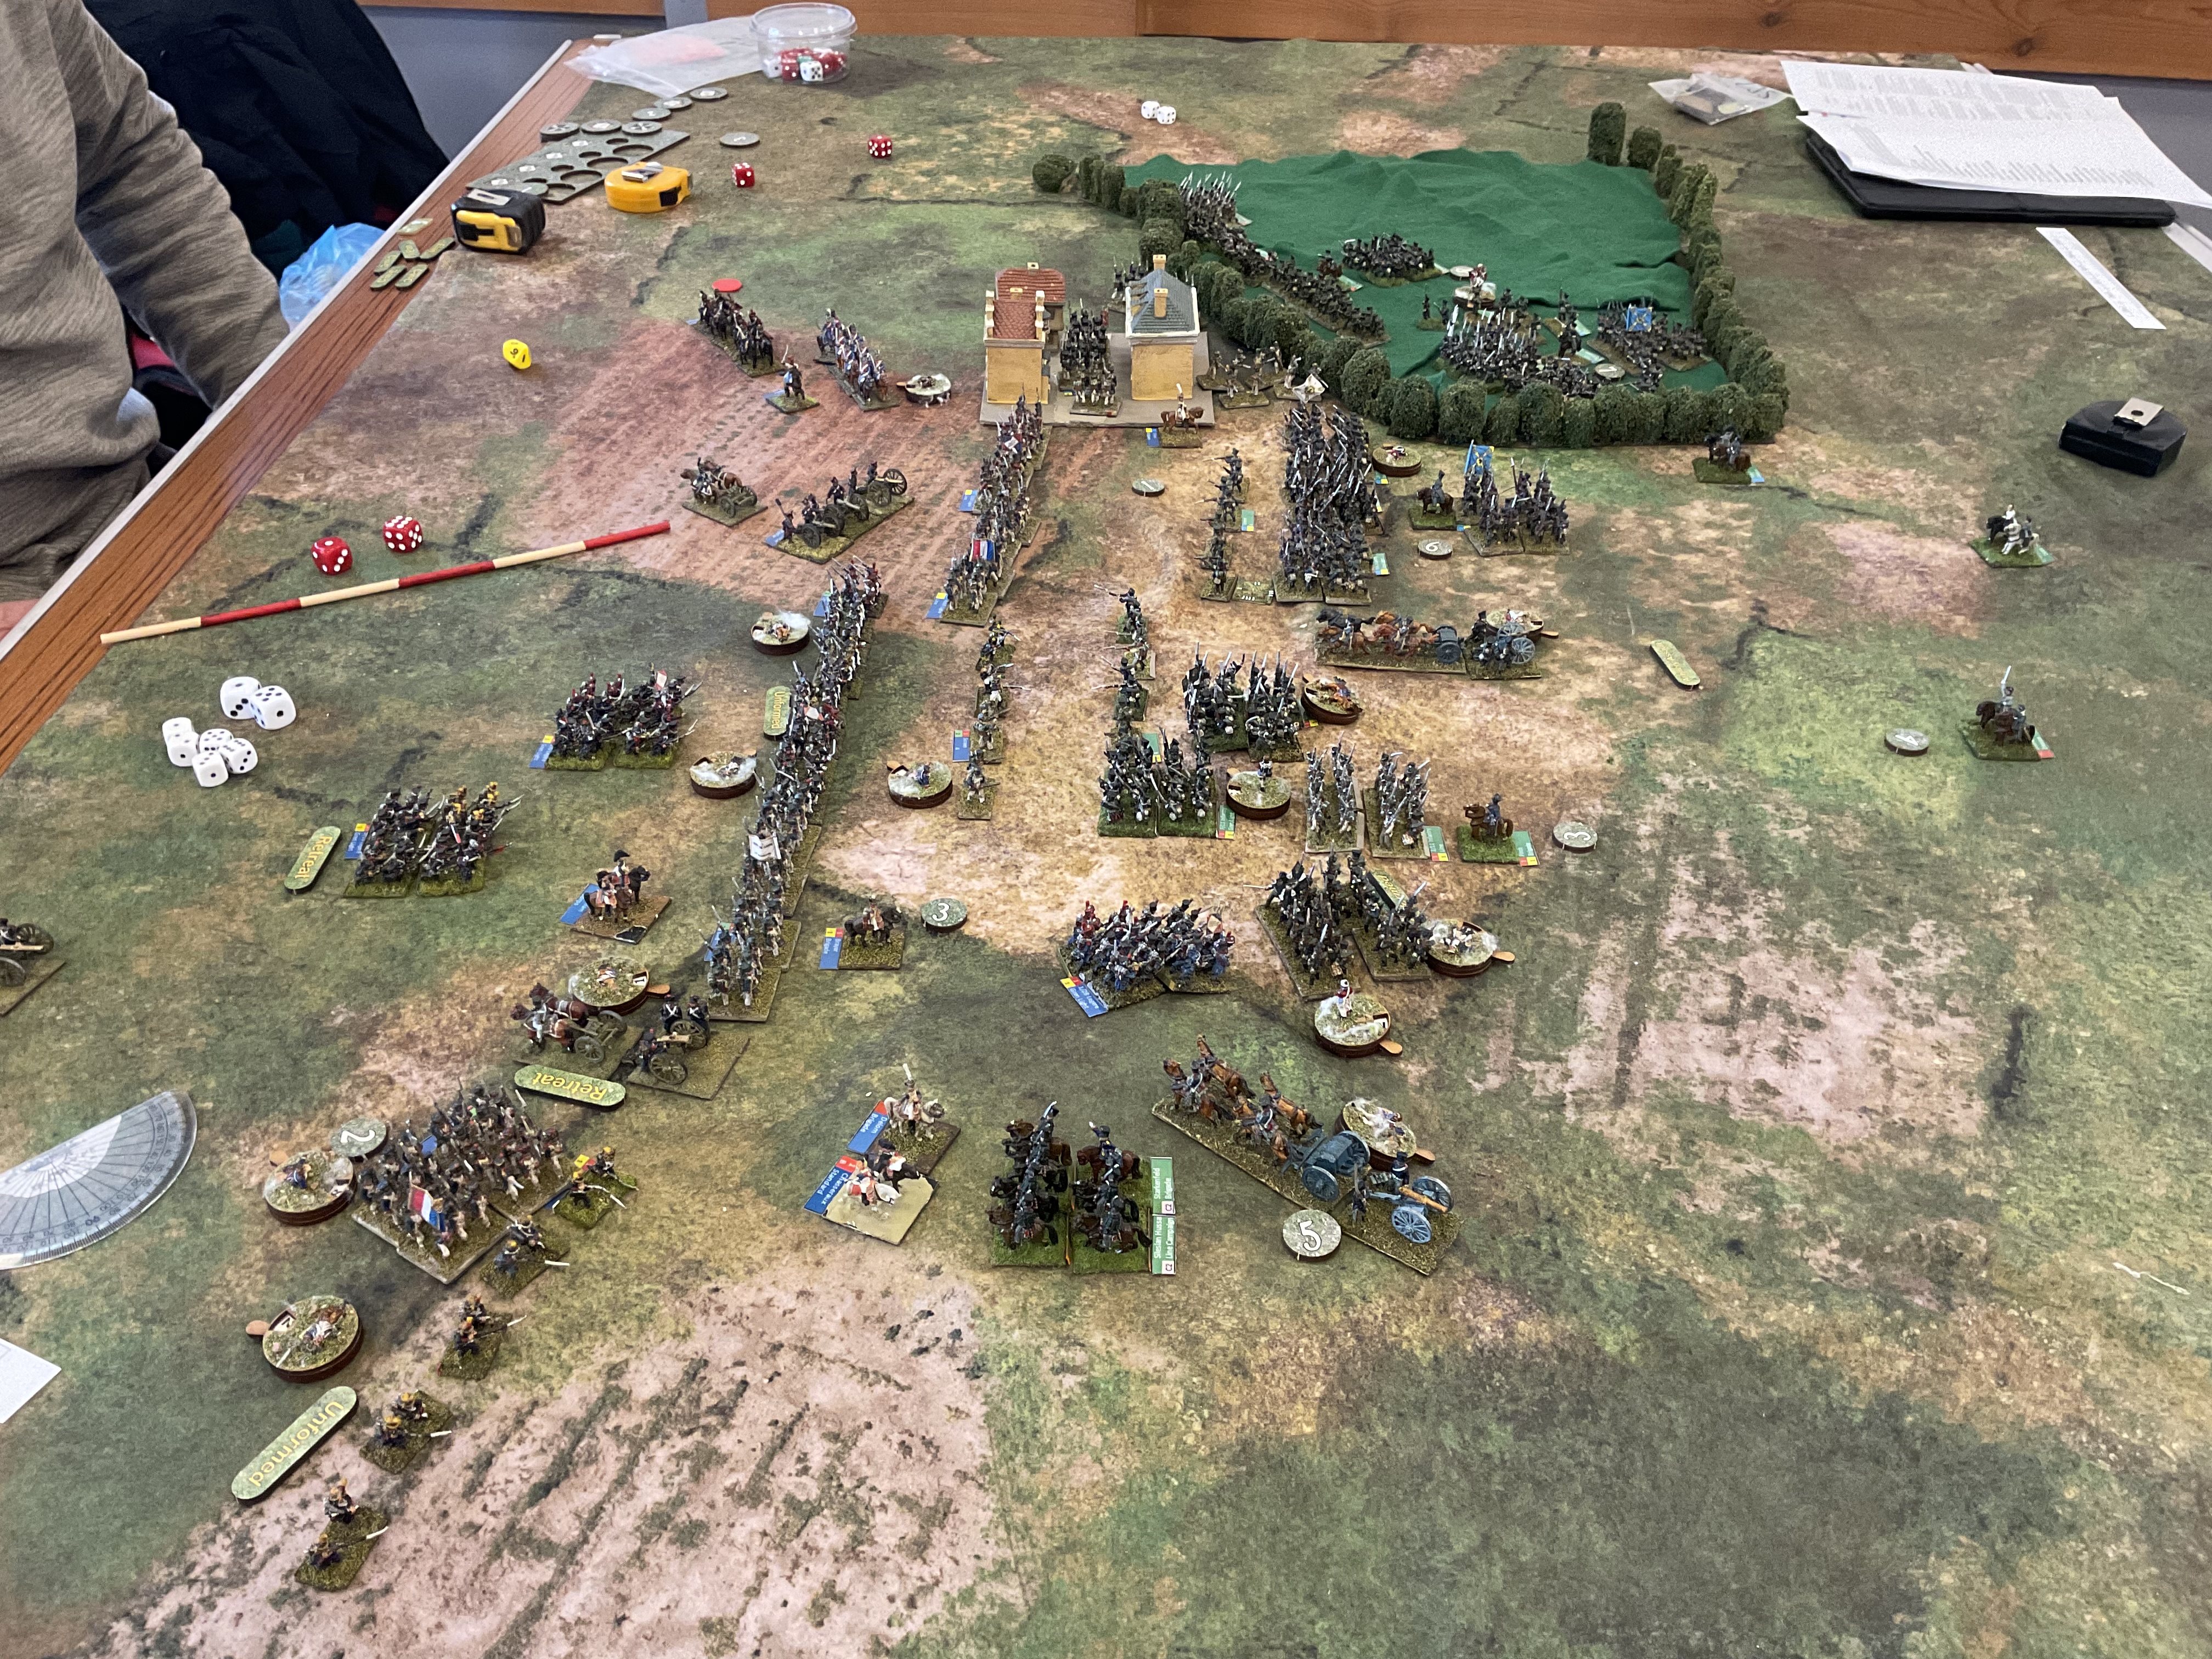
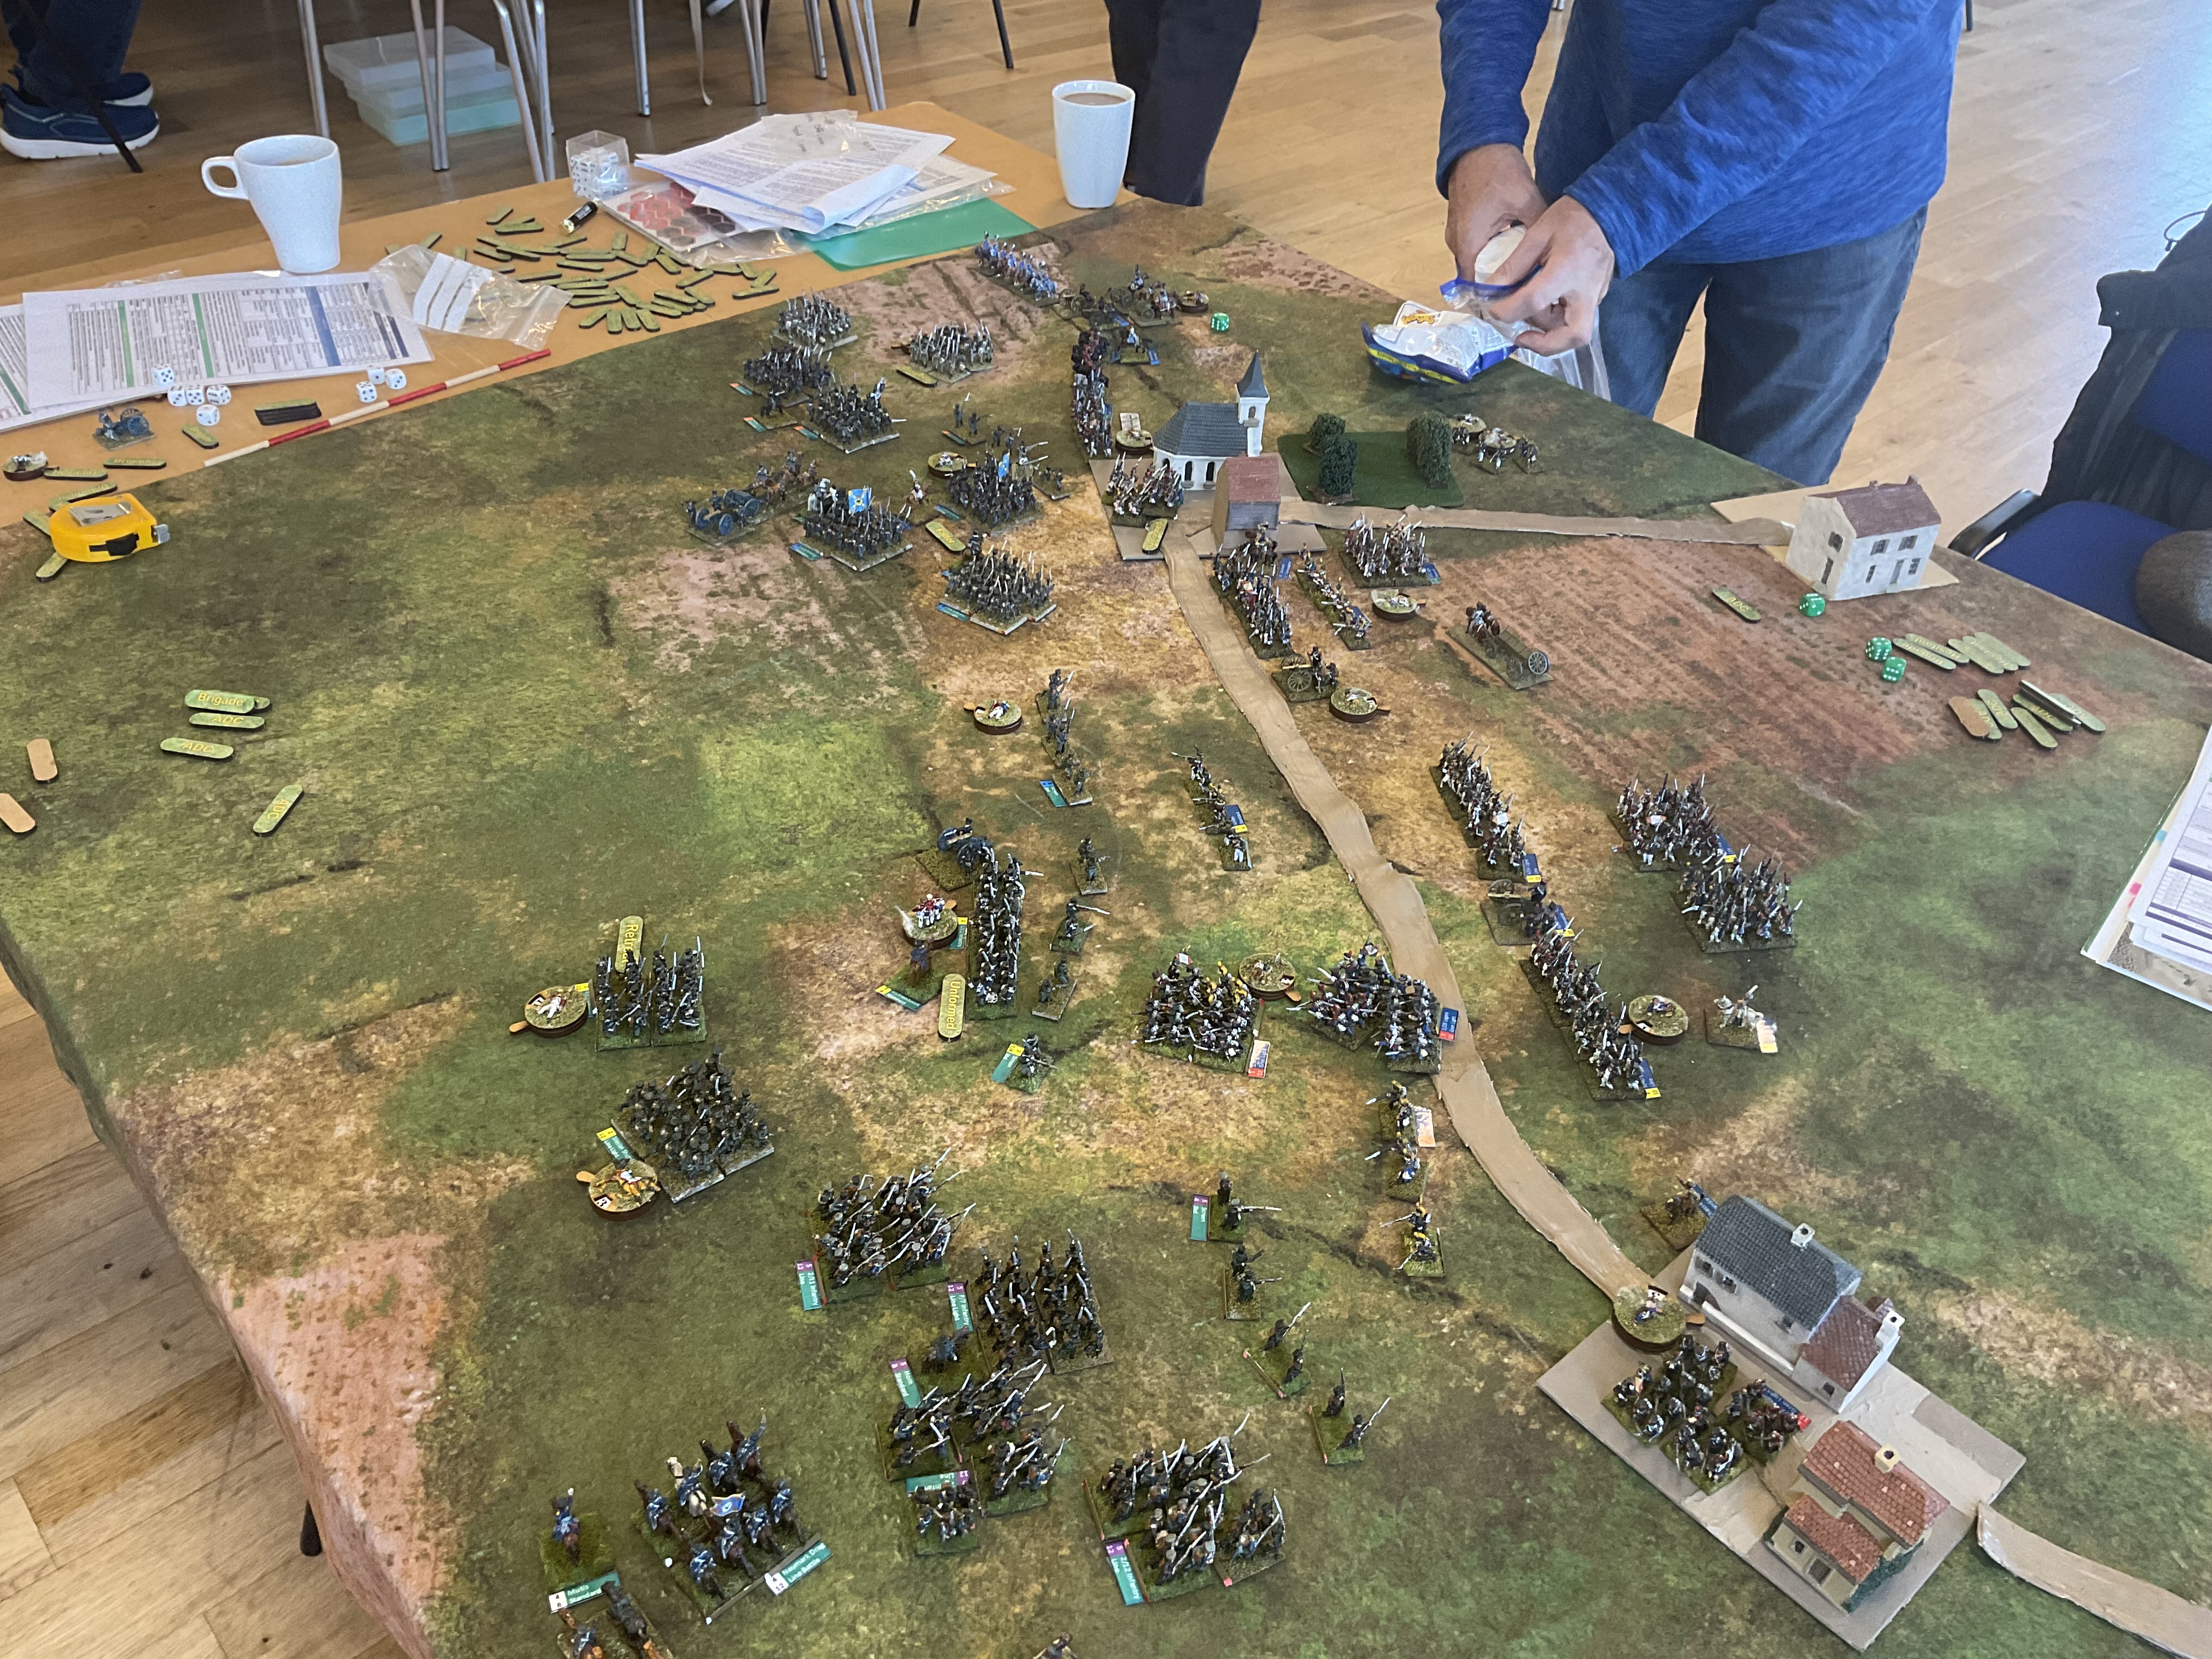
Our Lutzen game at the club at lunchtime – turn 5 I think. Prussians on the left.
Last weekend I got back to my club (Tunbridge Wells Wargaming Society) after a long break for a game of Général D’Armée 2 (GDA2). We attempted the shorter Lützen scanario in the GDA scenario book. We got as far as turn 7 after five hours of play of a supposedly 20 turn game. It was in fact clear by this point that the Prussians (played by me) weren’t going to win. Is it realistic to expect us to get through a scenario of this size in 6 hours – which I think is the effective maximum playing time for a club day? I need to know because this is not a big scenario by the standards of the GDA books.
How the game went
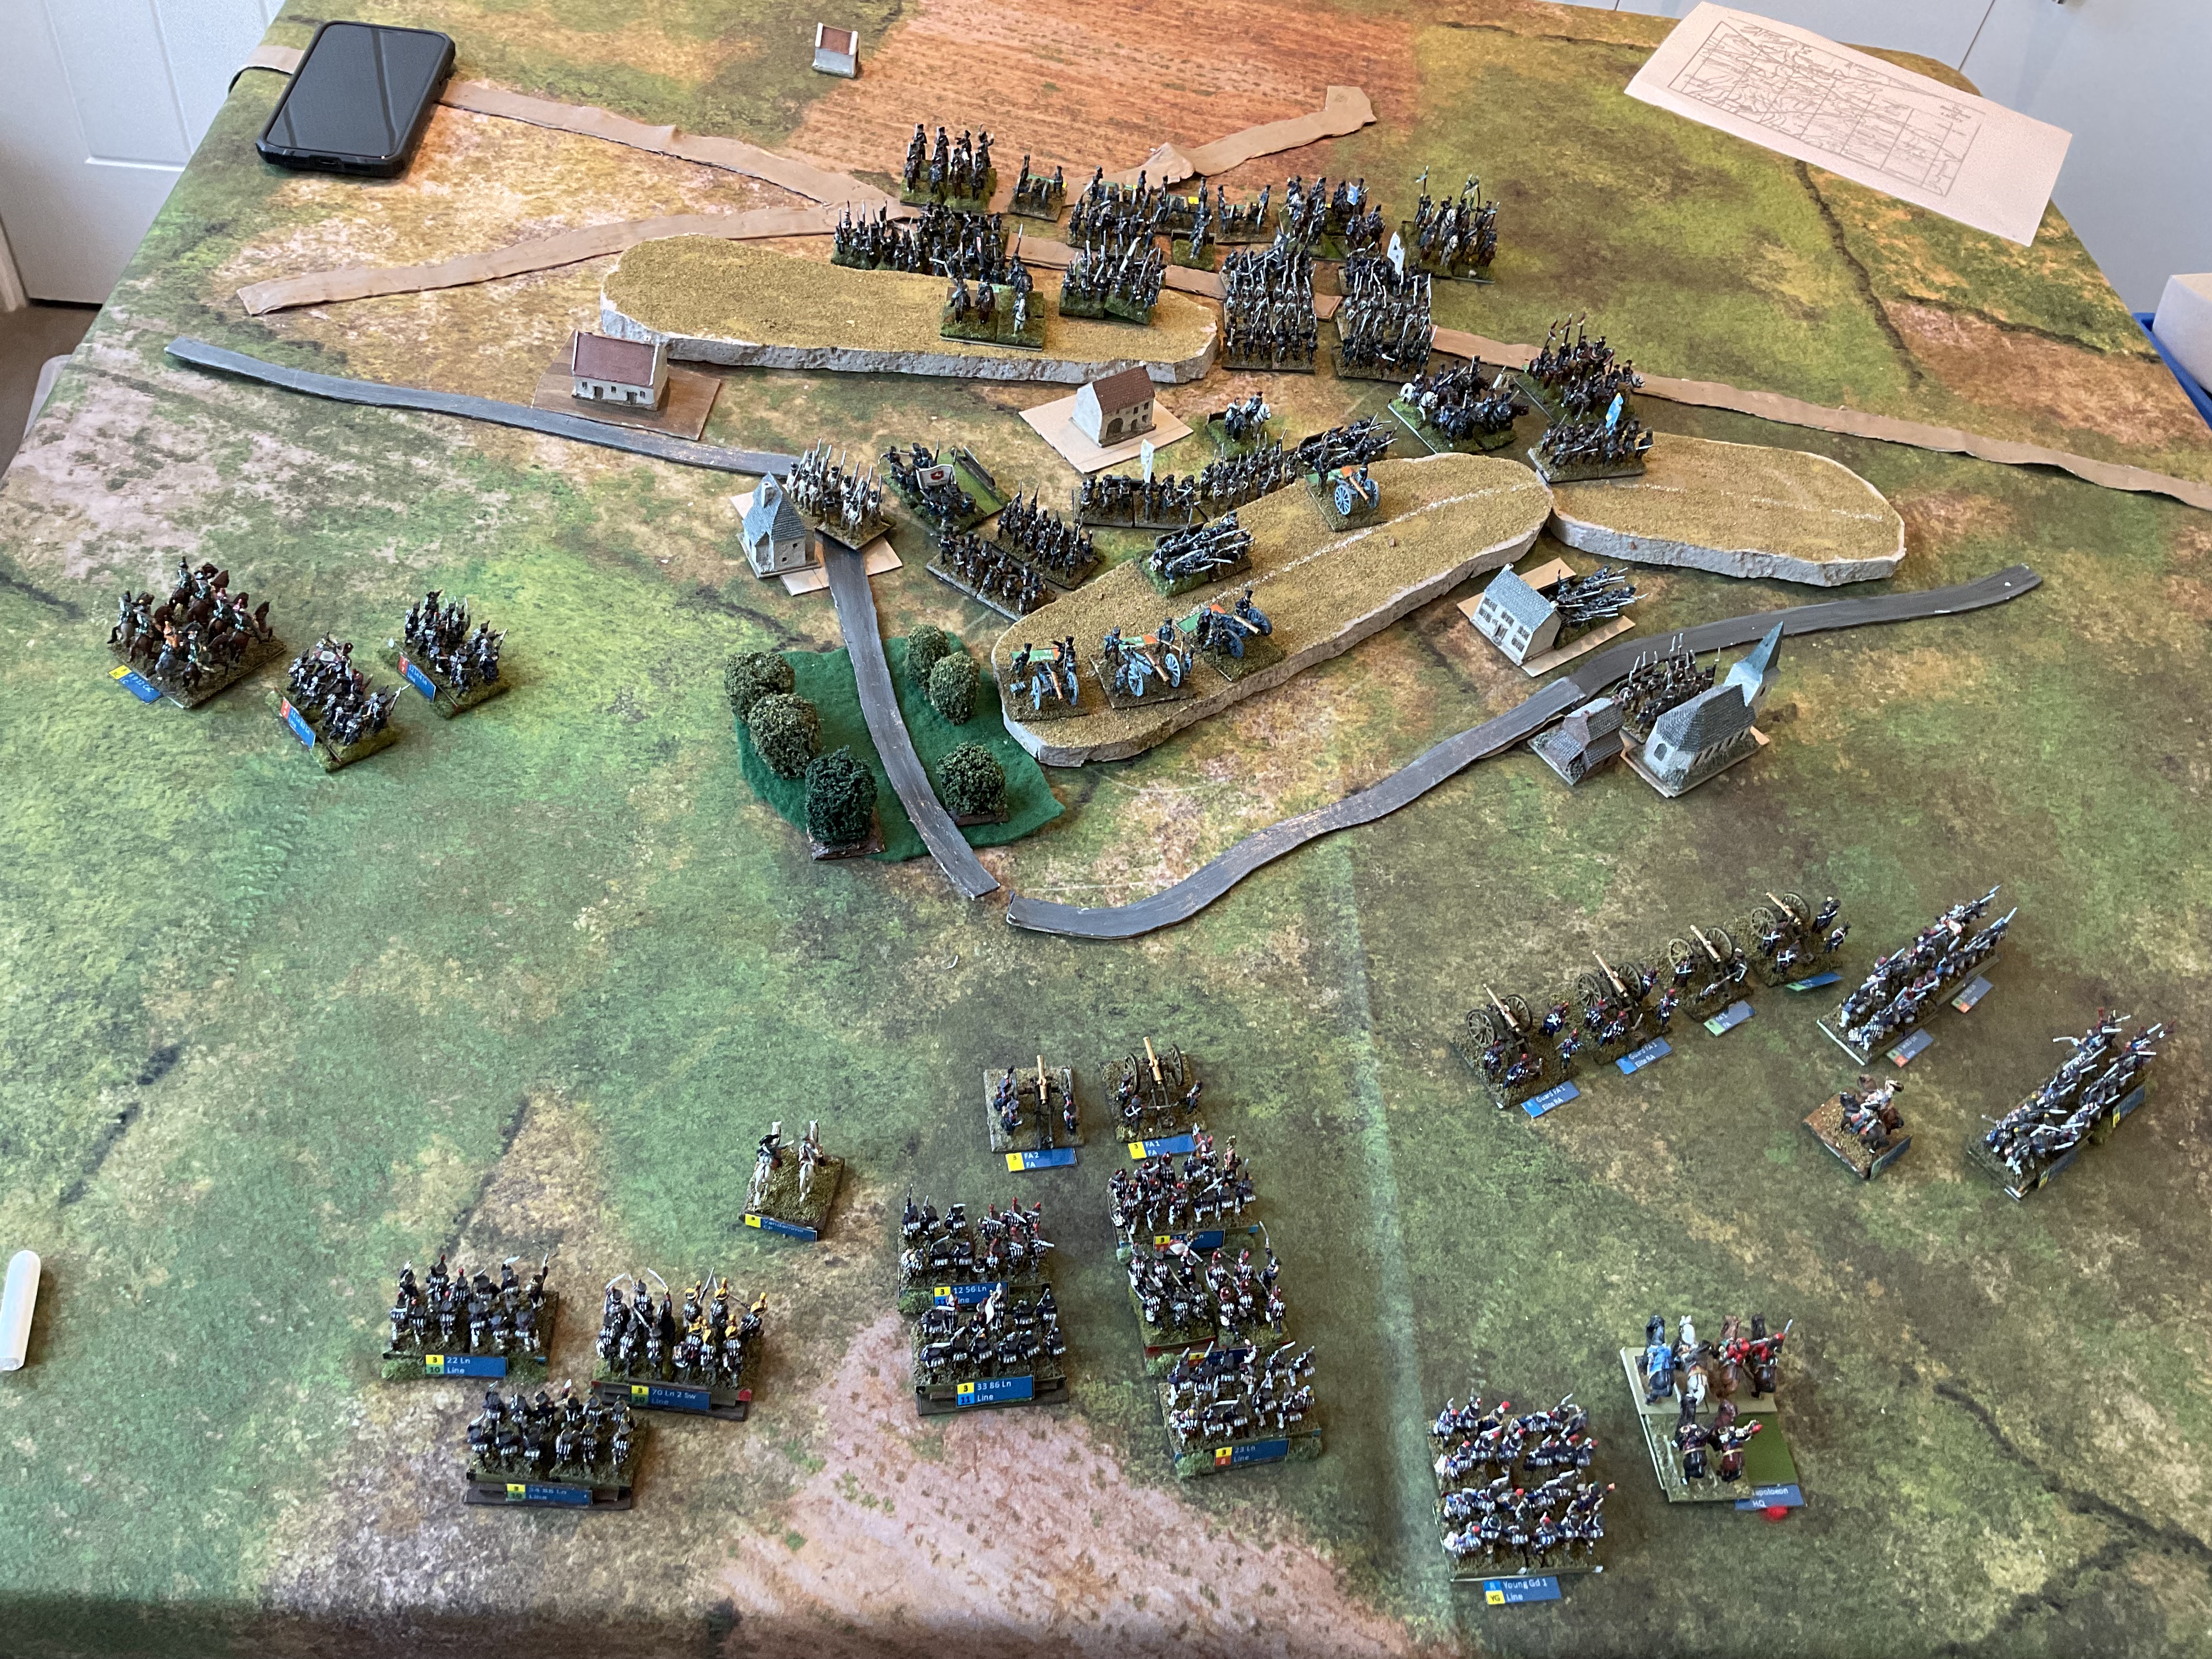
First a little bit of after action report. If you’ve been click-baited into this article by the title, then move on to the next heading. The French (played by regular club partner Malc)had four brigades of infantry, joined by a cavalry brigade in Turn 3. They had to defend four villages (three visible from the picture, and one off to the right) and an area of high ground (at the top of the picture). There objective was to ensure that no more than two of these fell into Prussian hands. He deployed one brigade each in and around each of the two forward villages, one in between and one as an off-table reserve.
My Prussians had three infantry brigades and one of cavalry at the start, with a further brigade of infantry arriving on turn 4. Alas I was meant to have a further brigade of cavalry, but I left it at home (along with a foot battery on each side, meaning that we had to represent each battery with a single base). The missing cavalry was two units that were supposed to be there at the start. I did bring the second brigade of one unit and one horse battery – and I deployed this at the start rather than wait to turn 3. My plan was to refuse my right and send two brigades to the left to take the high ground and village on the left (Rahna), with the remaining brigade to pin down the French centre. The cavalry covered the right flank. This plan proved defective – and Malc had correctly anticipated it.
On the left, my best brigade could not reach the high ground in time. Up popped the French cavalry reinforcements in that spot, pinning it down for the rest of the game. My cavalry was on the opposite flank and although I did redeploy it, it took too long to get it where it needed to be.
On the right my brigade ran into the fire of two batteries. At this early stage the French had plenty of of spare ADCs and so could afford Artillery Assault taskings. In the first turn they scored a double six each. After that the French artillery managed two or three 11s! The centre brigade reached the Rahna, but with one unit ragged from artillery fire. Stupidly I led the attack on the village with this unit, and it got destroyed in the attempt (more artillery fire on the way in, including one of those 11s). A second attack took the village; helped by the fact that the French were hesitant and could not reinforce the combat. But they were able to retake it the following move, when it was my turn to be hesitant. I decided to use my reinforcing brigade to shore up the collapsing brigade on my right (having been severely mauled by artillery fire), and to keep pinning the French brigades of right and centre. It did this successfully, even attacking the village (Gross Gorschen) on one occasion, but with little prospect of being able to take and hold the village.
And so we came to Turn 7. Malc had one entirely fresh brigade. All of my brigades were looking battered, with one on the edge of destruction. A final humiliation was the loss of one of my batteries (see below). The French brigade defending Rahna was getting a bit battered by now, but the others looked in reasonable shape, and I still hadn’t unpinned the brigade from the French cavalry, which was slowly being destroyed by the horse artillery. I had used both my CinC commands in a desperate attempt to keep the attack on track. I decided to throw in the towel. A throughly deserved French victory.
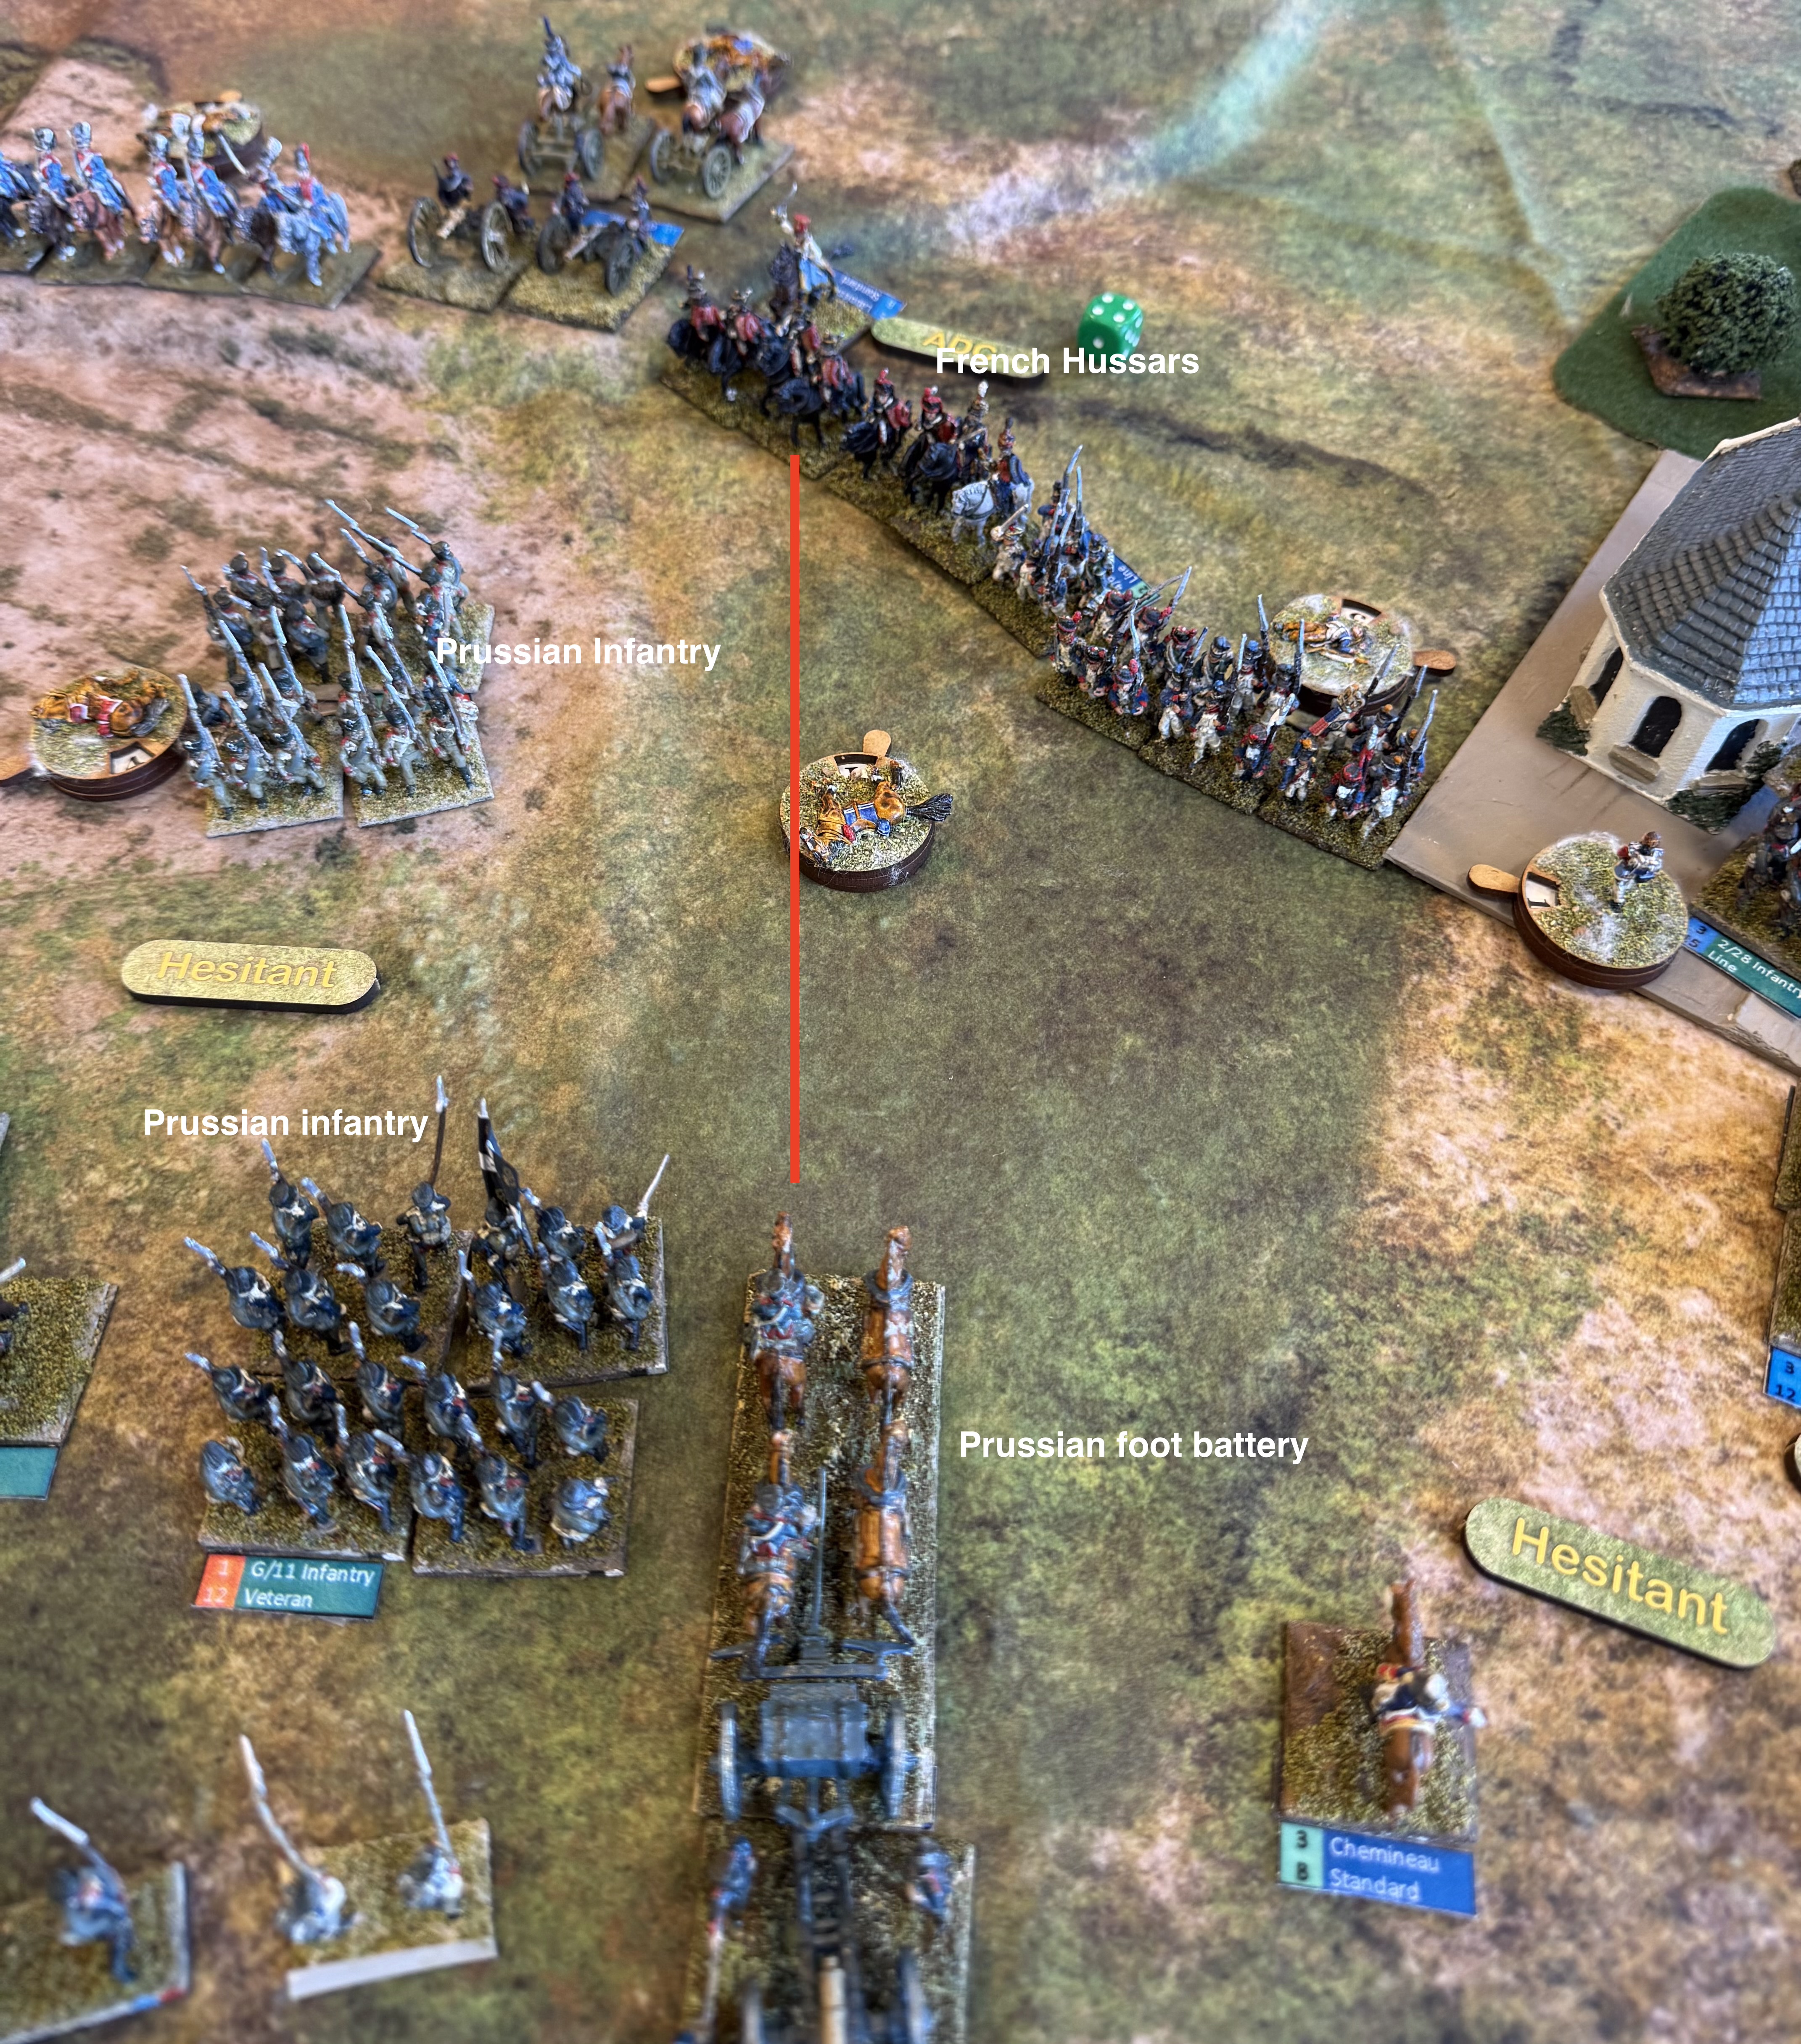
One item of interest, which I raised on the GDA Facebook group, is worth mentioning here. On turn 6 the French Hussar unit pictured below decided to attack the artillery battery I had brought up to assist the pinned brigade, but which hadn’t unlimbered. That was nasty because attacking an unlimbered foot battery means automatic dispersal. The cavalry went on to attack the Prussian column next to it, but this was beaten off with losses to both sides.
I decided this was legal, even though it meant brushing past a Prussian infantry unit in square at closer than 5cm. I thought that the rules said this could be done in a charge move – but I hadn’t read them closely enough. The only time units can get closer than 5cm to the enemy is in the final step of a charge, after reaching the 5cm point when the charge process is resolved. Thanks to FB group for setting me right! The FB group also suggested that the hussar unit could not legally manoeuvre past the infantry unit to its left. But I’m pretty liberal on such things, as I think there is more flexibility in practice – especially for cavalry which manoeuvred by squadron.
Making the game faster
This scenario is by no means large by the standards of both the 1813 and 1815 scenario books. So if I want to run these at club days we are going to have to get through them much quicker. A 20 move game needs to be do-able. First of all I will cover things that don’t involve modifying the rules.
One thing to do is have more players. We had originally planned to have a third member of our group, Rod. He would have taken charge of the Prussians, while I did the game mastering, perhaps assisting the Prussians a bit. We could easily have had two players a side with an additional game master. But I’m not sure how much faster this would have made things. At the start of turn everything focuses on the overall commander of each side; and the turn is structured into a number of phases which apply across the whole table, which means there would be quite a bit of waiting for players to finish. And more players ,more chat! But it would help.
Secondly, is to spend less time referring to the rules. I’m afraid that I’m a bit of a rules lawyer, and I really like to get things right. Many players prefer to keep things moving even if it means getting things wrong. And GDA2 is difficult to master in detail. I have written a summarised version of the rules to speed things up, but this isn’t all that helpful (though an excellent introduction to the rules). The things that I need to look up tend to be in the main book – and I found myself turning to this first. The index is a godsend. Still we were checking rules much less than in earlier games, now that I’m much more familiar with the rules. The FB group is a help here. I read the rule queries coming through there, and try to answer the ones if somebody else hasn’t got there first. And I do try to make decisions quickly at the risk of being wrong – as I was about the attack on the battery. I will think about doing my own version of the quick reference sheets (4 sides) which are notoriously hard for finding the bits you are looking for. But as a game master I need to focus on keeping things moving.
Another idea we actually implemented is to make the table a bit smaller. The scenario recommends that if possible the games should be played on a table 5ft deep and 6-8ft wide. We played on my standard battle mat which 4ft by 6ft (actually a little over). It helps that my bases are only 25-30mm wide, with four to a standard battalion. That means a standard battalion is 10-12cm frontage in line rather than the recommended 15cm. The game table wasn’t overcrowded. Since no adjustment was made to the move distances or ranges, this means things should happen a bit more quickly. And I think that was so – by move 7 it was quite clear how things were heading. That would justify knocking a few turns of the game length.
After that I’m running out of ideas. Movement sabots for columns might speed up pushing the metal around the table. I could do this relative discreetly since my bases have magnetic bottoms, so this could be done with a relatively thin piece of metallic card. Still I think bases are thick enough as they are, and sabots are usually a bit unsightly.
Fiddling with the rules
Now to consider moving beyond the pale to think about any house rules that might might things happen a bit more quickly. David Brown, the author, has done a lot of this for version 2 of GDA, and I think the combat mechanisms should be left alone. the troop quality system it could be simplified a bit, that is likely to be more trouble than it is worth. We’re getting used to the existing system fast.
Instead I want to think about making things happen more quickly at the command level, and in movement outside the combat area. I’ll tackle the second issue first. Both of these should reduce dead time and help battles get resolved in fewer turns – they won’t make the turns any quicker to resolve.
Moving reserves into combat can take quite a few moves, soaking up ADCs as you try to avoid the risk of hesitancy. This applies especially to attackers bringing in off-table reserves after having advanced deep into enemy territory. There is also an issue in moving uncommitted troops from one flank to the other, as I tried to do. I don’t think either of these was particularly difficult historically, and it’s a well known wargames design conundrum that troops more quickly outside the combat area than when you approach the enemy. At 2 mph troops could be expected to cover 30cm on the tabletop for the minimum turn length of 5 minutes; the column move distance is 15cm. When following an order to reposition, outside a combat zone, things should happen much more quickly.
My current thought experiment on this works for the Redeploy and Reserve taskings. Outside the combat zone (perhaps defined as 20cm from the nearest enemy troops, perhaps 30cm) troops with these taskings should be able to move faster – perhaps using the Forwards move rate, or simply double standard, or a fixed bonus of 20cm, say, provided units are in column or limbered. I think a road bonus could be added – to reflect their use as a navigation aid as they are too narrow to handle combat formations. The tasking is not removed at the end of the turn provided the unit is outside the combat zone. However it would still be subject to brigade command rolls, and would be lost if the brigade became hesitant. (This is actually similar to the current rule for Redeploy – though I’m not sure about losing the tasking if hesitant).
If reserves are deployed far from the front line, and the Reserve tasking or is lost because of hesitancy, then this can be replaced with a Redeploy tasking.
An alternative house rule is to allow reserves to be deployed anywhere on the table where there is a clear line of march outside the combat zone from the entry point. Where troops are forced to deploy in the combat zone, then they can do so deployed. But there would be no reserve movement. On reflection, this may be a better way of handling the reserve tasking as it is altogether quicker.
Command rules
Changes to non-combat movement amount to tweaks of the existing system. I next want to consider something much bigger, which will be beyond what most players of GDA2 will want to contemplate. But not all: because I know some people who have done this already. Iain from my old club, South London Warlords, explained this to me when we were involved in a big reconstruction of Castaglione played using GDA2 – though I’ve forgotten what he said his replacement system was! But it went to the point that I am now going to make.
The issue is the brigade command roll: this has a one-third chance of failing, reduced to one-ninth if you invest in a Brigade Attachment tasking for that brigade. This is often severely disruptive. In many cases it is entirely realistic. The brigade commander (incidentally I think the use of the word “brigadier” in this context is an anachronism – I suspect the word more usually referred to an NCO at this time, and certainly for the French, where it still does) might well get confused, or orders might get lost. But this is unlikely under the nose of his superior officer, and certainly not for more than one move in a row (a not infrequent occurrence in GDA). If the brigade was the divisional/corps commander’s focus of the time, then the brigade was very likely to do as wished. But Commander interventions are limited to two in the whole game. The rules don’t reflect this commander focus well. In any case hesitancy would be pretty obvious to the CinC in the relatively small battles in scope of GDA.
Let me digress a little at this point. The Napoleonic (and Revolutionary Wars) era was a period of command transition. In the earlier 18th century command was focused on the commander, who would array his army in one or more lines. Junior officers were expected to hold their place in the line until ordered to move by the commander. The commander would take himself to the main locus of the action and take control there. The classic pattern was Frederick the great’s “oblique order”. The commander would start on one flank and progress towards the centre as the battle unfolded. Nothing much would happen on the opposite flank unless the enemy was able to seize the initiative there. The best Napoleonic example of this was Wellington at Salamanca. Wellington’s command model was very much in this 18th century mode, though he adapted it with an intermediate divisional command instead of the inflexible lines of battle.
Roll on to Bismarck’s wars of the later 19th Century (and maybe the American Civil War or the same era – but I’m less family with this). Here the battlefields were vast and a delegated model of command was in operation. The role of the battlefield commander during the battle was limited. His main contribution was to plan of battle the night before and issue orders to his subordinates. Battles could get very muddled. We can see this devolved model developing in the Napoleonic era. Napoleon’s marshals had wide discretion when Napoleon was not breathing down their necks. In my view the most developed example was the Allied armies of 1813/14 (especially Schwarzenberg’s Army of Bohemia) – battles often turned on intermediate commanders using their initiative, while central command looked distant.
In wargames terms the best way to reflect the old model is Phil Barker’s PIP system – players get a variable allocation of PIP points which they allocate to junior commands, with those further from the commander model being harder to allocate to. No PIP, no movement. The new model is best reflected by the Fire and Fury system developed for the American Civil War, and used in Chris Pringle’s Bloody Big Battles for Bismarck’s Wars, where junior commands are subject to activation throws (called movement throws) to see if they move, and the commander has little influence over this. GDA uses elements of both: ADCs are its version of PIPs, but the brigade command roll is like the Fire and Fury movement throw.
But GDA2 games (in spite of their name) reflect smaller battles between extended divisions – so their model should be closer to the commander-centred one – which in any case was far from dead in bigger battles. So how might the rules be tilted to reflect this?
My thinking revolves around a more active Commander. The commander model can be placed with any brigade, which automatically then operates under orders, and may take on one or two taskings (two would cost an ADC). Perhaps there would be a distance restriction for moving the model around between brigades at the start of the move. ADCs and taskings would be issued to other brigades as usual. But the very powerful CinC commands would disappear. That would be a pity as these add a lovely touch of drama. They might be used to represent the intervention of a more senior commander on the field – but if so they would not be under the complete of the player. Also something on the Destiny table should knock out the CinC figure for one or more moves.
This needs more thought. One idea might be to use an event card system – cards drawn at the start of the turn might allow a senior officer intervention (i.e. CinC command), take the CinC out to deal with staff, comms or intelligence tasks, and perhaps other events. There also needs to be some mechanism for allowing for the difference between more active and passive generals.
This all needs a lot more thought – but I thought I’d put it out there!
The French mass for the attack on Ligny – this is the trial set up at home
My most recent club game was a “small Ligny” – excluding the action on the eastern flank, and the final commitment of reserves by Napoleon. This was not in fact a serious refight – the main aim was to familiarise ourselves with the Horse, Foot, Guns rules, which we are due to use for a “big Waterloo” game (including Wavre and Grouchy) in a month’s time. This latter game, put on by somebody else at the club, promises to be very interesting. We will use 2mm troop blocks with the lovely Ferraris map as the playing surface.
Still, Ligny (two days before Waterloo in 1815) is an enduring fascination of mine. I want to do a full version of it using my own rules – and a “big Ligny” too, incorporating Quatre Bras. It is a very demanding test of a grand tactical rules system. To date I have tried Blücher and my own adaptation of Bloody Big Battles; both failed – the French didn’t stand a chance. There are two big challenges: fighting in the villages, and Prussian command and control, where the two and eventually three corps became intermingled, and where the (division-sized) Brigades were sometimes broken into pieces ad-hoc. How would HFG do?
The game in progress with Gerard’s division attacking Ligny village in the foreground. Chateau Ligny is on the wrong side of the stream…
We used my own version of HFG, which I produced nearly 10 years ago – as the original’s scope was too wide (1700-1910, naval support, etc.) and densely-written (by Phil Barker of Wargames Research Group fame). These were designed to work with my basing system. I felt it would be easier to use these rather than the originals, which were slightly updated (V1.1) since ten years ago. I fought two battles with the system (Waterloo and Salamanca – both described on these pages – search for HFG) before moving on.
Each element was about 2,000 infantry, 1,200 cavalry or 20 guns. The bases corresponded to French infantry brigades or cavalry divisions – with a couple of extra bases for Vandamme’s corps. For the Prussians I used one element for each regiment – though in practice they mixed the regiments up. On numbers they should have had a couple of elements more – but the OB I was using did not account for losses at Gilly the day before, and I gave them an addition of Chateau Ligny as a strongpoint, without deducting anything for the garrison. The landwehr I graded as inferior, but all other troops on both sides were standard. This is a bit generous to the Prussians. The French were probably better quality in general, and some of the newer Prussian regiments were not tip-top, especially where they represented elements of different formations thrown together. Still HFG has only three quality grades, so fine-tuning was not possible. Elite would have been reserved for the French senior Guard (at Ligny, but not on my table). For the Prussians I got a lot of pleasure from using my collection to get figures closely approximating the actual regiments in 1815. The French were my hard-working 1809 miniatures, so not especially realistic.
The board was thrown together quickly. The playing area is just 3ft by 3ft. It was thrown together very rapidly from elements that I had in stock – the hills in particular only vaguely reflect the actual terrain. Ligny brook was treated as an area of slow-going. Ligny village was treated as two built-up ares (BUAs), separated by the brook. St Armand was treated as parkland/orchard (slow going, cover from artillery, but otherwise limited impact), with Longpré, where most of the fighting on that flank took place, was treated as a single BUA. I used my new Geek Villain “Field of Glory” battle mat – which was glorious, in spite of not being to scale. I used 6mm buildings, as anything bigger doesn’t work at this very compact ground scale. I shouldn’t be using 18mm miniatures – but I’m not building 6mm or 10mm armies up from scratch! There is more than even the usual disconnect between figure and ground scale (but if that’s all right for Rapid Fire!…).
We played for about 3 hours, packing up for the club AGM, which took place at 2pm. I wasn’t counting the number of turns. HFG turns represent a short time interval (10-15 minutes), so there are meant to be lots of turns, but it was inevitably slow at first. We only really got as far as the opening stages of the battle. The French, played by Malc, massed all their artillery in the centre, and proceeded to drive off the outnumbered Prussian artillery opposite. Meanwhile Gérard”s corps tried to pile into Ligny, Girard’s division into Longpré, and Vandamme worked round the French left, eventually joining the attack on Longpré. The Prussians, played by Rod, gradually moved their second line – from Pirch II’s corps – round to the right flank. Gérard repeatedly tried to break into Ligny, and only succeeded in the last move before we broke up. He only lost one element – but not to the fighting in the BUA but to a single Prussian artillery battery posted on their left, out of range from the French artillery. It was the only destroyed element on either side during the game.
Girard and Vandamme’s attacks on Longpré were just as futile, and never broke in. Given that historically the French did break into both places fairly quickly and then started a seesaw battle, sucking in almost all the two Prussian corps’ infantry, this didn’t seem to be reflecting history. It was also rather dull and slow game play. HFG was not a good system for this battle. A more appropriate trial game would have been smaller and on more open terrain.
On the two Ligny problems, I don’t think HFG handled the first (BUAs) at all well. Part of our problem was unfamiliarity with the rules. In HFG there are two phase of combat: “firing”distant combat” and close combat. Infantry can’t move into close combat without starting from within firing range. When attacking BUAs this initial firing combat is critical, and the defenders start with a big advantage. It’s important to get this right, or otherwise your attack won’t get to the close combat stage – which is also at a significant disadvantage unless you can get a “silenced” result in firing combat. If the French had got this sequence right, they would have done much better at Ligny – not so much at Longpré.
Still I don’t think the rules capture Napoleonic BUA combat well. Fire combat before the sides closed was not important historically. In practice defenders could only mount skirmish fire at the edges. Most of the combat in the interior took place in the streets, without much cover. There was a lot of close-quarter fighting with little or no advantage to the defender – unless they could organise on a strong point with a secure perimeter, such as a churchyard (and even then this usually needed to be prepared in advance to be properly effective). The rules seem to framed for later 19th century warfare, with far more effective firearms, and where soldiers used the local cover to much better advantage.
On command and control the rules did pose a challenge. The corps commanders were “command parties” which were mobile but only have a small command radius. Army commanders can’t give direct orders to units not under direct command. With Prussians’ large corps this made it hard going. That wasn’t unrealistic – though historically the battle was controlled by the army command, with the corps commanders having only a limited role, it ended up in a similar place.
Another thing to learn from the rules is that because the turns represent a short time period, you can be patient, building your position before launching an attack, and using long artillery bombardments (five or six turns, even).
My earlier criticisms of HFG stand, however. The biggest of the is that it doesn’t capture attritional combat well – the gradual wearing down of armies. It is a low-probability/high impact system, which I don’t really like, though this works better the armies and timescale. The fact that both sides must dice for each combat and add up combat factors slows things down, though this speeds up with practice; this matters when you need to get a lot of turns in. Although I can think of ways of improving the system a bit, I’m not investing in it – I’m going a different way.
The journey on my big battle rules continues. I got quite a long way with a new activation system inspired by Lasalle II on my BBB-based system, but I realised this was not going to work in the multi-player games that I want to play. Instead I’m working on some other ideas:
Instead of multi-based units in contact, in formations analogous to lines and columns (following BBB), I want to try moving each base as an individual element – a bit like HFG, except that the elements are smaller (say 1,000 infantry rather than 2,000, with a 30mm frontage rather than 50mm), and each subject to damage before being removed. This follows Bruce Weigle system for his 1870 series.
I want to use a card system for quick resolution of morale. A bit like the Twilight rules, combat will be resolved by alternating morale tests.
I’m thinking of using a card system to drive the turns too – but this is undeveloped in the Napoleonic context. The central idea is that all moves are standard (say 6in), but not all units can move every move.
My idea is the develop a series of systems with common elements to cover WW2, Bismarck’s wars, Napoleonic and the Great Northern War. I’m close to testing the WW2 system, and I am thinking of moving to Bismarck’s wars next. Meanwhile for Napoleonics I’m playing very enjoyable mid-sized battles with Général d’Armée 2.
GDA2 uses a lot infantry miniatures. Fifteen or more battalions on the table is commonplace, and often more in their scenarios, and there are 24 figures in each one on my basing system (not counting large battalions). I didn’t have enough Prussians for some of the 1813 or 1815 published scenarios – except perhaps using some Landwehr as line infantry. I have similar problems for the French, where I have had to use Guard units in the line. So I needed reinforcements!
My immediate focus was on the GDA Lützen scenario. For this I needed lots of bog-standard Prussian line. Four regiments were involved (two Silesian and two West Prussians), with up to four battalions each and 13 altogether – plus two battalions of grenadiers and one of Silesian Shützen. And that’s not the full game size – though I doubt we will ever play the extended variant with another 3 battalions of late reinforcements. I have but three battalions of standard line infantry (from the 2nd, Pomeranian, regiment). In addition I can rustle up seven odd-looking battalions from the 1815 new regiments – previously reserve units (plus 8 Landwehr) – and I had a couple of bases of Silesian Shützen.
My plan was to put together another six and a half battalions. Four of line infantry – painted as the 2nd West Prussian regiment – and two of grenadiers (West Prussian and Pomeranian) and an extra couple of bases of Shützen. The line infantry and shützen I could cobble together from Old Glory figures in my lead mountain, with a few AB officers which I also had in stock – which would leave me with only a handful of unpainted Old Glory figures. I bought the grenadiers and some extra skirmishers from AB. AB do them in campaign uniform, without the fancy shako plumes – but with a couple of details different from line infantry, like badges on the cartridge box.
This project is especially significant because I bit the bullet and decided to change the basing. Until now my infantry (and cavalry) have been based on 25mm squares (and skirmishers on 25mm by 15mm bases). I decided to move them to 30mm wide, with the same depth. The tipping point was the decision that in my future grand-tactical rules I would articulate the bases individually, rather than forming them into lines and columns like individual battalions. When a base is on its own it looks a lot better as an oblong, so you can see readily which way it is facing. The difference is not so great that I can’t use them alongside my smaller bases: indeed a I have some British units, bought from a friend, on 30mm squares, which I have used successfully co-mingled. A second decision was to use pre-cut MDF bases (bought from Pendraken) rather than cutting them myself from thin cardboard. I use these bases on my smaller scale figures (6mm and 10mm) for ease of handling, and I have decided that the thicker bases aren’t so bad visually. The handling issue still applies, and the cardboard can warp.
This first picture shows the 1st and 2nd battalions of the 2 West Prussians. Each line battalion comes with a skirmisher base, and to these I have added a couple of bases of volunteer jagers. The 2nd West Prussian regiment actually contributed little (one or two battalions out of a possible four) to the Lützen order of battle for the GDA scenario – but I already had the flags in stock.
Next come the Fusiliers and the 3rd battalion. The Fusiliers count as a light unit for GDA purposes, so I did five skirmish bases. When fully deploying the unit my plan is to take off two bases from the main unit and put on four skirmish bases; this is not in the rules but has an almost identical effect. The 3rd battalions of Prussian infantry were only used at the start of the 1813 campaign. After Lützen they were folded into the other battalions. However, since all my 1st and 2nd battalions are standard sized, I can use bases from this unit to make them into large units (and the Fusiliers too if I just add a single base), typical of 1815, and even later in 1813.
And finally the grenadiers and shützen. The Pomeranian grenadiers are in the front rank. I chose this regiment rather than the Silesians (who were actually in the order of battle) to match with the Pomeranians I already have. Also there was Frederick the Great’s quote about Pomeranian grenadiers. The AB figures are lovely, and a cut above the Old Glory ones (though these are not bad – and quite characterful). The shützen are a combination of my old two bases, rebased and touched up, and two new ones. Likewise with the skirmish bases (where as a light unit, they get five – plus I did three bases of jagers for the other regiments). They integrate pretty smoothly, though getting them off the old bases, covered in static grass was less straightforward.
Doing seven units of infantry as a single project was easily my biggest at 18mm – but I it felt necessary to get the troops table-ready in reasonable time. I based and primed the units all together. I then did the basic painting by individual unit, so as to be able to see progress more easily. After the first four units, I finished the bases and gave them the final coat of varnish/wash for the ones completed so far. I then moved on to the final three units. Because I thought the wash dulled down the white webbing and the white/red facings a bit too much, I did this earlier in the process for the second batch, and did the final paintwork (the webbing, facings and metallics) in one big batch afterwards. I also did a little highlighting on the first batch to lift them a bit – including on the flesh parts, which looked a bit dull. I’m no expert at highlighting (getting the right weight of paint on the brush is a real skill) so I don’t think this added that much.
Incidentally the wash is one aspect that I have been experimenting with. This time I mixed a bit of sepia acrylic ink with acrylic airbrush matt varnish (from Liquitex). I have used black ink before, and found it a bit too strong. The sepia is better, and the finish of the varnish (if properly shaken before use) is exactly what I want. As I said, I still think the figures needed final highlighting – but this is not a big job.
How about the new bases? I’m not a total convert. The figures still look a little loose for close order infantry to my eye, especially in the “march attack” pose. When posed advancing with lowered weapons (only the shützen this time), and the ranks slightly offset, then the extra space works. For the light infantry I did try to offset the ranks, though this is barely visible. However, by modern wargames standards these units still count as densely packed, and the wider bases do look better on their own.
The first batch of units were finished in time to take part in one of my club games, mixed with my older units. You can see from this excerpt:
The shützen are on the front left; 3/2 West Prussian is the right of the limber (which is from the artillery batch described in the last post). There’s no problem mixing the two. But the big question lurks: do I rebase my old units? Not for now.
My Prussian lead mountain is now substantially reduced. I have some packs of AB Landwehr that I will paint up as Silesians. I have a couple of AB cavalry units that I don’t really need but would look good. My next Napoleonic project is French infantry reinforcements: six battalions in late uniform, including two of Young Guard.
My new 1815 Prussian artillery and limbers – on my new Geek Villain Fields of Glory mat.
Apologies for the long silence on these pages. I’ve been quite busy. In 2025 I’ve had two games of Général d’Armée at the club, one with my figures, and one based in 1800 with a fellow club member. I’ve been working on some new ideas for my WW2 rules, some of which I will apply to other periods. And I’ve been busy painting reinforcements for my 18mm Prussian army for 1813 to 1815. I’ve also revamped this website, though not so sure about how much better it is. Today I am going to describe my new Prussian artillery an d limbers; next time it will be the turn of seven battalions of infantry.
I started with the artillery, not because I had any special need for my GDA2 games, which are not intensive of artillery, but because I had been planning this as part of my Ligny project – for which I will use my own grand-tactical rules – which use a lot more artillery models by comparison. I had gone as far assembling all the figures and models ready to complete this aspect of the project a year ago – but then got distracted. I actually finished this in January, but not got round to photographing the results – I am actually a bit vague about what I did! There are ten bases of deployed artillery – three horse artillery, two heavy artillery, four field artillery and one howitzer. In my system I denote horse artillery with two-figure bases (and the howitzers too), field artillery with three crew figures, and heavy with four. The historical batteries were all the same size – 8 guns. In addition I painted eight limbers – three with two pairs of horses, and the rest with one.
The first image shows the heavies on the left and one of the field batteries on the right. The figures are all AB – much nicer than the Old Glory ones I have been using before. The 12 pdr pieces are also AB; the one on the right (in paler blue) was not painted in this batch, but left over from before. The 6 pdrs are Blue Moon – these are chunkier than the AB ones, and I’m using them for foot artillery. Apparently there was a bit of variation in Prussian artillery in use.
The next picture shows three horse artillery bases (far left, and both on the right) and the howitzer. The base on the left is meant to represent a battery from the Lützow Freikorps , which was still wearing the old uniforms in 1815. These are old Battle Honours Austrians with head swaps from Old Glory Prussians. Nothing very impressive, I have to admit. All the artillery pieces are from AB, with the howitzer in the lighter colours of my earlier batch. Incidentally I replaced the howitzer barrel with one from a Battle Honours Austrian 7pdr howitzer, and the AB one appears to represent the heavy 10-pdr howitzer.
What to say about the techniques used? The bases were cut from some packing plastic that I had lying around, after trouble with cardboard (even mount board) warping on bigger bases. They worked out in the end, but the material is too flexible and not very easy to glue. I needed to fix the magnetic material on the bottom early, and cure on a steel surface to make sure they were flat. In future I will use polystyrene plasticard – more expensive but more reliable. The figures were finished in the fast-drying oil medium I have been using before, with some raw umber mixed in – but the result is a little too glossy for my liking. Next come the limbers:
I have used Blue Moon Prussian heavy limbers and limber horses (with riders) for the foot artillery. The two horse artillery limbers – at the left end, are Minifigs – whose more dynamic pose works better for that arm (though I’m not a fan). AB limbers are works of art but fearfully expensive. For bulk buying wargames use Blue Moon are a much better source. If I didn’t have substantial numbers of Minifigs horses and riders already in stock (from more than a decade ago when the choices were more limited) I probably wouldn’t have used them. To date almost all my limbers have been with a single pair of horses (which would only have been used for manoeuvring – two or three pairs was the norm for normal use) – this because I was worried about the table space they would take up. This is not an issue for GDA2 games, so I have introduced a few larger models with two pairs (though without any attempt to represent the tackle).
I tried a new technique for the horses. I built up the colour in thin glazes of acrylic on a white base, using acrylic airbrush matt varnish as the medium. I thought this might give the horses the more luminous quality I have been searching for. It was a lot of faff for not especially striking results. I will be back to oils next time – have picked up one or two ideas from Yarkshire Gamers’ You-Tube tutorial. The horses will need a bit of touching up – in the hurry to finish I forgot the white markings. Looking at the photo I also notice than one horse doesn’t have the tackle painted.
The bases were covered in my usual sand and acrylic medium mix, coloured with white and raw umber for a pale dried mud colour. This is then covered with a mix of flock and sand to give a rather paler green-beige ground that in my earlier efforts: dark bases don’t show the miniatures to best advantage. Though the strong PVA adhesive I use to fix the flock mix is pretty good, I still felt that it could do with fixing with a mix of PVA and water. I thought mixing a bit of raw umber paint in would help bring out the texture. Disaster – the paint made the bases too dark. I tried rescuing with a bit of light brushing with beiges and lighter green. The result is OK but not great.
That may finish my Napoleonic Prussian artillery for all time. I have lots of it.
Situation after Turn 1. The French are attacking from the left and have just got their cavalry across the stream at the far end of the table
This game was a bit of a landmark for me. It was my fourth game played with Général d’Armée 2, and the third at my club. We played it to completion (we had started the 13th move out of a possible 14 when we decided the French had won), giving not much more than 20 minutes a turn. This is the sort of fluency I have conspicuously failed to achieve so far. It was also the first game I have played based in 1813, rather than 1815. The system is now firmly established as my favourite for Napoleonic games, and I’m still happy to play it virtually without modification.
I have been taking GDA2 games from the published scenario books (though these are designed for GDA1). These may be a bit questionable historically, but they have been designed as playable scenarios. Having played the Gilly scenario from the 1815 book twice, and not ready for the much bigger St Armand or Planchenoit, I thought I’d look at the 1813 book – the other period when I can field my late war Prussians against the French. The first scenario in the book, and the obvious place to start, was the one for Weissenfels. This encounter, just before the Battle of Lützen, is described as a “skirmish” by Nafziger, and historically it is noted for two things. First, it featured the death of longstanding French Marshal Bessières. Second it showed the fresh French Marie-Louises standing up capably to swarms of French cavalry. According to Nafziger the battle was largely about the French infantry beating off swarms of Russian cavalry – with only a single Russian jager regiment present as infantry.
The GDA scenario is very different. Russians have seven battalions of infantry (three of Line jagers, four of Reservist line infantry), two brigades of cavalry (four units) and one of Cossacks (three units). The cavalry looks faithful to the historical order of battle, though not quite as overwhelming as those historical (and doubtlessly French) accounts suggest. The French order of battle is closer to history: Souham’s 8th Division, with 15 battalions of infantry (historically two brigades; four for games purposes) supported by a brigade of cavalry that was stronger than any of the Russian brigades. The Russians are defending the Rippach stream, and the French need to get to the village Rocken at the far side of the table by Turn 14. This is a very interesting scenario, with the defenders deployed much further forward than typical, and so more ground to play with, but without enough forces to mount a full defence of the stream. The French have plenty of troops but are constrained by the stream, and half the troops they have are Recruits.
The first problem is that I don’t have any Russians. I could simply have substituted the units for Prussians of the same quality, turning my Landwehr cavalry into Cossacks. But I wanted to field historical formations, and since this wasn’t really a historical battle I saw now reason not to use Prussian troops from the Lützen scenario. I took two brigades of infantry from that source, but dropped the grenadier battalions. That gave me seven battalions of infantry (two of Reservist quality, the rest Line). I gave them two brigades of cavalry from the Lützen scenario, plus another brigade that was at the battle but not in the scenario; I also topped up the dragoon brigade (consisting of one cavalry unit and one battery of horse artillery) with an extra small unit of dragoons. Each of the Prussian cavalry brigades consisted of a standard-sized unit and a small unit, reflecting the Prussian use of four squadrons of one regiment in their brigades, and two from another. This makes the Prussians slightly stronger than the Russians in the scenario, but with one fewer units of cavalry (but no Cossacks) and a weaker horse artillery battery. I also let them have the horse artillery from the start, rather than it turning up later.
The French forces in this scenario feature in the Lützen scenario too – though some have been upgraded in quality, and I used them unchanged. The advantage of this is that I can print out a full set of labels for Lützen, with a few extras. That means I will be set up for the Lützen, if and when we get to play it. I sampled a video from a GDA2 veteran, Scott Driscoll (Check Your Leader TV) who played Reisswitz. He made the village on the Russian side of the stream, Göhren, a Tactical Objective, which would certainly affect the character of the game. However this isn’t in the main scenario – and I don’t think it was really appropriate for a delaying action like this.
It’s worth talking about the rules. GDA2 is often criticised for the way it is written – the book is 112 pages long (or 99 plus appendices on army choice and the index). It sometimes quite hard to find the rule you want to look up – we spent a lot time doing just that in our October game. It would be wrong to say that it is badly written. I found them to be always clear, and although rules are often repeated in different parts of the book, these are (almost always) consistent. I can’t think of any typos or obvious mistakes. It has an index. All this is a wonder by the standards of modern rule-writing. Still, I much prefer a more compact style. I decided to write my own summarised version (I actually do this quite often). I left out the preliminaries of the battle (up to scouting and deployment), and the procedures and tables summarised in the four-page quick reference sheet. This came to ten pages of fairly compact script. I did use it a few times in the game, but I had missed a couple of things, and often I wanted to assure myself with the original. Its main value was that it helped me thoroughly familiarise myself with the rules. I knew my way round the rulebook much better, especially since I had discovered the index! For copyright reasons though, I don’t think I can publish it here.
And so to the game. I took on the French, with Rod, my usual opponent at the club, taking on the Prussians. My scouting was good enough to show that he had placed one brigade of Infantry to cover the crossing on my right, while the left looked thinly covered. I had rather assumed he would might cover the right primarily with cavalry, so I adjusted accordingly. My plan was to seize the crossing on the extreme left with my cavalry brigade, and follow it with the smaller of my two more experienced infantry brigades, so try and sneak around his flank and on to the objective. The other more experienced brigade I put on the right with its artillery on the hill. The two brigades of Marie-Louises were to come on in Turn 2.
Rod had two brigades of infantry, but three crossings to cover. He covered the one on my right, and Göhren and its associated crossing on my centre-left. He possibly could have tried to cover both bridges with his right-hand brigade. Anyway he decided to leave it open. I had the initiative in Turn 1, gave may cavalry Forwards tasking, and got across the bridge, with the infantry following. Meanwhile the other brigade engaged in bombardment and skirmishing at the other crossing. the photo above shows the game at this point. In Turn 2 I moved the two brigades of Marie-Louises in, one to advance on Göhren on my left, and the other to support my right.
On my left I pushed the cavalry forward and it encountered a Prussian brigade sent to meet it – and decisively beat it after two rounds of combat (it was quite a bit stronger); it got a Falter result and eventually dispersed entirely. Meanwhile I tried wearing down the nearest Prussian infantry unit with canister from the horse battery – which was much slower going than I expected. However disaster befell the Marie-Louise brigade in Göhren. The first unit got a toe-hold in round one, in spite of coming in with a two dice disadvantage, and brought in a second battalion as reinforcement. But the tables turned, and the Prussian won in spite of the advantage having turned against them (they had a three or four dice disadvantage – I hadn’t remembered the rule about a two to one advantage in dice, though it may not have applied). Both French units retreated, putting their brigade onto Falter, and then it broke as it failed its Falter test. It required my CinC to intervene (Stand with Me!) to stop the remaining two units being lost.
Lunchtime. The Prussian cavalry and French Marie-Louises have both been forced to retreat after two-round combats, causing their brigades to Falter. Both failed their Falter tests next move.
On my right my infantry brigade tried forcing the crossing, but only being able to push across one unit at a time, and without especially good luck, I made little headway. The Marie-Louise brigade could only contribute its skirmishers, though these did manage to destroy the Prussian screen, rashly not withdrawn, and cause a Falter – which forced the CinC to intervene. My battery eventually destroyed the horse artillery battery (which had mauled one of my infantry units), causing another Falter on the dragoon brigade, which eventually recovered.
Meanwhile Rod started to move over his remaining cavalry brigade help shore up his right. My cavalry was on the edge of being worn down, so might have been vulnerable, and as time was moving on, I decided that this was the moment for a decisive move. My two battalions of my left infantry advanced towards Rocken. They then went onto a Forwards Tasking while my cavalry charged the Prussian cavalry to keep it diverted. This was enough for the leading French unit to reach Rocken. It was now Turn 13 and there was no way the Prussians were going to retrieve the situation. My plan had actually worked. They rarely survive contact with Rod’s deployments.
At the end, with added coffee mug for authenticity. The French have reached Rocken at the back, while the Prussians have held on on their left, and even still hold Göhren, just.
This game was a major success. Going forwards it leaves me to deal with a few things. I need more troops. With 24 figures in a standard unit of infantry (though only 8 cavalry), these games use a lot of infantry figures. Of course that gives them a satisfactory visual appearance. The last two games stretched my French collection. I had to bring in two units of Young Guard to stand in for line infantry for the Gilly game, and both those units and a unit of Middle Guard for this one. I need to put together a brigade or so late period French infantry to bolster the numbers. The Prussians are looking a bit stretched too. I could do with some more regular line infantry.
Also my terrain needs work. I have bases and buildings for two “villages” – I needed four this time, and the result was a bit threadbare. My homemade cardboard river pieces need an upgrade too. I think I might have to buy in some latex ones, though there is a bit too much regularity in their shapes. And while the table mat is OK, I could do with more fields and things to add a bit of visual interest.
The Lützen scenario is a way off at the moment. The French army is the much the same as for Weissenfels, if we go for the smaller game (some of the troops get upgraded). But the Prussians, now on the attack, need more than double the infantry (though less cavalry). And the game is 20 turns. This is a much bigger game and it would have to be played more quickly if it is to be completed in a day – a maximum of five hours playing time. More players would doubtless be a help. But it is something to aim at. There are three other Prussian-French scenarios in the two books – Mockern in 1813, and St Armand and Planchenoit for 1815. These battles are even bigger, though the 1815 games are 18 and 16 moves respectively. Something to aspire to! It’s a pity there are not more smaller scenarios like Gilly and Weissenfels.
Twilight of the Sun King is one of the most interesting, and I would say important, rule systems out there. It has a simple but ingenious game mechanism, which does away with much of the paraphernalia of traditional wargames rules, making it particularly useful for bigger games. It was originally designed for the wars of Louis XIV (the Sun King). These new rules represent an adaptation for the Napoleonic era. Based on a preliminary read through, though, I have very mixed feelings about it.
This is the first time that I have bought any rules based on this system – even though the Great Northern War is one of my periods, and that is contemporary with the wars of the Sun King – and they were recommended by one of the readers of this blog. I didn’t really understand what the fuss was about until I read an article in Wargames Illustrated by Bill Gray, my favourite regular contributor to a magazine that I find increasingly disappointing. He gave a thumbnail description in July 2023 edition in the occasional “Why I love…” series. The system is so simple that an overview is actually most of it. Bill describes the system that he uses (“TWIGLET Redux”), which is based on the original, rather than subsequent published editions. I was blown away the elegance of the design. I immediately started culling it for ideas for my nascent system for Bismarck’s Wars. Each side moves alternately. The move starts with a morale phase, where each unit that is under fire or in contact with enemy units tests. Units can withstand a certain number of fails (typically 4) before being removed. This test, using two D6, or average dice, is kept very simple, with a minimum of modifiers. There are no automatic retreats or other such refinements – it is up to the players themselves to remove battered units from danger before they are destroyed and concede real estate. After morale there is movement; some moves can be carried out without more ado (advancing straight forward, for example), others require a score of 3 on a D6 , with again very few modifiers. This is followed by a targeting phase, where the player specifies which of the other side’s units are under fire. And that is pretty much that. No separate firing or close combat processes; no elaborate protocols for retreating or following up after combat, no high-flown activation system. Some sort of army morale system to end the game before it gets interminable is advisable.
So how does Twilight of the Emperor (henceforth TotE) work? The basic structure is there, sure enough, but the author, Nicholas Dorrell (not the originator of the system, who was Steven Thomas in 1995, based on earlier ideas by Steven Simpson – with later versions by Andrew Coleby) adds in a lot more complexity to reflect the developments of this later era. These are in three main areas. First is command. Units are brigade-sized, putting it in the same space as systems like Sam Mustafa’s Blücher, or earlier Grande Armée (brigades can be standard, small, large or tiny…); these are organised into divisions or corps. This, apparently, wasn’t built into the Sun King version – but the changes are quite simple. A command figure for divisions (if merited) or corps can influence morale or movement tests. The second main way is a reflection of tactics. Each unit can adopt one of a number of modes, broadly reflecting column, line, square or skirmish – with a distinction between British and other lines. This is where the trouble starts, because it inevitably builds in a lot more complexity.
And the third area of Napoleonic detail is in troops types. Mounted troops are not just split into light horse (cossacks, etc.) and cavalry, but cavalry into heavy, medium, light and lancers, as well as battle cavalry and other. Artillery can be organised into battalions, brigades or boost individual units. British doctrine is distinguished from “Continental” (the British use of that word to refer to other Europeans is a personal bugbear, but that’s another story), and various other differences in national doctrine are recognised. All this complexity means that the quick reference sheet extends to four sides of A4, though not especially densely packed, admittedly. The morale test takes up nearly two sides. The original would surely require a single side for the whole thing. Added to this the author wants to reflect additional troop grades. In the original there are just three: Trained, Elite (+1 on morale tests) and Raw ( -1). The problem is that if the modifiers get any larger, they would have a major distortionary effect. In these rules (optionally), you can grade Trained troops from A to E; these can be randomly promoted or demoted to Elite or Raw depending on grade (so and A gets a 50% chance of promotion, an E gets a 50% chance of demotion, etc.) – a couple of optional systems are presented to do this (e.g. permanently assigned on first test). This is admittedly a self-contained aspect of the rules that can be left out (and doesn’t make it to the QR sheets) – but it is another thing to do in game play, and needs to be kept track of.
This level of complexity is just not what I expect from a set of rules in the big battle space. Sam Mustafa’s two big-battle systems don’t bother with distinguishing between the use of different tactical formations; they have a simplified systems of dealing with troop quality and type. Ditto for Chris Pringle’s Bloody Big Battles, though this is not specifically designed for this era it is used for Napoleonics with some amendments. Having spent a lot of my life writing and adapting big battle rules I haven’t seen the need for such complexity either. If you want that sort of thing it’s better to drop down a level to rules where the main unit is a battalion – mis-named Général d’Armée or Lasalle (which is still pretty stripped down) for example. There was an opportunity to keep the QR sheet down to a single side, which was lost.
Of course, this is a matter of personal taste. To many players the extra twists on tactics and troop types are the very joy and essence of Napoleonic wargames. I remember the thrill of Bruce Quarrie’s Airfix Magazine Guide back in the 1970s, which opened my eyes to the wonderful world of Napoleonic wargaming. The complexity was part of the joy. If that is how you feel, then this system may be a clever way of bringing that complexity to big battle rules. I haven’t tried playing them, so they may well flow quickly once you get used to them. But the three page player guide included in the booklet seems to revel in the number of decisions the player needs to make – and if there is one thing guaranteed to slow play, it is giving players too many choices. You pays your money and you makes your choice.
A couple of other aspects of the rules caused me to raise an eyebrow. Quite a few words are devoted to ideas of flank or rear support, which can affect morale tests (depending on formation). A second is that units in contact with the enemy require a successful morale test to break off. Neither of these get a mention in Bill Gray’s TWIGLET – and indeed the ability to break off combat (subject to a movement test) is one of the design features that Bill really likes. These may well reflect modifications made later in the official evolution, before TotE. Both seem to there to persuade players to adopt what are deemed to be historical deployments and tactics – rather than letting the merits of the tactical situation do so.
So, my view is that the designers of this system have taken an elegant system for big battles and moved it towards more mainstream systems, and gilding the lily. This may be to your taste, but it is not to mine. So, how would I adapt the original model for the Napoleonic era? We need to go back to what the main differences between warfare in the two eras at the big battle level. The first is that armies were much more articulated into separate divisions and (sometimes) corps each under the command of a general, often on a campaign basis, rather than just for the day. This idea was embedded into pretty much all armies by the time of the late Revolutionary wars (i.e. from 1799) and quite possibly from way before that. The corollary of this was that the divisions could tolerate operating at some distance from their neighbours – and were much less worried about exposed flanks than in earlier eras. That reflected tactical developments in the manoeuvre of battalions, with the use of columns and squares, or simply with much better drilling of the troops allowing rapid changes of facing. TotE’s command rules make sense, with more commanders on the field than for earlier versions. But how to reflect the more sophisticated tactical handling? It should be harder to conduct flank attacks – the typical solution is that these must be delivered from behind the front of the target (which TotE does). I would suggest that all attacks require a movement test – rather than just frontal attacks. There is a case for some special cavalry v. infantry rules incorporating squares – which trade protection against cavalry for manoeuvre and vulnerability to artillery. But this rapidly turns into a nightmare and I wouldn’t be inclined to go down that route. That means doing away with the paper-scissors-stone aspect of Napoleonic tactics, but I don’t think that was a big battle thing.
How about representing different troop types? The first thing is to tolerate much less variation. The critical question is how much different types of troops were used in different ways by generals of the time. If you can’t find much of a difference in role, it shouldn’t go into the rules. For example, at the big battle level there is no point in having a separate classification for lancers, which were another version of general-purpose cavalry. There isn’t much of a case for treating French dragoons as different from hussars or chasseurs either, for example, at least on the battlefield (a different matter for the British). If you feel the need to make distinctions then one way is to give some units special abilities in one aspect of the game – for example a bonus/penalty on the movement tests, or particular morale tests (just close combat, say). The simplicity of the Twilight system admittedly makes that harder. Perhaps give some troops a the elite bonus on some morale tests but not others (close combat but not firing, or vice versa), or a demotion if facing particular troop types.
When adapting the system to my own rules (starting with the Bismarck era ones) there are couple of other things I would do. First I would drop brigades from the tabletop organisation, and articulate each division into a number bases depending on the number of men (one base for 1,000 infantry or 350 cavalry, say) not necessarily corresponding to actual historical units, and move these as individual elements, with a bonus when the are joined together in bigger combinations. This latter can be enforced using a PIP (movement points based on a D6 score, say) system for each division, perhaps replacing the movement test altogether. This would then be a blend of Twilight and DBA (De Bellis Antiquitatis – Phil Barker’s revolutionary system which started the fashion for stripped-down rules). And then I plan to replace the morale test dice throw with a card draw. But that’s another story.
In conclusion I would say that the Twilight system can be used for Napoleonic battles, but I would stay closer to simplicity of the original, and try to get the QR sheet down to a single sheet. But that really is just down to personal taste.
Our game not far from when we finished. At the top right the French cavalry’s flank attack is in progress
My hobby year started off with real momentum. But this crashed to halt in early April, and I’ve made little progress since. A combination of holiday trips, a family crisis and gardening conspired to divert me. I can’t see myself getting back to the hobby room for a few weeks yet. The one bright spot is that I have kept the games going, with my two regular monthly groups, and I have had time to explore new set of rules: Général d’Armée 2 (the published rules don’t bother with the accents: I’m just being nerdy) – known hereon in as GDA2. I have already posted my first reactions. At the start of the month I played my first game with a couple of people at the club.
For this game I went for a similar scenario to my first club game of Lasalle 2, a very different game system, but in a similar space in terms of the scaling. A Prussian brigade of 9 battalions plus two cavalry regiments and two batteries attacks a French division of 10 smaller battalions and two cavalry regiments and two batteries. We used my normal Napoleonics, on 25mm bases, with four bases to a standard unit, and six for a large one (the Prussian infantry were in large units). Because of this small base size, we used the 28mm distances, but in centimetres rather than inches. We played on the same field size I have used for Lasalle 2 – 40in by 60 in, rather than the full 4 ft by 6 ft. Following my concerns about the complexity of the game, we decided to leave some of the rules out, notably the menu of ADC tastings, including the C-in-C commands. My fellow players provided the tokens, including a set of casualty trackers using rotating number devices (which can be seen in the picture – adorned with casualty figures).
The game itself proved a bit lacklustre. The Prussians moved to an infantry attack, but this took too long to develop. The French decided to send their cavalry round their left flank. This again took time, but they were able to deliver a devastating attack on the Prussian cavalry, catching it in the flank, and driving it from the field, causing complete disarray on the Prussian side. At this point we ran out of time. Subsequently we realised that this flank attack should have been kicked off with a Redeploy tasking, which the French player forgot to do – as the cavalry started off in the centre rear. that wouldn’t have been too hard, though.
Clearly the learning curve meant that we were slow. In a learning game it is worth taking time to refer back to the rules a lot. We decided that my attempts to simplify the game didn’t really work – and especially that the CinC intervention rules were critical to the balance of play. We also felt that the scaling didn’t work, as it was taking too long for the combat to develop – even after I allowed the attacking side to deploy much further in than the rulebook suggested. We decided next time to use the full rulebook, and the standard 15mm scaling, though using a 6ft by 4 ft playing area. The unit sizes would need to be kept the same, though, as I don’t have enough miniatures for the six-base standard battalions that you should really have for this scaling.
For all the frustrations we decided that the rule system has an excellent Napoleonic feel, and that this would be our standard Napoleonic system for club games.
It is also clear is that the game’s name is a misnomer. “Général de Division” would give a more realistic idea of the scope. Though the rules do provide for the use of an army corps, this would still need a very large playing area – or smaller scale miniatures. In the latter case, though, our experience is that there is a danger of things being too slow – though I do see Facebook reports of it being done successfully. I will resume development of my own big battle rules.
Alas, I am going to miss the next club day at the beginning of July. However, I have promised to lead a game at my other regular venue, which should entail two players a side. I plan to use the Gilly scenario from the 100 Days book (although this is not a historically accurate reflection of that encounter, on the evening before Ligny). I’m hoping that some of the other players will have some experience of the game – and I will certainly bone up on the rules – as we need to keep it reasonably brisk to get through ten moves.