
This week at long last I completed a batch of 16 vehicles for my 20mm 1943 Italian theatre project. I started this back in October, but a trip to Australia, Christmas, flu and other stuff intervened. I had thought it was a good move to do large batches of vehicles in order to clear the plastic/resin/pewter mountain, but this was probably too big, especially as it covered both sides. But it is an important reinforcement which will enable much more variety in any club games we play with my 1943 stock. In this post I will look at the seven British vehicles.
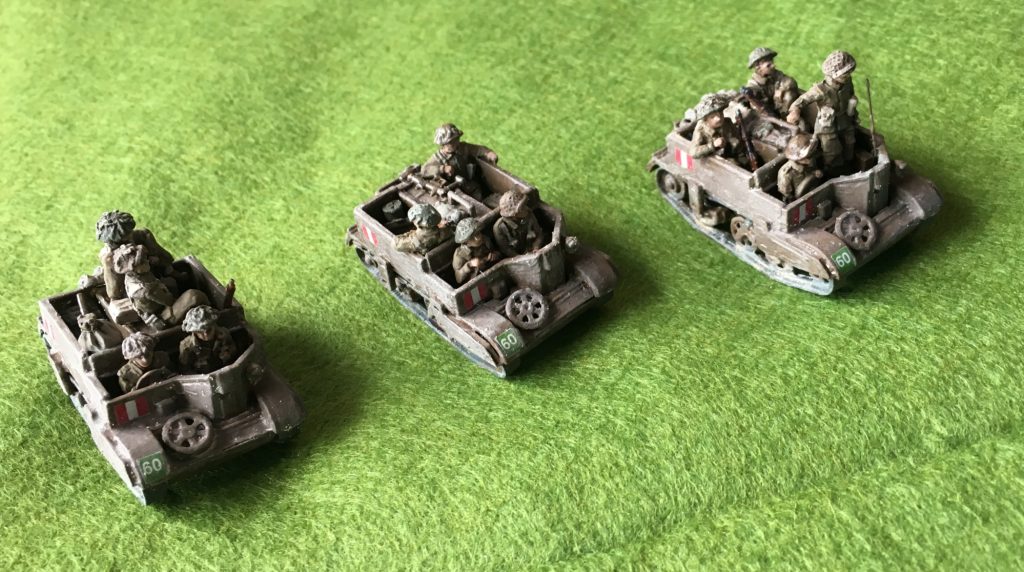
First come three Bren carriers, giving me a complete carrier section. A British WW2 force without carriers is like a pub without beer. Apart from the rimmed helmets nothing looks more British. Also carriers give the British side a mobile reserve – which matters since they didn’t use armoured personnel carriers at this stage. And a common theme of this batch was to strengthen reconnaissance forces, which is another role for the carrier section.
The models are from my teenage collection, from which I kept six Airfix carrier models. They aren’t particularly nice, and they are 1/76, when I prefer 1/72, especially for the smaller vehicles. But it seemed a shame not to make use of the inheritance. I crewed them with the AB Universal Carrier set. These are lovely figures, not entirely suitable for 1943 Italy (1944 Normandy more like). Getting them to fit into the models was a challenge, especially the ones seated in the back. I added various stowage items, including weapons – though I was unable to get Bren guns sticking out of the aperture in the front – in fact it was a bit of a struggle to find any suitable spare Bren guns, which barely feature in the various sets of parts on sale. But I did manage a PIAT and a 2in mortar. It took me a long time to get everything sorted out and positioned reasonably plausibly. But it was worth it. The figures and stowage lift the final models to a new level. One issue is that these crew figures will stay in place even when they have disembarked and take their place on the table on foot. But it was impossible to devise a system of removable figures, and doing up spare debarked versions felt excessive. I have the same issue with my German half-tracks.
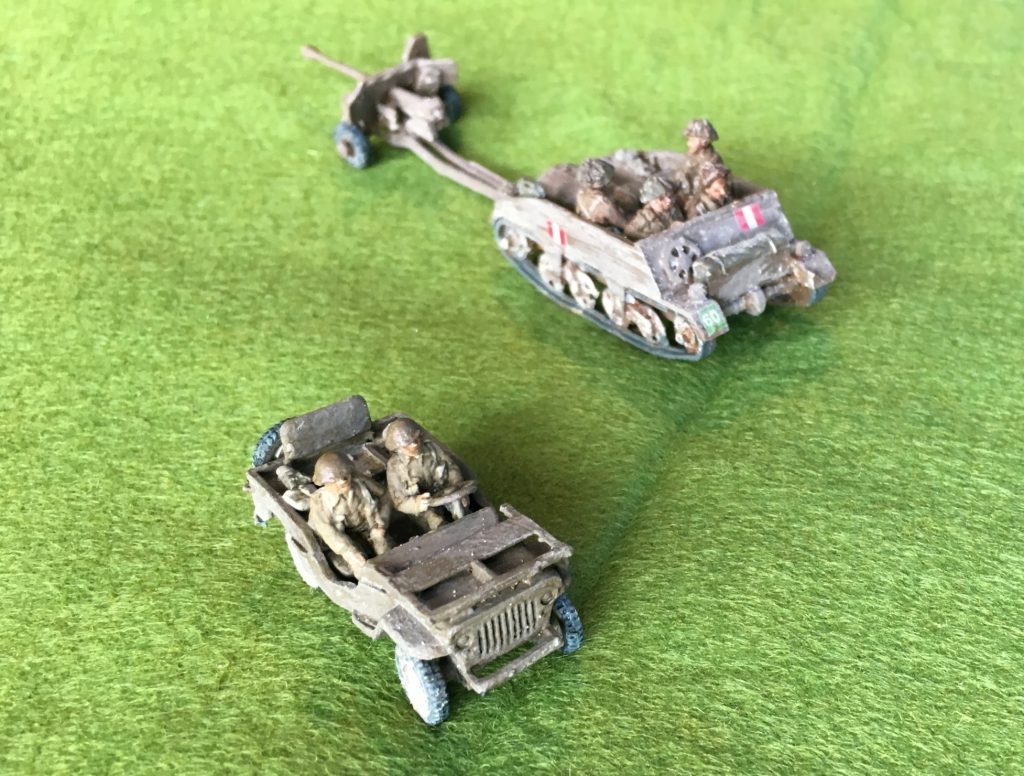
Next come a Loyd carrier and a jeep. These are metal models bought from SHQ. They worked out OK, and metal models have a satisfactory weighty feel, but I don’t think I will get any more. The models are a bit vague when compared to the crispness of the Milicast resin ones, which is the main alternative for the odds and ends. The crew for Loyd was from AB, again, and like the Bren carriers, help to lift the model. There are jeep figures from AB, but I bought these from SHQ as I was worried about a size mismatch on a model advertised as 1/76. The figures are indeed smaller – but they are also vaguer. The Loyd provides transport for my 6pdr AT gun. I had three Airfix ones which came with my carriers. I have one in deployed mode, and one towed, as it is hard to get these models to serve as both, though in theory you could.
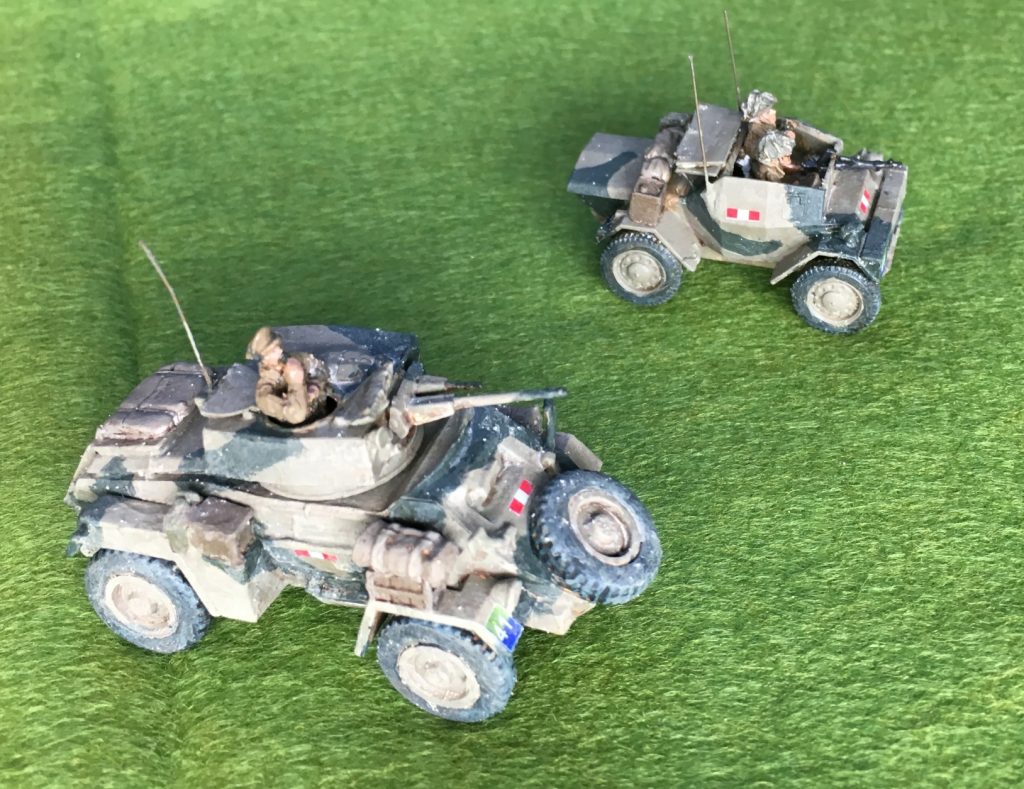
And finally for my recce forces I have a Humber armoured car and a Daimler Dingo scout car. The Humber is one of my teenage leftovers: a Matchbox model that now looks pretty unobtainable. It is the desert version of the Mk III, so not actually right for 1943 Italy (the spare wheel should be at the side, among other details). I managed to get the turret hatch open and insert a Milicast resin commander. These aren’t as good as the AB figures, and a bit smaller. That’s OK for a 1/76 model. The stowage was as per the original model, which got the balance right. I am very pleased with how this one has turned out. I wasn’t that keen on it originally, in its desert sand coat, but with a bit of TLC and a new scheme and it is transformed. In fact I am now very attracted to the Humber armoured car: a sturdy vehicle that looks as if it would have good off-road capability.
The Dingo is a new 1/72 plastic S-Model – there were two in the box but I left the other one for later. This is quite a fine-grained model with a few fiddly parts – unlike the chunky Plastic Soldier Company models that are my mainstay. But a big drawback is that it is modelled with the hatch closed. In photos you never see this vehicle with the top closed over. As a scout car it would not be functional like this. It wouldn’t have looked right. I had to cut the top cover and file it down to make it thinner to represent it folded back. I then inserted purpose-made crew figures from AB. There is no inside detail, but the AB driver has a wheel, and this suffices for wargames purposes. The other modifications were the addition of two aerials and replacing the Bren gun. The version with the kit was very delicate – whereas the Brens with my figures are much chunkier. Doubtless the delicate version is more realistic, but it would have jarred with the AB crew. I used one of my few spare Brens. The Dingo is a versatile vehicle that can be used for recce, artillery/mortar spotting or as a command vehicle (they were often commandeered for that purpose). And less vulnerable than the jeep: wargames rules seldom allow its small size, speed and manoeuvrability in getting out of trouble.
As for painting and finishing, the carriers (both sorts) were done up in infantry colours based on a much used picture of three carriers coming out of a landing ship on Salerno beach. The main colour is SCC No. 2 – the standard colour for British army vehicles and equipment in the mid-war, sometimes called Service Drab or Khaki Brown. This is not a colour you often see on modern restorations (or at all in fact), and colour photos are rare and unreliable – so unlike other colours it hard to know how it actually looked in action. The colour swatches in various publications show a dark brown with a slight reddish tinge. Photos and colour drawings from the time suggest something a bit paler and duller, not at all far from the khaki on soldier’s uniforms. I struggled and it took three goes before I decided I had something I could live with. This was closer to the swatches than the pictures, though still quite close to uniform khaki. I used the usual raw sienna base, with some blue, white and raw umber. Some red got into the early mixes but was pretty much gone by the end.
The Humber and Dingo were done up in recce regiment colours, using the two tone scheme of Light Mud and Blue Black. Having pioneered this with my Royal Scots Greys Shermans, it was quite straightforward to get to the mix – using Raw Sienna, Prussian Blue and white (the same three pigments I used for the British uniforms). It may have helped that I was using artist quality paints for this, which dry truer than the student colours I often use for bulk jobs. The disruptive patterns were largely made up, as there was not an official pattern for either vehicle – though for each there was a photo to get started with. I did the jeep in olive drab. Jeeps were painted up in Light Mud/Blue Black, but I think they were mostly left in their original colour. I reached this using Yellow Ochre and black, with some white. Olive drab presents difficulties for modellers. The swatches and official mixes all show something very dark; the pictures of vehicles in the field show something lighter. Modern restorations (and modern art work representations) go with a lighter version too – but more chromatic than you would expect from the “authentic” version weathering. I went for something paler than the swatches, but greyer than the modern interpretations. I looks right to me and I will use this colour in any future models needing this colour.
After the main paint work I gave the models a wash in peat brown ink, a little diluted. This was instead of the Quickshade I had used before (but not the jeep – which used the same mix I used for the Germans, which I will describe next time). This shade doesn’t discolour the vehicles the wrong way, as the colour schemes are variations of brown anyway. It worked fine as a substitute for Quickshade.
For decals I wanted enough to give the vehicle a period feel, but without the hassle of full serial numbers and vehicle names, which with my OCD tendencies would have taken ages to fix. For the British this meant the characteristic Arm of Service badges and the red and white ID flashes. I was going to do divisional ID badges too (for the 56th division), but I had printed these on transparent decal paper. Given the trouble I had with transparent decal paper on dark backgrounds for my Shermans I decided to skip these. They were an indulgence anyway: vehicles at Salerno and for much of the Italian theatre didn’t use the divisional badges. I didn’t do any markings for the jeep. The decals were my own, printed on white decal paper, which meant I had to cut them out right to the edge – which was a little inaccurate at times.
After a matt varnish aerosol spray I did a little touching up with some paint-on matt varnish, which dries to a slight sheen. I did this because otherwise the varnished vehicles look a bit too flat. This varnish went on to the flesh, the weapons and any binoculars and earphones, and also on any helmets not covered in netting. I’m not sure this is entirely right for the flesh, but it works well for the weapons and equipment, and I think a little contrast is a good idea.
Finally comes the dust patina. This time I used a purpose-made product: AK spatter effect accumulated dust. I bought this at Salute and it was my first serious job for it. It takes quite a bit of courage to do this on models you have been working months on in the knowledge that they could be ruined. The product is quite thick, and it is textured. It works very well if dabbed on with a paint brush in areas where you want it to be thick – it is good for spatter effects, as its name suggests. But I also wanted a weathered patina effect for the whole vehicle. I used a diluted version dabbed on with an old paint brush. I wasn’t at all sure about this as I was applying it, especially with the odd grains of texture effect which dotted the models a bit. I had to be careful it didn’t pool too much in the cracks. Putting it on with a cotton bud (which is what I did with my paint mix on the Shermans) didn’t work with this product. I was worried that I had overdone it; it was quite heavy on the Loyd carrier in particular. There was too much in one or two places (the wheels on the jeep, for example), but actually it was a little underdone in other places (on the wheels and running gear on some models, where it needs to be thickest). Once it had all dried and I got used to it, I decided that it worked well, giving the vehicles a nice used look. It worked especially well over the decals, helping to integrate them into the paintwork. My technique will doubtless improve over time.
Next time: the Germans.
Leave a Reply to David Cancel reply