As I was preparing the British vehicles last year, it struck me that I badly needed some German half-tracks to speed things up in German attack scenarios. I had already bought boxes of Plastic Soldier Company SdKfz 250s and 251s, so I put these together. There were three in each box, and I added an extra one of each from PSCs “reinforcements”. For good measure I also added an SdKfz 222 armoured car from my legacy collection. This was over ambitious, but we’re done now.
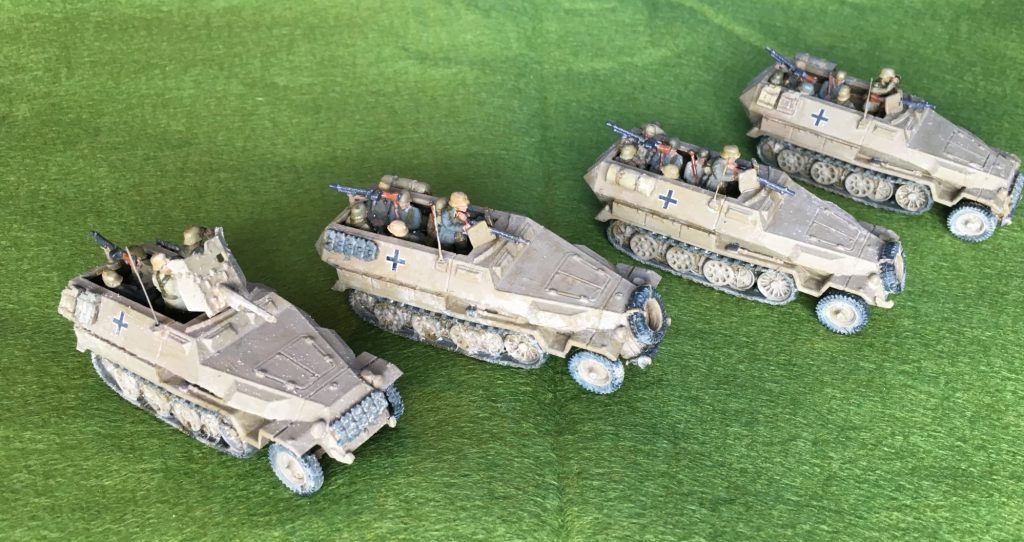
First the SdKfz 251s, sometimes called Hanomags. These were the earliest armoured personnel carriers used by anybody in quantity. The Germans often used them to carry troops into battle under fire in close support of armour, though this led to heavy losses. They used this tactic at Salerno, which gives me a bit of a gaming opportunity. By comparison, though the Allies had M3 or M5 half-tracks, they were slow to use them so aggressively. I had a couple of 251s in my teenage collection (from different manufacturers), and hoped to use at least one of these. But they were seriously under scale, and really wouldn’t have worked next to the 1/72 PSC models. Also they seemed to be based on the early A or B variants, when I wanted the mid-war C (different again from the D, introduced in 1943, and which is the most commonly seen in Normandy). I decided I needed four to make a complete platoon, which included the platoon leader’s version with a 37mm gun, though I have no idea whether they used these in Italy!
The models were an early PSC release (fitting in with their initial focus on Kursk), which means that the model is a bit more basic than I was used to, and the instructions very vague, with no explanation of the options. The model is quite chunky, as usual – PSC scale them up from their 15mm (1/100) versions. I had a little difficulty in fitting the top hull section to the middle bit, which necessitated the use of some putty. But the models do the job and are good value for money. PSC provide crew figures (2 in the front, 4 in the back and a gunner), which I used. These figures are a bit chunky and not nearly as nice as AB castings (which would have been available as an option, for quite a bit of extra money). By using some spares from the platoon leader, and the 250s I was able to up the crews by one in each of the ordinary vehicles – still one short of the actual crew. It was a bit of an awkward fit in places, and I tried to get the layout slightly different in each model. Also I used the loader form the 250 for the 37mm gun, and a figure with binoculars. I added an aerial. I’m not sure they were all equipped with radios, but I decided to be generous. The aerials were scale 1m, which looks a little short, so upped it to 1.5m for the platoon leader. Some stowage was added too, but sparingly. Pictures tend to show these vehicles quite clean. Mostly these came from the kits themselves.
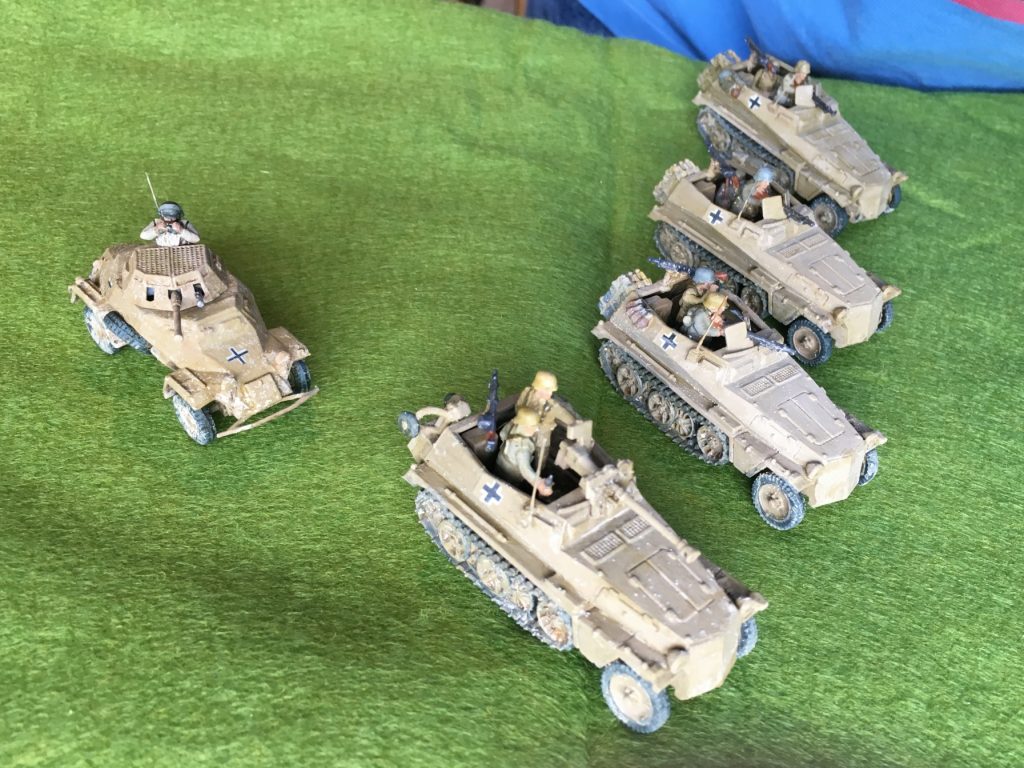
Next come the SdKfz 250s – the alte version, still in widespread use in 1943. Unlike most half-tracks, this vehicle was purpose built for that mode, and was accordingly more robust. It was used a lot by the German reconnaissance forces – hence my interest, as I think interesting scenarios can be built around reconnaissance forces. Once again I opted for a platoon of four. The leader is a 250/11 with the sPzB 41 anti-tank rifle. This was dismountable, and the kit provides the dismounted carriage both in a folded version to be carried on the back, and the deployed version. I will do a dismounted version when I next do some German infantry, using some surplus crew figures from the PaK 38.
The kit was from PSC, but a later issue than the 251, with more options and better instructions. The crew was of similar quality to the 251 kit (and the machine gunner identical). It was the usual chunky fare but fitted together a bit better than the 251. Only three crew were provided per vehicle, when there should really be five. You can’t see that one is missing from the front seat though, so like the 251s there is just one short in the back. It would have been very awkward to try and fit more figures in. I used some of the figures from the 251s to give some variety as well as having the machine gunners pointing in slightly different directions (which mean a bit of surgery to the lower legs in a couple of cases). Aerials and a bit of stowage were added.
Finally there is the SdKfz 222 armoured car. I had kept one back from my teenage collection, taken form the old Airfix reconnaissance set. This contained one of these armoured cars, plus a kubelwagen. I kept the latter too, but it is hopelessly under scale, even for 1/76, and unusable. A pity because I had gone wild with the reconnaissance set and I have two or three lots of it unmade and unpainted. The Airfix 222 is a bit of problem as the turret just isn’t right. It’s too small, doesn’t have the mesh covers, and it would be very hard to add a crew figure. But the PSC kits came with a turret for the 250/10 version. So I wondered if I could marry these turrets with my Airfix models to get a platoon of armoured cars. The good news was that notwithstanding the scale difference (1/72 to 1/76), it looked about the right size. The bad news was that it is modelled with the mesh cover closed – in pictures it is always open. I manged to fit it to model, and even to perch a crew member on the back of the turret (there are photos of them doing this). So I thought I would give it a go. By 1943 the SdKfz 222 was a bit passé, as its off-road capability was a bit limited. I think it had largely been replaced by the 250/10. Never mind it’s what I’ve got.
Painting the half-tracks provides a bit of a challenge given the partially enclosed nature of the vehicles. I usually like to assemble then paint, but that was clearly impractical. So I assembled the top (including the machine gunner attached) separately from the rest, and then gave it all the darker base coat. I then completed the assembly. That meant I couldn’t reach the lower deck portion of the models to provide any paint detail there. That was OK though – these are only wargames quality after all.
As with my previous two attempts at mixing the dunkelgelb main colour, I struggled to get a satisfactory mix. After thinking I had achieved it, I took against it and decided on a remix and repaint. That meant the paint went on a bit thick. Though building up paint in layers with slightly different shades is a recognised painting technique, this was clearly overdone. And I’m still not 100% with the result, which is a bit too grey and has a hint of green (though that was partly down to the wash). Dunkelgelb came it in a wide variety of hues during the war, so there is no such thing as accuracy – but I had hoped for something a bit lighter and yellower. As it is I ended up with something very close the old Humbrol “authentic” shade, so it is well within the realistic range. This is the third successive time I have struggled with this colour and painted many more coats than I originally intended, so there is still a fundamental problem here. One difficulty may be that I have been using student colours, which tend not to dry true – though since this is a high volume job I would like to make these cheaper pigments work. But also I’m attempting to reach the result with a three hue mix (plus white), with yellow ochre, Prussian blue and terracotta red. This leaves far too much room for variation. I need to experiment with two hue mixes. Yellow ochre and black may work (though this is the traditional mix for olive). I am even thinking of using a brighter yellow and purple (my attempt with yellow ochre and purple not working so well when I tried it). This is not an advert for my practice of mixing paints from artist’s colours, rather than the usual paint by number approach using hobby paints.
Like my other German vehicles so far, I didn’t paint any camouflage patterns, though olive green and red brown were issued for that purpose. I don’t see it much in pictures form Italy in 1943, and I went a bit too wild on this back in the 1970s. I might try this on some later vehicles, based on a degree of historical evidence. The crew figures were painted in uniforms with various shades of olive, sand (i.e. faded olive) and grey. As before I don’t have good sense of what they should look like – photos are a bit scarce. But at least it’s reasonably consistent with the infantry I have already painted.
The next adventure was the wash. I decided against using the Windsor and Newton peat brown ink I used for the British vehicles. It has a bit of a red tint which I thought would make the dunkelgelb look wrong. Something like this happened with the Panzer III models and the Quickshade, which has a similar hue. So I decided to have a go at mixing my own with yellow ochre and black ink, diluted with water. This proved very tricky. It took me quite a bit of time before I reached a version that I felt brave enough to use on my models – a sort of olive green. This was fine where it pooled in the recesses, but gave the models a slight greenish hue elsewhere else. It took the models even closer to the old Humbrol colour! I think I’ll try something else next time, though I have large quantities of my mix left over. Should be fine on olive drab (I used it on my jeep too).
For decals I used just the balkankreuse. I considered ID numbers (as for the tanks), but this was a bit awkward with the stowage items, and anyway you rarely see them on this sort of vehicle. For the 250s I used spares from old Airfix Pz IVs. A bit chunky but OK. For the 222 I used some from the old Airfix recce set. The black and white weren’t properly aligned, which was a pity! For the 251 I used slightly bigger ones from a set I acquired commercially at Salute in 2017 at significant expense – black and white ones on the sides, and white ones on the back doors. These decals are very sharp and much nicer than the old Airfix ones (though you have to cut them out carefully), but the back door ones were a bit tricky as I had to cut them down the middle so as not to obscure the crack between the doors.
The decals were placed on a surface prepared with polyurethane gloss varnish, and sealed with the same substance. I’m not sure the first step is strictly needed given that I prepare the surface with Microset – but the flash is invisible. I might experiment without next time. After this I sprayed the vehicles with matt varnish. As with the British I painted a bit of “matt” varnish (which gives a rather unpredictable level of sheen) onto some highlights for a bit contrast – flesh, small arms, straps and helmets. This was a good move for the machine guns, which look much better, and I think it works on the helmets too. It is a technique I will develop as a complete matt finish doesn’t quite work.
Finally came the dust patina. I experimented a bit on the 222, as the most dispensable of my models, and overdid it bit. The others turned out fine, though I did apply some extra to the running gear afterwards as the mix had become too diluted.
That’s going to be it for a while on my 1943 stuff. I have a stack of stuff still to paint, and plans for much more, but my Napoleonics are feeling neglected, and also some terrain stuff to do. Plus I have some domestic credit to build, which means a bit of a clearout in the spare bedroom where I do my painting.
Leave a Reply