Monthly Archives: March 2014

Deconstructing Waterloo, Salamanca and Austerlitz

I’m thinking aloud about command and control in wargames. My original, over-long piece started to develop thoughts about plans, initiative and how they were influenced by calibre of corps commander. Let’s draw out some general points:

  1. Plans have an important role in battles in allowing acts of complex coordination and allowing more distant corps to take the initiative. By and large, the side with an active plan holds the initiative.
  2. Plans take time to draw up, though a strong corps command function, as the French possessed, may speed the process up.  They also have a shelf life, as units move under the plan, or as the enemy fights back, the plan loses its power.
  3. When a plan is weak, corps commanders are liable to behave more erratically. A relationship of mutual understanding and trust is critical between the army and corps commander. Only rarely is this strong (e.g. Napoleon with Davout or Massena) ; very poor relations can happen (Napoleon and Bernadotte) – but most relationships are intermediate, and intentions can get misinterpreted – attacks being too aggressive, for example.

These thoughts started to come out of an examination of the battle of Wagram. Since that was a profitable exercise, let’s look at some others. While I have a rough idea about a lot of battles, I have a deeper understanding of only a few. But that’s a start. Let’s do Waterloo first.

  • It starts with a curiosity. There is a 7-8 hour gap between first light and Napoleon getting the battle started. The French army started the day somewhat scattered, it is true, and overnight storms caused the ground to get waterlogged, impeding the movement of artillery. Interestingly this sort of slow start characterises earlier battles in the campaign: Quatre Bras and Ligny.
  • Napoleon did have a plan, though it was a pretty simple one. A grand battery was assembled drawing elements from across the whole army. Reille’s corps pinned Wellington’s right with an attack on Hougoumont. D’Erlon’s corps delivered the main attack on Wellington’s left, with the intention of swinging round to the centre and Mont St Jean. The grand battery must have taken a bit of planning effort, and the poor ground made it slow going. D’Erlon’s attack involved four infantry divisions and supporting cavalry, and took quite a bit of planning at corps level.
  • Wellington’s plan was to hold the ridge line and await the Prussians. This wasn’t really an active plan, but his divisional generals (there being no functioning corps system) clearly understood the defensive nature of their task, and had certain standing instructions (for example the artillery was not to counterbattery).
  • The French plan was executed properly at first, but it faltered when attacking the British line itself. It was shattered by the intervention of British reserve cavalry (ordered from the top command). The dense French formations meant that there were no reserves to speak of in D’Erlon’s corps, and the whole plan was halted, beyond Reille’s continued pinning attacks, which required only limited coordination.
  • The French then threw in their main uncommitted reserves: their cavalry, in what later came to be viewed as a series of hopeless charges. There are suggestions that these cavalry attacks were started in error and continued in order to save face. Personally I am sceptical of this explanation. But it did seem to be the only way of the French retaining the initiative. Why was that important? I think it is a matter of army morale. Loss of the initiative does imply a blow to morale, especially to the attacking side.
  • Meanwhile Bulow’s advancing Prussians halted a short distance from the battlefield for a matter of hours, so as to draw up proper battle formation from their march formations. When they eventually arrived, they delivered a concerted attack, which no doubt benefited from the time spent gathering and planning.
  • After this the battle degenerates into a series of ad-hoc interventions by groups no bigger than a division in strength, with the main impetus coming from top command.  Perhaps only Zeithen’s intervention was a corps level initiative based on only a very general directive – though arguably it was this final intervention that broke the French army.

One further thing needs saying about Waterloo. It was a very compact battle. Only the Prussian army was at all dispersed as it approached. Communication of orders was no doubt very straightforward for the French and British commanders.

Another battle. Thanks to Rory Muir’s excellent work, I have some knowledge of Salamanca.

  • This is an opportunist battle. There is no plan in the sense that I have used it. Wellington realised that the French army was exposed, and decided to attack. He then delivered orders to each division in turn, creating an echelon attack. This might be thought of as a series of ad hoc attacks ordered as Wellington worked his way down the line from right to left.
  • Each British division delivered a well-coordinated attack. The French were completely surprised at first, which compromised their ability to respond. Their overall command also suffered from wounds to both Marmont and his first successor, until Clauzel eventually took over.
  • The middle phase of the battle degenerates into something quite confused. The third British divisional attack (Cole’s) fails, and the French attempt counter moves. The British have the upper hand though and they manage to outlast the French, who fight a stout retreat.
  • Practically nothing happens on the British left (even though this is where the best British troops are). Probably Wellington did not get the opportunity to think about what to do with these troops, which he didn’t really need.

Now let’s think about another battle: Austerlitz. My knowledge of this battle is weaker – I have a couple of more recent books, each with much better information on the Allies – but I haven’t read them yet. So this account comes with a bit of a health warning.

  • The battle is interesting because it is a trap. Napoleon has a plan – but the plan involves conceding the initiative to the Allies, and letting their plan take its course until the critical moment.
  • The Allies duly draw up a very detailed plan, which allows them to get their whole army in motion in a coordinated way, using a series of columns of roughly corps size, although some columns get a bit delayed.
  • The French launch a counterattack. This is launched as corps level (let by Soult) with well coordinated attacks. The Allied plan collapses. They can only respond to the French in ad hoc way, with all their corps positioned in the wrong places. And Allied morale suffers as their plan fails and thy lose the initiative.

Next topic on thinking this through is how to simulate the effect a battle plan has on playing a game with one hour turns.
Command and control in wargames

In this post I’m going to do a bit of thinking aloud. As yet I have no evidence that people are visiting this site. I am waiting for the publication of my Vitoria article before trying to publicise it. So I’m not expecting this article to be actually read!

But I often try to resolve conceptual problems in my rules by thinking aloud in writing. So now I have the blog, why not do it on line? Maybe it will catch the interest of a passing reader, who can contribute their own observations.

The story so far. My last edition of the rules were all very well, but the games were taking too long, and needed too many moves. The obvious way around this was to move to hourly turns – like Volley & Bayonet (V+B) – rather than the half-hourly system. This needs a rethink of the command and movement system. Left on its own there is too much risk of large parts of an army staying immobile for game hours because of an unlucky run of card draws (I’m using playing cards instead of the more normal dice).

Is there a need for a command system at all? The already mentioned V+B doesn’t have one, beyond a fairly simple radius system (units need to be within a set distance of a general). This works better for one hour turns than it does for shorter ones. The long time period automatically builds in a lot of friction. You don’t have all that many moves to accomplish your aims, so the sort of gamesmanship that consists of waiting to see what the other side does before committing is riskier. But problems remain. I think it is an important facet of simulation to have some means of representing the constraints of different command and staff systems – and differences in information. I dislike the radius system anyway, as it does not relate to anything observable on the actual battlefield – though a softer version is virtually inevitable.

What about other rule systems? There are two that are particularly interesting, neither for the Napoleonic era. First there is Gå På, a Swedish set designed for early 18th Century. This is one of the most interesting rulesets I have encountered. Units, or groups of units are brought under control through a combination of initiative values of their commanders, and line of sight. Amongst other things, the more moving parts your plans have, the more likely that units or groups of them will be “out of command”. And if they are out of command then they are liable to move forward and get stuck in before you wanted them to. And as the battle progresses, visibility is reduced, and it becomes even more likely that units drop out of control. Battles start to descend into chaos. I’ve played with these rules a couple of time recently; we have approached our task in a rather Napoleonic fashion – but we are starting to learn that these have too many moving parts, and that it may be better to stict a more basic linear system. The advancing chaos makes the game fun.

The second system is Bruce Weigle’s  1870 series (of which I have 1859 and 1866 – and played one game of 1870). These are quite different. Each player gets a limited flow of orders. If units don’t get orders then they sit still. The more moving parts, the more orders needed and more difficult this becomes to achieve. It is, however, based on 30 minute moves. You don’t get Gå På’s advancing chaos, but you get a realistic level of friction.

For  a grand tactical, Napoleonic game the latter system is probably closer to the mark – though it would be good to allow the possibility of an unauthorised attack. The idea of a steady breakdown of command and control as the day progresses is attractive – but if it just means that things grind to an exhausted halt, as I don’t think that’s how battles of this era worked – though it might for later ones.

So what are the factors that need to be reflected?

  1. More complex plans are more difficult. However, they may be feasible if sufficient planning effort is put in, based on good information.
  2. Corps level staff contribute to the process. In 1809 Napoleon could simply give his corps commanders a generalised order, and the details would be worked out by them. Charles’s staff drew up detailed plans for the Austrian corps commanders, slowing things down a lot.
  3. Speed is the enemy of coordination.

I am in the middle of reading about Wagram – though I have only started to get into the second day. This produces some insights.

  • Napoleon’s staff prepared very detailed plans for their attack from Lobau to the left bank. The Austrians were in the dark and made very little planning effort. The result was that the French started with the initiative, and they were able to deploy their forces very rapidly, with a high level of coordination, while the Austrians were hustled out.
  • By the time the French reach the Rossbach, though, it’s a different matter. Their plan is played out; they don’t know where the Austrian forces are. But on the spur of the moment Napoleon tells his troops to attack over the Rossbach and onto the plateau.
  • This attack goes badly – though they surprise the Austrians and hold the initiative. The attacks aren’t well coordinated; the fighting, in the failing light, descends into confusion, with friendly fire. Both side suffer from panics – but the French suffer the most.
  • The exception to this is that Napoleon’s ablest and most trusted marshal, Davout, contents himself with a little probing, and does not launch a rash attack. The other attacks are led by Oudinot, MacDonald and Bernadotte – all distinctly 2nd division in the corps commander role. This is as much question of their relationship of trust with Napoleon as it is of their abilities as commanders.
  • Overnight, the French pull their forces together into a tight group, but with no specific plan. They want to see what the new day brings and what the Austrians do. The Austrians, on the other hand, pull together a very detailed plan of counterattack. This counterattack takes much longer to communicate than anticipated, which means that coordination suffers. But with a series of attacks, the Austrians succeed in holding the initiative for much of the second day, until their plan is played out.
  • Marshal Bernadotte, with whom Napoleon’s relations are poor, overnight decides to pull his corps back from the village of Aderklaa, allowing the Austrians to occupy it uncontested.
  • Marshal Massena, along with Davout a 1st Division Corps commander, accomplishes a tricky repositioning of his corps, which helps stabilise the French rear.
  • The more remote Austrian attacks start well, if late, but eventually run out of steam as their commanders don’t really know how to exploit the advantages they have won.

I will get more insights on this as I continue to read Gill’s book on the battle, but writing this out does trigger some interesting thoughts.

Planning plays an important role in who holds the initiative, even if the implementation of that plan is delayed. The plan has a life cycle; after a degree of time and especially movement it plays out. When the plan is weak then a number of things can happen. Things can just fizzle out; corps commanders can interpret their orders in a variable way, perhaps over-aggressively (as with the French attacks on the evening of the second day), or perhaps with excessive circumspection (Bernadotte abandoning Aderklaa). Also coordination breaks down.

Another observation is that the traditional wargaming device of giving generals a character rating (aggressive or cautious for example) does not really count for much. The over-aggressive French evening attacks were conducted by a general noted for extreme caution (Bernadotte) as well as fire-eater (Oudinot). What matters more is confidence and trust. One can easily rate the French generals as good (Davout, Massena, maybe Marmont), bad (Bernadotte) or average (everybody else). In the trust stakes the Austrians would mainly count as average (maybe Bellegarde and perhaps Rosenburg count as good) – but they suffer a capability deficit compared with the French.

Translating this into gaming is interesting. I don’t particularly want to get the players to write up orders as part of the mechanism. I would like to stick to the paperless move system if I can. But plans do last for more than one hour, and may take more than one our to prepare and distribute. It is interesting how the commanders at Wagram decide to be either active or passive. This leads into the question of initiative. The classic system is alternate move – which is what DTN V2 is based on. Gå På has a system of interchanging moves between the units of both sides. 1870 uses simultaneous movement. But both are problematic. In the former case it takes too longer and is a bit complicated; in the latter you get problems if two commands move into each other.

And there I will draw a line under the musing. The deconstruction of Wagram has proved the most valuable part of the exercise. Next piece should look at other battles.


Vitoria historical narrative

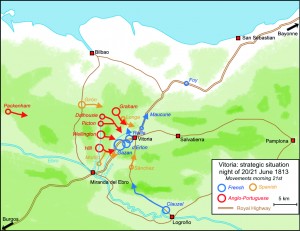
Vitoria Map 1

Finishing the resources I am posting for my Vitoria project, for now, I have posted a historical narrative on the battles page, together with a brochure on the battle published by Vitoria’s tourist office on the battle.

The historical narrative is based on an article I wrote a year ago, but which wasn’t accepted for publication. It was the first part of a two part series; the second covered wargaming the battle, and evolved into the scenario already posted. The editor wanted more wargame and less history. It is not very detailed, but gives a narrative that is much clearer, and I think more accurate than most versions that get published. That is partly because jean Sarramon provides a more complete narrative from the French side than the usual sources used by English-language authors, which throws a bit more light on things. Also my researches into the orders of battle gives a stronger grasp on the numbers involved than most. And I haven’t followed the British fashion of having large slabs of direct quotes from memoirs to carry large parts of the narrative. This can help provide an atmosphere and provide some interesting angles – but it isn’t really proper history. The historian needs to provide an opinion on how reliable theses accounts are.

The Vitoria brochure is interesting. It does not provide much in the way of historical narrative, although it has the best published battle map that I’ve seen – for showing the movements of the combatants anyway. it also provides some details and pictures from a more local perspective, which helps fill out the picture.

Vitoria scenario and resources

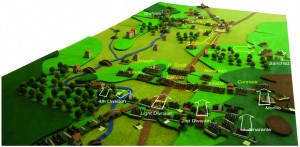
Turn 8

I have now posted  a scenario and orders of battle for this battle, my first project for the Dining Table Napoleon. This is based on a long process of research. I am particularly pleased with the orders of battle, which are much better that the mediocre stuff that is usually published, especially for the French. Of course, it just a best guess based on triangulating incomplete information – but that is what wargamers need!

This is one of the most important battles of the Peninsular War, and marked the end of French rule in Spain, though they continued to occupy some parts of the country after that. Strangely, though, it gets very little coverage compared to many other Peninsular battles. There is no book in English dedicated to it beyond an inevitably light-weight Osprey. Many accounts that do appear are a bit garbled. The best in English remains that of Charles Oman in his Peninsular War series – though I have not read Michael Glover’s account. However it clear from works written after Glover and referencing him that he does not come up with much that is new.

The best work is in fact in French, by Jean Sarramon, published in 1985. This makes better use of French sources, and provides a pretty convincing detailed account – if a little pro-French. I am not a fluent French speaker, but I did manage to translate the key sections of the book.

As a wargame, Vitoria is a bit one-sided, but nevertheless it is interesting. It is fought down the table rather than across it, with battles on two fronts eventually converging. I have also designed an alternative scenario, injecting more uncertainty into proceedings by allowing both sides to change their battle plans, and for the French to potentially have some more forces available. I haven’t played this – but I hope to get the opportunity someday!

Also included in orders of battle are forces in the vicinity that did not take part on the day. For the French these include Foy’s division, and a nearby brigade (Birlet’s) that was available to him. A firmer order from the French command would have ensured these forces’ presence – and Wellington probably expected them to be there. In addition I give details of Clauzel’s force, whose presence was never a real possibility – Wellington timed his attack to specifically to pre-empt him. On the Allied side I give rather unsatisfactory information on the Spanish general Giron’s forces, who arrived too late, and Pakenham’s British division,

It is too much to hope that anybody else will actually play this scenario with my rules – but I hope it is of value to any players wishing to do their own version of this interesting battle.

Apologies for the poor quality of the picture accompanying this post – which comes the game I played last November. The original looks fine on my screen. It seems to be an issue with the way WordPress displays pictures inserted into posts.