Monthly Archives: July 2018

More BBB Napoleonics

As stopgap measure I have been using Bloody Big Battles to give my Napoleonic armies an outing at the club. The scope of these rules is very similar to that for my Dining Table Napoleon, though the feel is very different, so this is a learning experience.

I reported on our first game, which was a contrived Ligny scenario. One of the learnings from this was how important scenario design is. That scenario was flawed, as I have found for all my loosely Ligny-based scenarios. I will try this battle properly one day, but it needs about double the number of troops on the table that I am currently using – and even that’s too much at the moment! What I have been looking for is scenarios with more tension and choices for the player. Ligny is a fairly straightforward slugging match; a combined Ligny-Quatre Bras scenario would be another matter…

I searched for ideas amongst the scenarios published in the BBB rule book , which covers the Franco-Prussian War, and the supplementary scenario book which covers other battles from the Crimean War onwards. These aren’t Napoleonic, of course, but quite a bit of effort has been put into scenario design to get a good game. Unfortunately these were mostly not obvious multi-player club night choices. The terrain was generally rather complex, and not feasible from the club’s bits and pieces. Quite often forces arrive later in the game – great for dramatic tension, but that means there is nothing for some of the players to do until they arrive. Nevertheless I decided that there was one I could work on: Koniggratz in 1866.

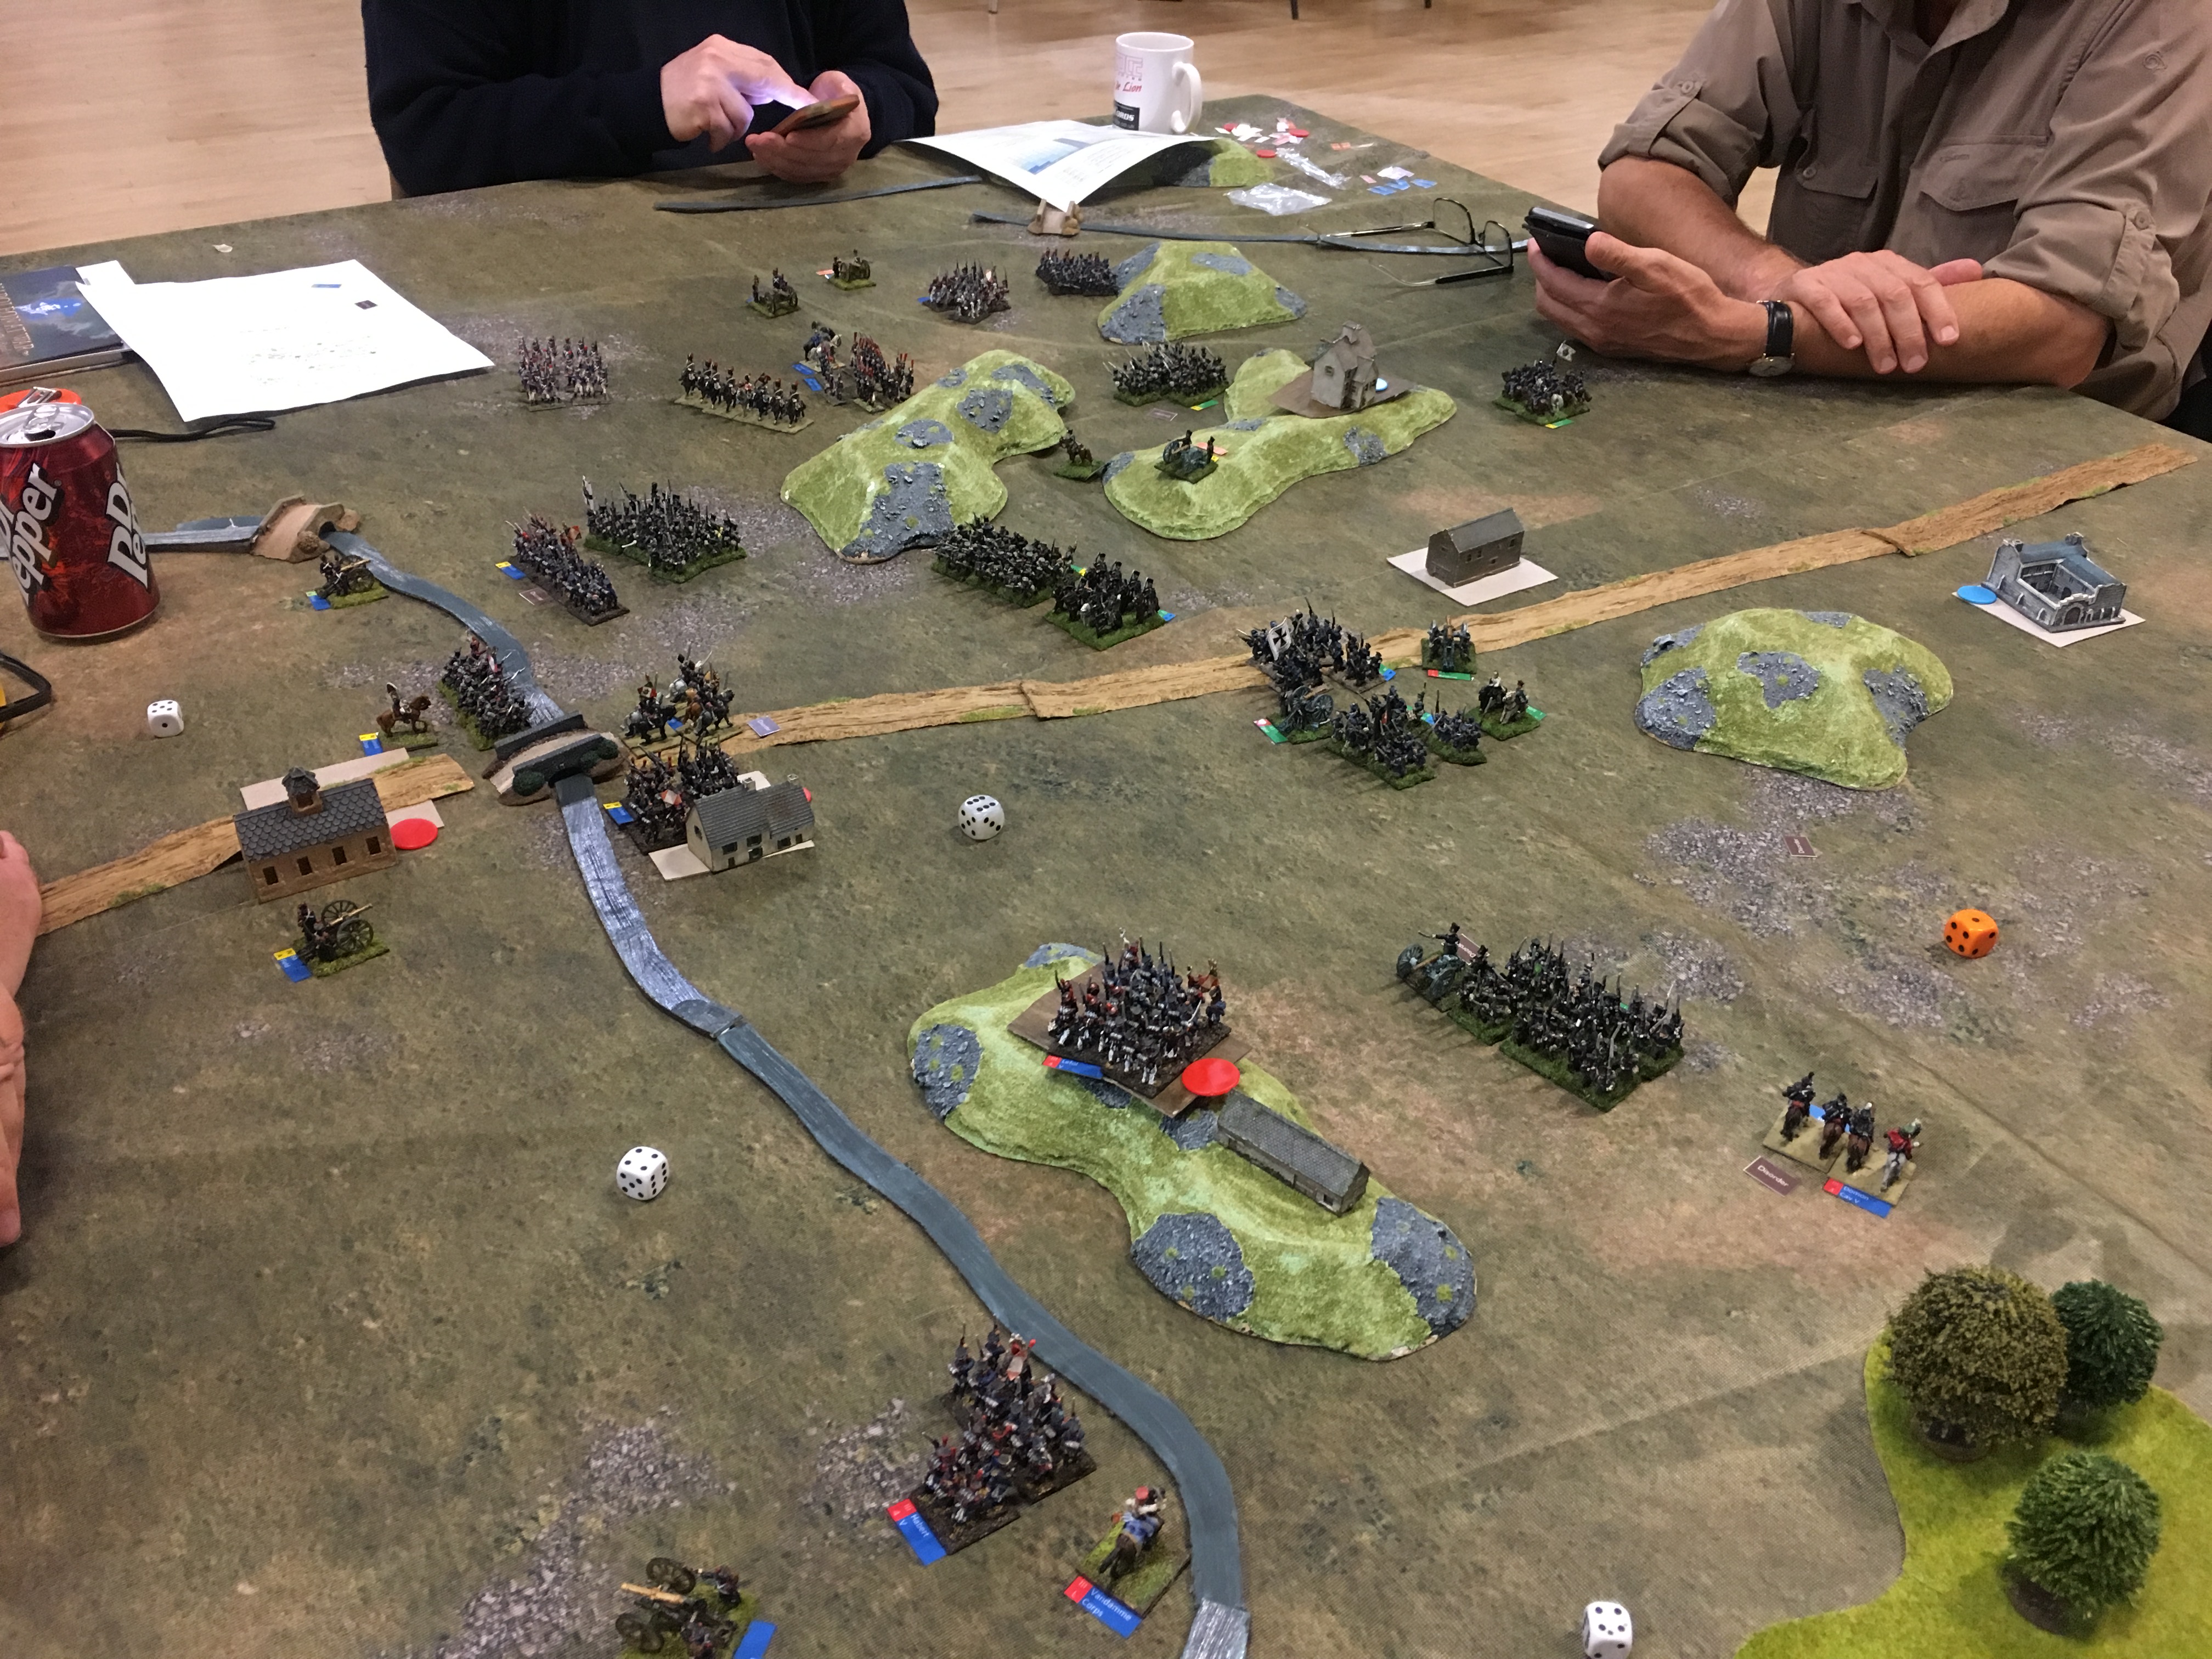
That might look strange. It’s a very big battle. The scenario book uses 2,500 men per base instead of the more normal 1,000 to 1,500. Even then it is double the size of the armies I thought we could manage in an evening with four players. But actually if you represent the forces at one unit per corps (about half size) it works reasonably neatly. The 1815 French, as the better quality army could take on the role of the 1866 Prussians, and the 1815 Prussians could stand in for the 1866 Austrians. I organised my armies into the 1815 units at 1,250 men per base (for the infantry) as this give nicely sized units (4 bases for the French infantry divisions; 4 to 6 for Prussian brigades). For the weakened Austrian corps classed as “Fragile” in BBB I used the mainly Landwehr brigades of III Korps (classed as Raw, not Fragile). The French I classed as Veteran, to make up for the superior armament and tactics of the Prussians in 1866. A large number of Prussians were not due to arrive until Turn 3, but it was easy to split the Prussians between the two players for the first two turns.

The next problem was the terrain. I used roughly the same distances as the BBB scenario. This was a bit of a gamble since I was using half the number of troops. I found that it wasn’t too hard to simplify the rest of the terrain into something that would present similar choices. I did not include the Austrian entrenchments; only the six villages counted as objectives were included (villages in BBB not having a big impact on play).  Although I couldn’t do the hills properly with what the club had (some other members had got to the ones I wanted first), I managed to set up something acceptable in under 30 minutes, we got the game going with four players.

By 10pm we had only got through three and a half moves, though; it needed eight. One player was new to the rules, the two others only had a single game. Even I had to look some things up. But even allowing for that it would be quite hard to finish the game in an evening, even with only six infantry and cavalry units per player. That was the bad news. The good news was that the scenario itself was much more fun. Each player had interesting choices to make. The gaps in the dispositions allowed some dramatic moves to be made. We decided to play it again as a daytime game at Pete’s.

What of the rules? Bernie, probably the most experienced of my co-players, was experiencing them for the first time. He didn’t really like them. Pete and Terry were quite happy; it helped Pete that he had played with the Fire and Fury system before. I think that Bernie was reacting against two major problems. The first is that the rules system was designed for a much smaller scale game (for the American Civil War) and so its mechanisms don’t feel right for the bigger scale. This is the same issue with have with Rapid Fire and Fistful of TOWs for WW2 games, except worse. The BBB system doesn’t have a Napoleonic feel for the smaller scale either. The musketry range is very short; there are no squares to combat cavalry; hitting a unit in the flank is not necessarily decisive, and so on. This means that it looks wrong both as a big division game and as a pretend battalion one.

The other problem is that losses are very lumpy. A lot of not very much happens (getting into and out of disruption) punctuated by occasional dramatic disasters. That’s because a casualties are by base removal, which are a very high proportion of unit strength. This doesn’t reflect a steady accumulation of casualties well at all.

I’m learning to live with these two problems. They do seem to come out in the wash by and large: you get a stimulating game with reasonably realistic results. However my DTN rules should address both issues. They will have an unabashedly big game feel, and I am working on ways to reflect accumulation of fatigue and casualties better – at the same time as being punchy. That’s the hope.

We’re learning how to play BBB. You really need to get units to combine and support each other, to accumulate as many advantages as possible in attack.  Head-on one to one collisions don’t achieve very much unless your objective is simply to delay. But there are aspects where I want to try and make the rules feel more Napoleonic. There are three things I am thinking about: cavalry, skirmishers and artillery.

The thing about cavalry in BBB is that it isn’t very special. It doesn’t fire; it has a longer move. That’s it. I used a Prussian cavalry unit to eject a French infantry unit from a village, unsupported by infantry. Bernie attacked one of my Prussian cavalry units with a combined force of infantry and cavalry (though it only succeeded in pushing it back a bit). The long cavalry move can mean that it appears out of nowhere to make an attack – especially in a game like ours with gaps between the units – though such attacks will be less decisive that people might think. It doesn’t feel right, but I still don’t know what to do. My first attempt to tackle this (long ago for a Waterloo game) was a bit of a disaster. I can think of a lot of possible tweaks but I’m not sure they’d benefit the game.

I’m much closer to developing something on skirmishers. I have rejected the standard BBB rule, which uses skirmish bases as part of the main body. I want to deploy small skirmish bases in front of infantry units. I have drafted a rule that does this, and which also helps the game. But, though I have stripped it down as far as I can, it’s still a bit complicated, and I want us to become more fluent in the main game system first.

My thoughts are altogether less developed on artillery. I think the game can take more artillery units on the table, and allow the possibility of smaller horse artillery units (which can move and fire) and howitzers (to supplement other artillery against cover).

Meanwhile I can take heart from the success of the scenario. I am starting to understand how to craft and adapt scenarios for these rules. Though I need something smaller for club night.

Reflections on the battle of Salerno, September 1943

Very nearly 75 years ago a combined army of British and American troops conducted an amphibious invasion near the Italian town of Salerno, not far from the now glitzy Amalfi Coast, south of Naples. The Germans counterattacked and there were 10 days of hard fighting in which thousands were killed from both sides, and many Italian civilians too, many more of whom lost their homes to artillery bombardment and bombing from the air. The Germans then retreated. This battle is little noticed in current historical accounts of World War 2, but I have long been interested in it.

My initial interest was sparked when I was at school, fascinated by anything to do with WW2, when I read a book on the battle by the journalist Hugh Pond, which included many accounts from survivors. This evolved into my focus on the Mediterranean battles of 1943, before German heavy armour and Allied air superiority created a very awkward asymmetry.  That went on ice in 1979, as I left home (or rather my parents moved out of town leaving me behind), and I put my wargames stuff into storage or gave it away. When I did resume wargaming, I concentrated on the Napoleonic wars.

That changed a couple of years ago when I joined a wargames club, and discovered the enduring popularity of WW2 games. I then found some of my old 1943 models in the loft. Now retired, I decided to have another look. I naturally resumed my interest in Salerno. Source material was thin, though, as historians and games are much more interested in Normandy 1944 and after, or the Western Desert in 1941-42 (to say nothing 1940 Blitzkrieg or the 1941-45 Eastern Front). I found a rather unsatisfactory Osprey book. But eventually I laid my hands on Angus Kostam’s book Salerno 1943  published in 2007. This is a very good book. It reconstructs events across the ten days without digressing into the anecdotes so popular in historical works. The maps could be better, and I would have liked more on the air war (and more detail generally), but after reading this I at last have a better grasp of the sequence of events. It has also given me a better feel for warfare in WW2 in general.

What to say of the battle? Generally the Allies blundered and were outfought by the Germans, who seem to have suffered half the casualties. Only artillery, from field batteries and warships, saved the Allies from disaster. In the end the Germans did not have the strength to prevail. In his analysis Mr Kostan falls in with a fairly standard critical assessment that the Allies under the US General Mark Clark went onto the defensive too quickly, giving the Germans the chance to take the initiative and drive the Allies into the sea. I’m not convinced. The Allies suffered their biggest setbacks when they pushed forward too aggressively, in the British sector on D-Day (when disaster hit the Hampshires), in Battapaglia not long after (ditto the Fusiliers), and the Americans in Altavilla and environs on D+3 and 4. In each case the Germans exposed the tactical ineptitude of inexperienced troops, who left gaps as they pushed outwards. In particular the Allies struggled to coordinate the different arms of service – infantry found itself under attack from armour-supported infantry without armour support or antitank guns. At other times it was the tanks that didn’t have the support (though at least once that happened to the Germans too). Coordination with the artillery was better, and that often saved the day. But I suspect even the artillery was not used as effectively as it could have been – a lot of shells being wasted on buildings which housed no Germans, because they were convenient targets that produced satisfactorily observable results. An object lesson on how things should have been conducted was provided by the British Guards, one of the few veteran units, when, towards the end of the battle, a big German attack ran into a prepared trap, where infantry, artillery and antitank guns were all properly coordinated. On that occasion even the antiaircraft guns were deployed to help, a rarity for the British, but commonplace for Germans. The result was devastating. A rapid advance by Allied troops that were still learning how to fight effectively could have been sliced up by the Germans, leaving the rear areas very vulnerable.

A further thing strikes me about the battle, which presumably applies to WW2 more generally. The fighting forces were quite thin on the ground, and one of the key ingredients to success to was understanding where your enemy actually was. The Germans were adept at pulling back to regroup, and turning up somewhere else. The better Allied troops (notably the US Rangers and paratroops), as well as the Germans, conducted aggressive patrolling in advance of their positions as a matter of course. This was no WW1 battle with clearly defined front lines. This is part of the “empty battlefield” syndrome that I have heard mentioned a number of times.

So what about wargaming Salerno? In the north, and some of the southern fringes, the battle was in hilly country, mostly unsuitable for vehicles. The Germans did use armour but the Allies generally didn’t. There was fierce fighting, including by the British Commandos facing German paratroops, but not so easy to create an attractive game, especially on a club night. Elsewhere though, notably in the sector fought over by the British 56th Division, the ground was flat, and the combat is closer to the popular Normandy pattern – though no bocage. The German forces were drawn from Panzer or Panzergrenadier divisions, so quite well-equipped, including good armour support and armoured half tracks, but no heavy tanks or tank destoyers (notwithstanding frequent reports of Tiger tanks from allied troops), and no panzerfaust or panzerschrek infantry antitank weapons. The allies had good antitank weapons (6pdr and 17pdr antitank guns for the British) including PIATs and bazookas. And the Sherman tanks (with M10 tank destroyers in the US sector) were quite capable of dealing with the German Panzer IVs and StuG IIIs. Air support did not play a big role on either side at the tactical level (though there was quite a bit of bombing of town by medium bombers and German attacks on the fleet). Reconnaissance forces on both sides were frequently drawn into the front line, with armoured cars etc. All this should produce some good games. The difficulty is allowing for artillery, important to both sides, and critical to the Allies, and the struggle the Allies had in ensuring their infantry was properly supported by antitank weapons or armour.

I’m just beginning when it comes to scenario design, though. There should be some ways of getting good club games from these ingredients. There is also scope for a very interesting operational level game (perhaps using Sam Mustafa’s Rommel) looking at the battle as a whole.That’s a whole new area though.


1943: my Royals Scots greys Shermans are finished

At long last this project is done. This has been my most complicated project to date, and I hope the most complex in my whole 1943 programme. And there has been a lot learning curve too. In spite of some mistakes, I’m pretty happy with how they’ve turned out.

My posts so far on this have covered the research, the build and finding the right colour. It remained for me to paint the things, apply decals and finish off. I covered the base colour, Light Mud, in my last post – and I’m very pleased with the end result on the finished model.

The next step was to apply the Blue-Black disruptive camouflage. The first problem was to identify the camouflage pattern. Here I managed to find Dick Taylor’s Warpaint Volume 2 which has copies of the official camouflage patterns. I then used photos of actual tanks from the RSGs and other regiments. The colour was a mix of the same three pigments used for the Light Mud: raw sienna, Prussian blue and white. Not very much white! This gave bluish grey. The actual colour may have been blacker, so maybe I needed a touch more raw sienna in the mix, but overall I think it looks OK.

The first model I decided to do following the official pattern for Sherman tanks quite closely – though this diagram was only loosely accurate for the Sherman’s shape. However, when looking at the photos it didn’t look quite right in a couple of places, especially on the upper surfaces. There was too much black. It seems as if the actual painters wanted to conserve the black paint, and so used rather thinner stripes (more like the desert disruptive patterns in fact). As I progressed through the other models referring to photos, I started to get the hang of it and became a lot quicker. I went back to the first model to paint over the excess black. The Blue Black required two coats. After that it was the tracks, stowage and crew. For the metallic bits I used a mix of black and silver with a bit of white and my Light Mud mix, highlighting with a mix stronger in the silver for the tracks. The stowage and crew required the same three pigments that I used for the rest of the model. I did not paint the blanket box at the back of the turret the same as the body of the tank, though this was usual. For the RSGs this box appears to have been fitted after the body had been painted. Instead I painted it a sort of greenish-khaki (a little oxide yellow got into the mix), based on one of the standard British equipment colours of the time. This was one of several oddities for the RSG. I have already talked about the turret hatch doors (with one half-door applied to front of the driver’s position). Also, thought it was common to remove the rear part of the sand guards for tanks in Italy, in other regiments these were welded to the rear deck to aid stowage. This doesn’t seem to have been done on the RSG tanks.

After detailing came a coat of dark tone Quickshade. I used Quickshade to act as “lowlights” and bring out the detailing – and dark because my mid tone has been drying up and my attempts to rescue it have turned it matt. I need a glossy surface for the decals. I also wanted a weathered, dirty look, so didn’t mind too much that it was dark. But it looked a bit messy on the smoother surfaces on the sides, front and turret. This was all fine after the later parts of the process, but I’m starting to think that there may be less sticky and easier to control methods of achieving the required effect. I can use polyurethane varnish as the base for the decals – or perhaps see if Micro Set decal fluid will do the same job – preventing the unsightly “flash” from appearing.

And so on to the decals. I decided to print my own, since I would be unable to find what I needed commercially. There is a problem when using a home printer for this: they don’t have white ink. So you either use transparent paper without any white in the design, or you print on white paper and cut out right up to the edge. This makes it useless for German markings. Turret numbers usually feature white edges; the balkenkreuz is too tricky to cut out at this scale. But British markings tend to be rectangular, and so feasible to cut out. The turret tactical markings don’t feature white (which does make them harder to see!). You don’t need white stars for British vehicles in 1943 Italy or earlier. So I bought packs of both sorts of decal paper, and drew up designs for that I hope will supply the whole project not just these models. This included a crude but adequate version of the thistle on a white over black square that the RSGs used in this period.

I started with the transparent paper and the turret markings. I set the printer to high quality but for normal paper. The quality of the output wasn’t as good as I hoped, but I pressed ahead. The next step was to seal the printed designs with gloss varnish: otherwise the water just washes the ink away (matt varnish is apparently toxic for decals). Unfortunately my spray-on gloss varnish was dead, and it is taking days to get a new supply (the stuff on Amazon is quite pricey). However, polyurethane with a brush was OK, provided the ink was dry (which took a bit longer than expected in the hot, humid weather we were experiencing). And so on to the models. Quite straightforward in principle (I used Micro Set to prepare the model, but I don’t know whether this helped). But the effect was very disappointing. The design was translucent and lost a lot its colour. The ink wasn’t strong enough without a white background. I tried, unsuccessfully, to use a bit of red paint to beef it up – tricky since it features numbers as well as a circle. By this time I had printed the white sheet, and discovered that if I set the printer to one of photo glossy papers it looked a lot better. I decided to take the decals off and reprint.

The white paper decals went on next. Three discrete red-white-red flashes and the RSG unit badge. This was a bit painstaking, but went OK. The decals were quite liable to damage in the process, so there were odd unsightly bits of white. I touched these up with a fine paintbrush after they were dry. With the white paper backing, the colours were wonderfully strong and not a good contrast to the one printed on transparent paper. Back to the reprinted turret markings. This weren’t much better than the first time, especially the bits laid over the black disruptive pattern. But I had lots of spares, so I decided to put a second decal on top to strengthen it. This was not quite as hard as I feared – lining them up was a bit like focusing. But the overall result was still a bit disappointing on the dark background. I put a little red paint on top, but this risked messing things up so that you couldn’t read the numbers.I decided to cut my losses and make do. The final step was to seal with polyurethane on the transparent ones, and Quickshade on the others, to dull them down a bit.

The next step went much better. This was the weathering. I needed to give the vehicles the dusty look so characteristic of vehicles in action. I was inspired by some of the illustrations in books, and especially one of a Light Mud/Blue Black Polish tank in Real Colors of WWII. With my previous German vehicles I had dry-brushed them with a dusty colour – but this wasn’t really very satisfactory. It helped highlight detail, but inclined to be a bit messy. After experimenting on some old models I developed a new technique. I applied diluted dust-coloured paint (Light Mud with a bit more white and some oxide yellow), and then dabbed it off with a cotton bud. This covered the whole vehicle with a fine patina, and left a bit of a bit of texture. The “dust” tended to gather in the recesses – but real dust does that too. I then put semi-dry brushed further dust colour on the tops of the sand guards and other bits near the tracks.  This also served to give the models a matt finish over the Quickshade. I still gave them a spray of matt varnish to deal with the bits of gloss showing through, and to add a bit of protection.

I’m pretty happy in the end. These aren’t display models, but good quality wargames ones. Having learnt a lot from these project, my next ones should be much quicker. Next is my British infantry platoon.

1943: Light Mud

At last! Back to the painting, which I had been forced to stop in February by pressures from the rest of life. Naturally I am starting where I left off, with my 1943 forces. I need to paint enough so that I can get a game going. When I broke off I was in the middle of my most complex project to date: the Royal Scots Greys’ Shermans at Salerno in September 1943. This means resolving one of the key issues when doing British vehicles in the Italian theatre. What is Light Mud?

Light Mud was the new camouflage colour introduced in 1943 by the British command in the Mediterranean, as British forces became embroiled in the mountains of Tunisia. The desert camouflage schemes based on Light Stone and Desert Pink were no longer appropriate – too pale. Meanwhile the service drabs of vehicles shipped from Britain (dark greens and browns) were too dark. Other colours had been used, including Mid Stone, and various mixes, but Light Mud became the new standard by order from April 1943. It was meant to be used in conjunction with a disruptive pattern in Blue-Black – though it often wasn’t.

But what was it? It was manufactured locally (in Egypt) and any specifications have been lost. I doubt whether many original samples of the paint survive, or not without irredeemable weathering. Almost all photos are black and white, and the colour pictures are unreliable. There are verbal descriptions that mention grey and khaki. This would appear to rule out one suggestion, that the colour was produced from a mix of Dark Stone (a dark yellow) and Desert Pink. That would have given a sort of light tan. It could have been a mix of Desert Sand and Dark Olive Green, the standard colour for disruptive patterns – my personal pet theory, as it would have been a good way of using up stocks of redundant paint. We are left with the idea that it was a light to medium grey, with a dash of khaki about it.

These illustrations from Star Decals is where most people seem to end up.

Another source has been a book published by AK paints called The Real Colors of WWII. This claims to based on careful research, including on surviving samples. It includes quality-controlled colour chits. Inevitably, almost, most of this effort seems to have been on German colours, because that is where most hobbyist interest is. They do have a chit for Light Mud, but I don’t know what sources it is based on. That looks greyer and darker than the star decals sheet, but then the same can be said of the Olive Drab. Tonally the colour seems to be very similar to Dunkelgelb, the standard mid to late war German vehicle colour. But it is greyer, though not that far from the grey end of the spectrum of different Dunkelgelbs. I have used the AK book as my main guide on hue, but looking for a rather paler tone than the chit, because of the scale effect and the use of Quickshade later in the process.

I decided to use the same method that I used to produce Khaki. Start with a base colour of Raw Sienna (an orange-brown), dull it down with Prussian Blue, and add white. I used student colours for the blue and the white, but used up some old Liquitex artist grade Raw Sienna, as I don’t yet have student paint for that pigment. My policy is to use student paints for vehicle base coats, and move to artist quality for finer work.

This took a few goes. After a few months out of practice I may have lost my touch a bit – though it took me just as long to reach a satisfactory Dunkelgelb for my Germans. On two occasions I thought I had it right, only to decide that it was too dark or too green once the model was fully dry. It may be that the paints aren’t drying true – a bit of a risk perhaps when you use student colours.  The result is here, with one of my German Pz IIIs for comparison. The German tank should probably be a bit greyer, but it looks to be within the authentic range. 

It does look a bit green, especially compared to the Star Decals sheets. But apparently that’s how it was. Incidentally it is one of the issues when with working with khaki – it sometimes looks green and at others brown.

The next step will be putting on the Blue-Black disruptive colour. The Salerno pictures show high contrast with the Light Mud, before the dust patina built up.