Monthly Archives: August 2017

1943: my old German tank models get a facelift

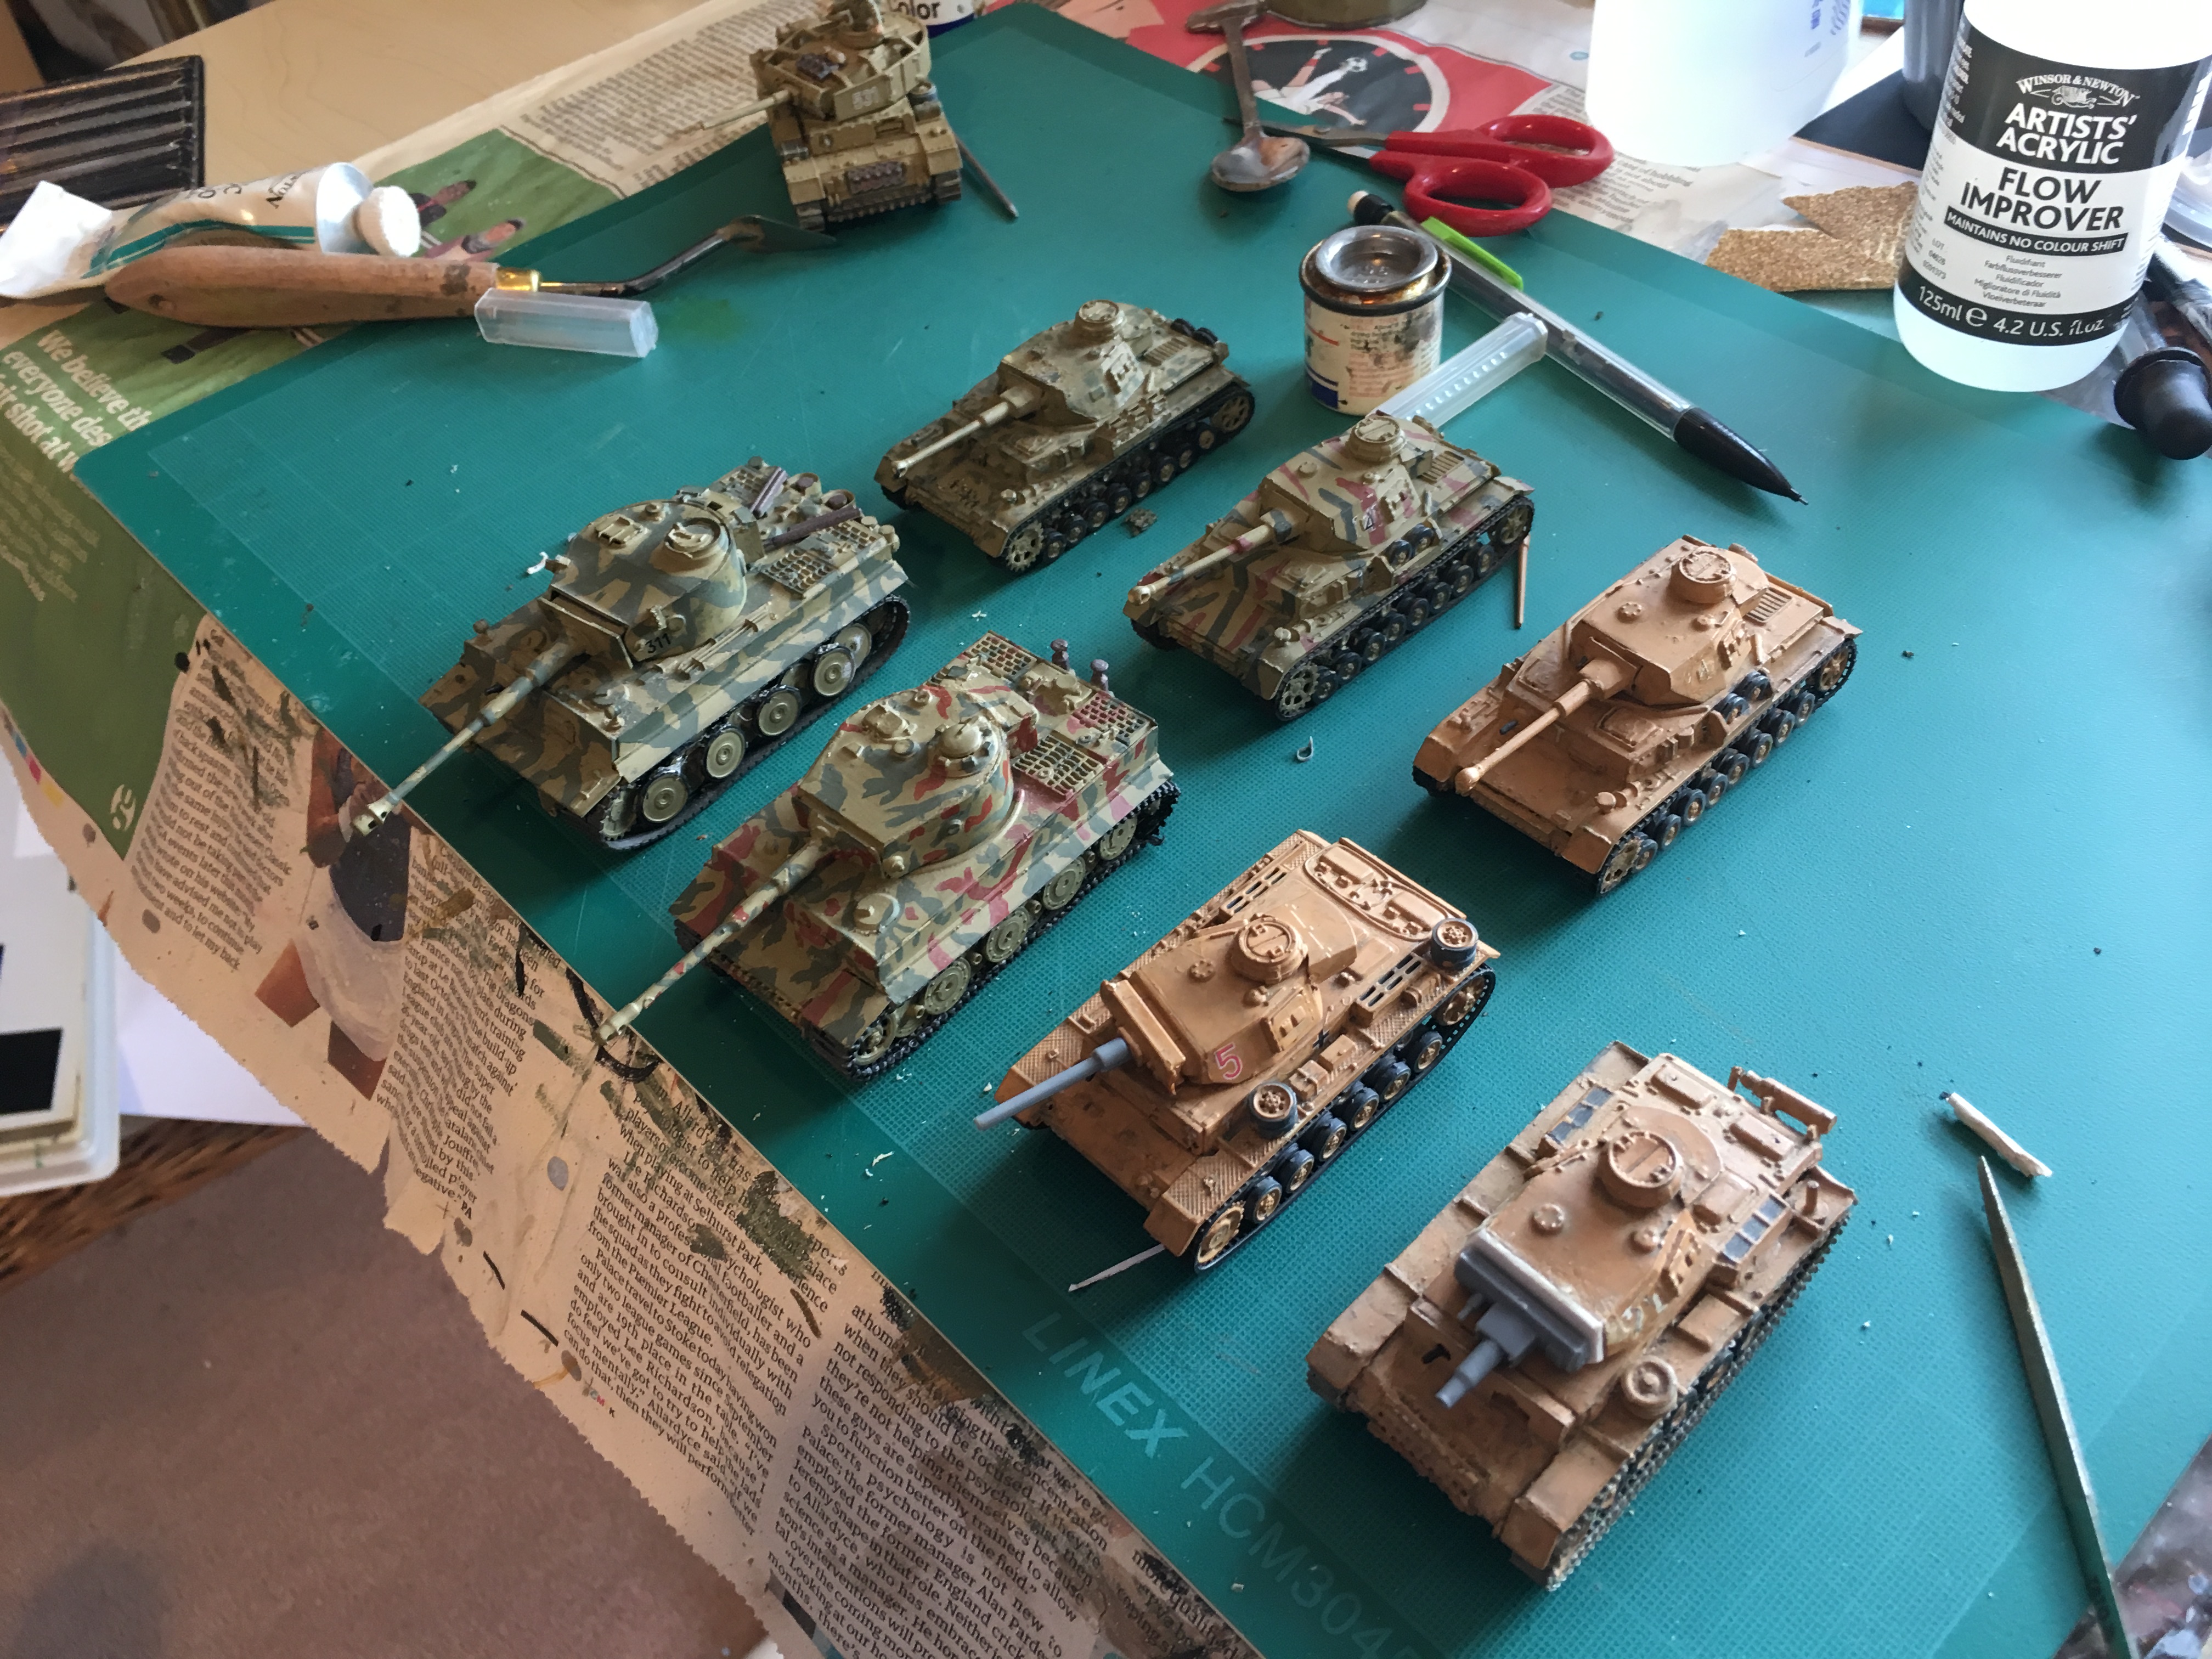
In my post before last I said that the next step this project would be to take my old German tanks and bring them up to standard. This I have now done:

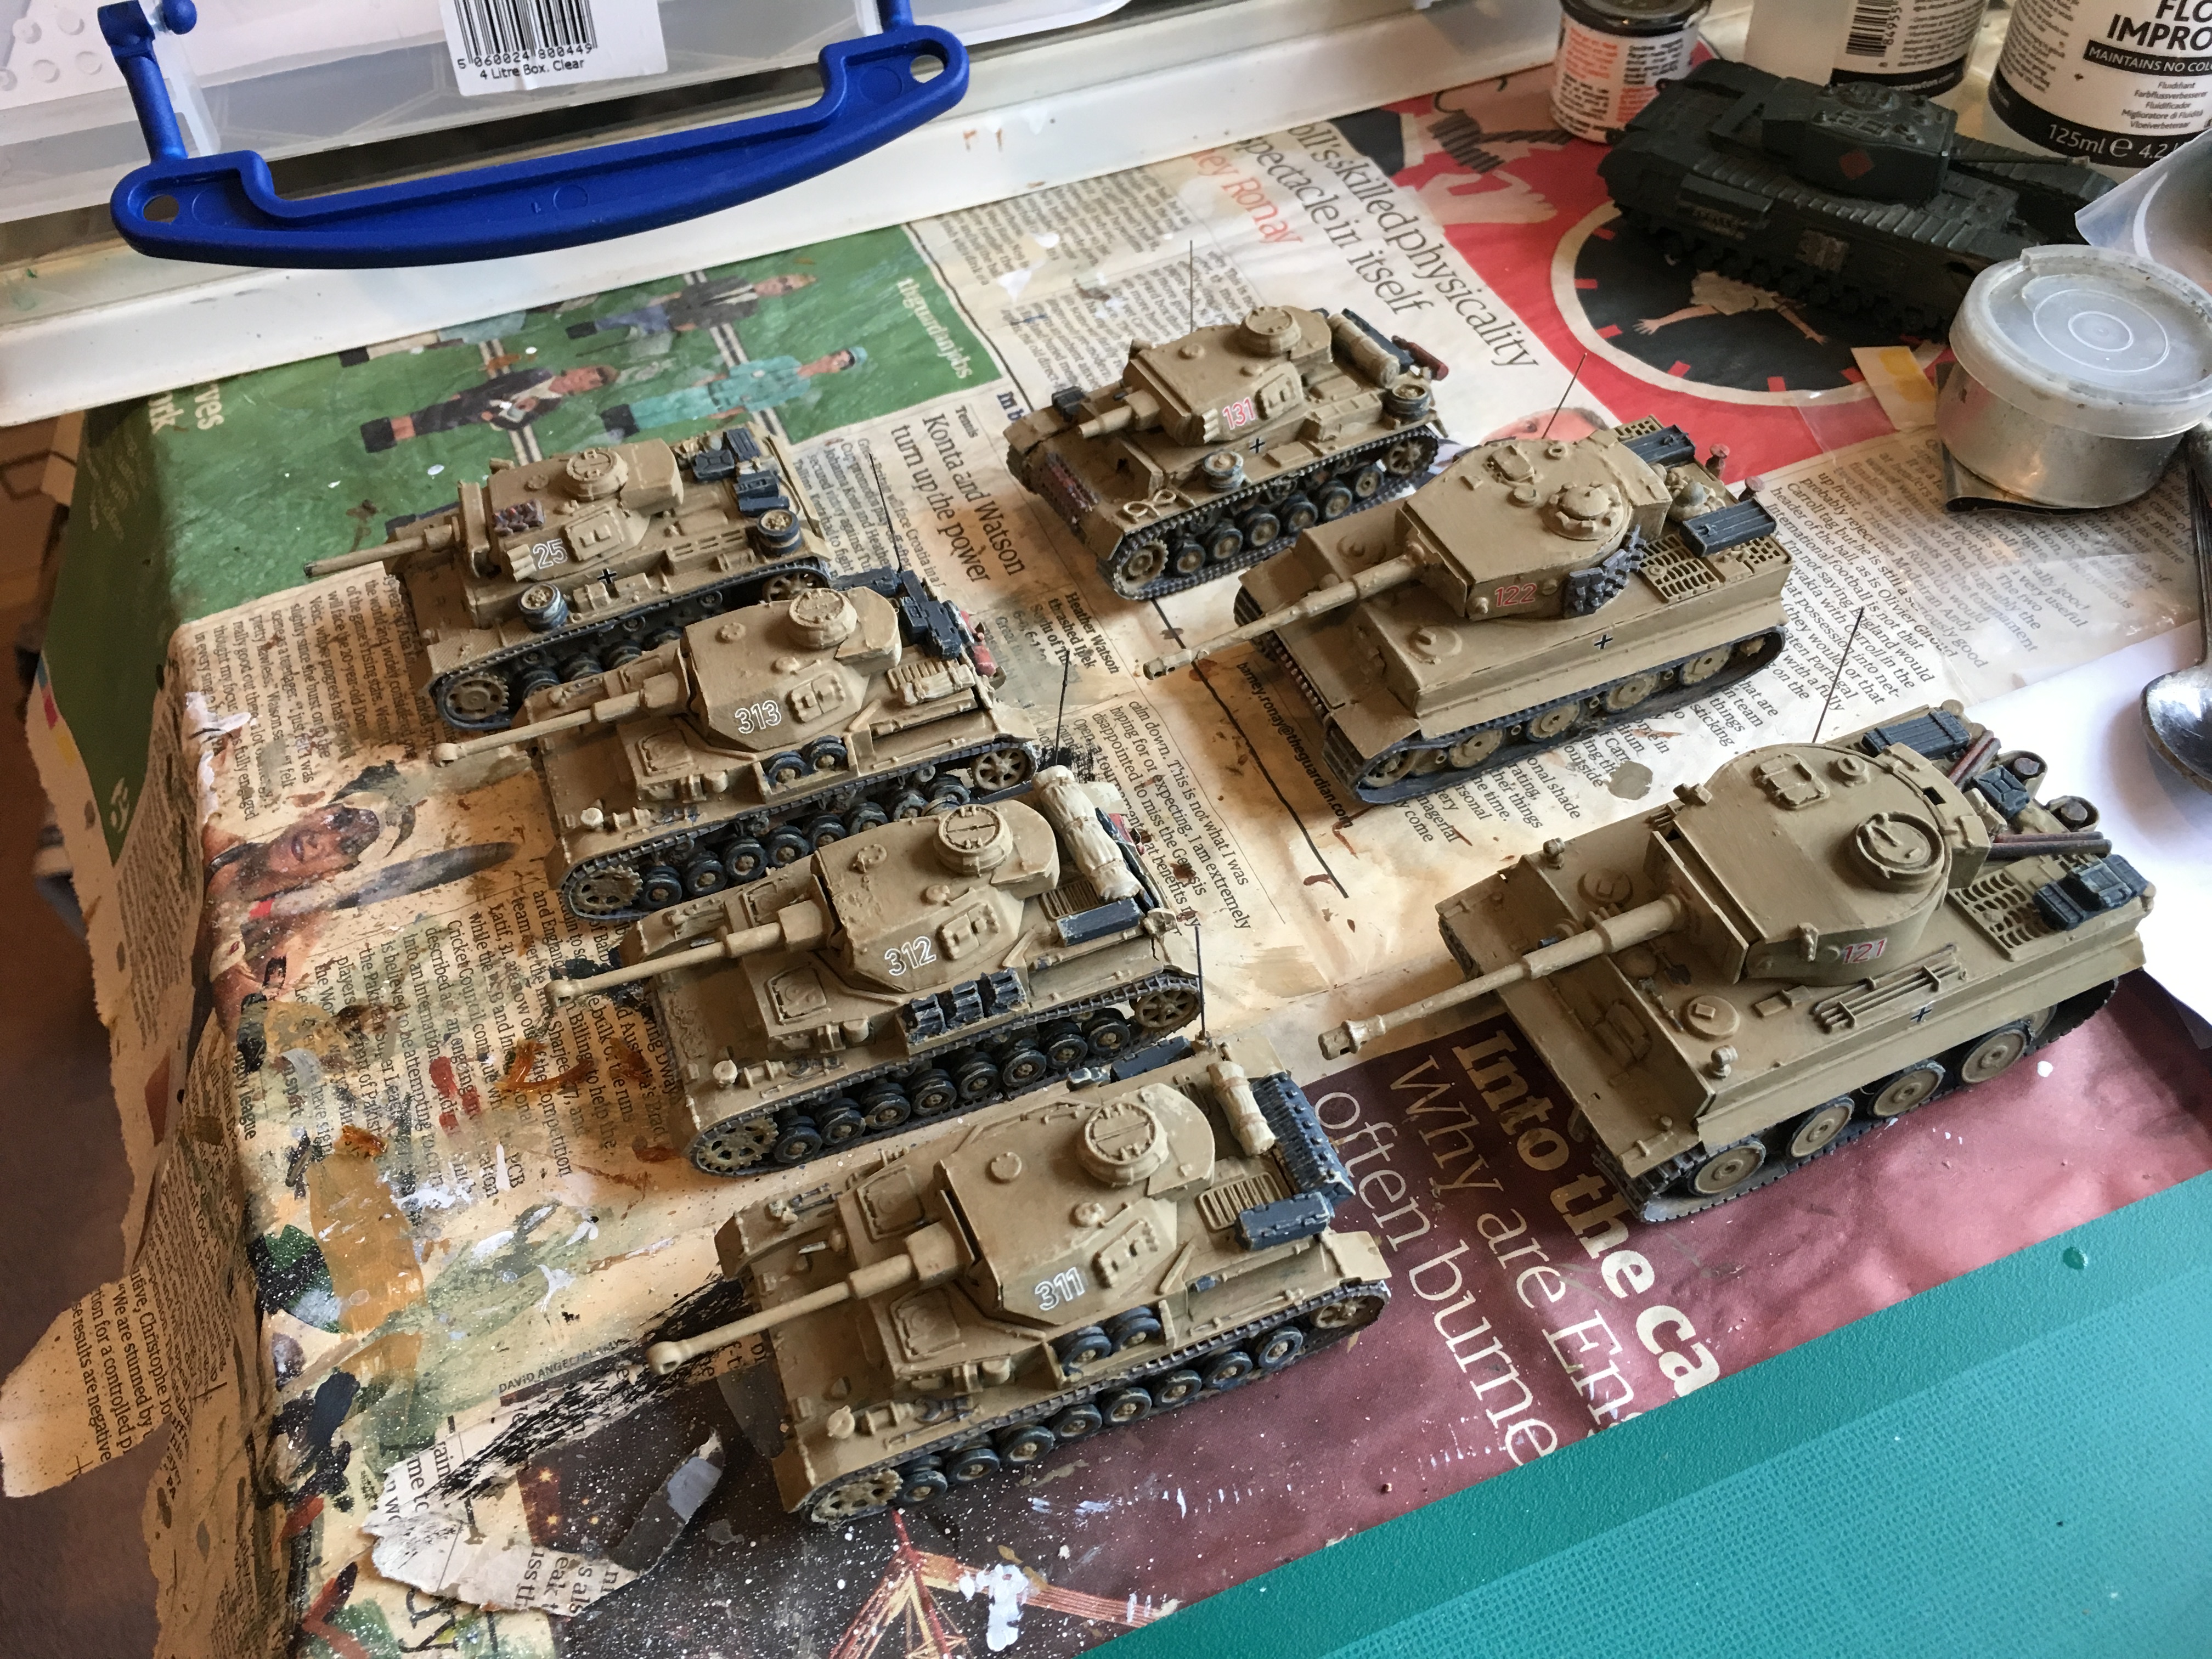
I followed a similar process to my Pz III platoon. First, though, the models needed a little preparation. This included fitting aerials. I used plastic bristles from a broom, but to scale 2m (28mm). These were fitted in a blob of superglue. This works very well – they are robust and have survived quite a bit of accidental battering. I also fitted some stowage from the PSC set. Not as much per tank as the Pz IIIs, and especially not for the Tigers. German tanks of this era don’t seem especially laden – not as much as in the Blitzkrieg era, or Allied tanks. The pictures of Tigers show them as quite clean, except for track bits added to the turrets, which I did for one of the tanks.

I primed the bare plastic additions, and also the polythene tracks, which all these models had, using the white metal primer. I still had some of the adhesion problems on the new plastic that I reported for the Pz IIIs. The primer was slightly diluted, but not as much as before, so that problem remains to be solved. If it isn’t dilution of the primer with water, and not the plastic requiring a wash first, I will change primer – artists gesso looks as if it works well.

And then to the base coat of dunkelgelb. I wasn’t able to reuse the paint I mixed last time – it was too far gone, so I had to mix afresh. I wasn’t able to get an exact match – and that is one of the main issues with my use of artists colours, and why I expect that most hobbyists will find this approach unpersuasive. Still, the mix was arrived at much more quickly (yellow ochre and white, with Prussian blue and terracotta brown added – all from “student” quality paints). The result was slightly greener and slightly whiter than the Pz IIIs, event after the application of the brown Quickshade. Actually I think I prefer it – the Pz IIIs look slight too red. The base coat went on in one sitting, but in several layers. The first was quite liquid, the others much dryer. I lightened the mix a bit as I put more on. It’s hard to say whether the layering had any effect, byond smoothing and imporving the coverage. I don’t think the models looked as flat as my old single coat of Humbrol enamels did, but the layering is not visible to my eye. Incidentally the paint dries very thin, so the layering did not obscure the detail. One of the tanks was victim of several layers of Humbrol, though, and the detail was noticeably less sharp on this one. The quick succession of the various layers may have had the effect of taking off excessive accumulations on the detail rather than accumulating it. Anyway, this looks like a good technique. The first coat takes a bit of time to apply; the others are very quick.

After that came the detailing, including the tracks, wheel tyres and stowage. With no crew to paint this was simpler. Then there was a dry brush of dust colour (the dunkelgelb with white), which was not as heavy handed as last time, though there were still some excess blobs.  And so to the Quickshade.

The decals came next. I was more sparing, since these are going to be second-string miniatures. Only two turret numbers. The Pz IVs had no Balkenkreuse on the left (because of stowage) and the Pz IIIs none on the rear. Even so I’m down to my last two of the small (3mm) ones, which will give me issues. I sealed with polyurethane again – but only after the decals had had nearly 24 hours to dry out – they seemed much more robust. Like the Pz IIIs the flash is still visible from some angles though. With the Pz IVs this is made worse because they had to be applied over a slight bump on the turret, which they couldn’t quite do as tightly as I would wish for. I am wondering whether I should revert to a technique I used on my model aircraft 40 years ago – which is to float the decals off the backing paper as normal, wipe off the glue backing them, dry them and then place them using varnish. These modern decals may be too fragile – but this technique worked a treat back in the day. I will have to experiment. Finally I finished with a spray of matt varnish.

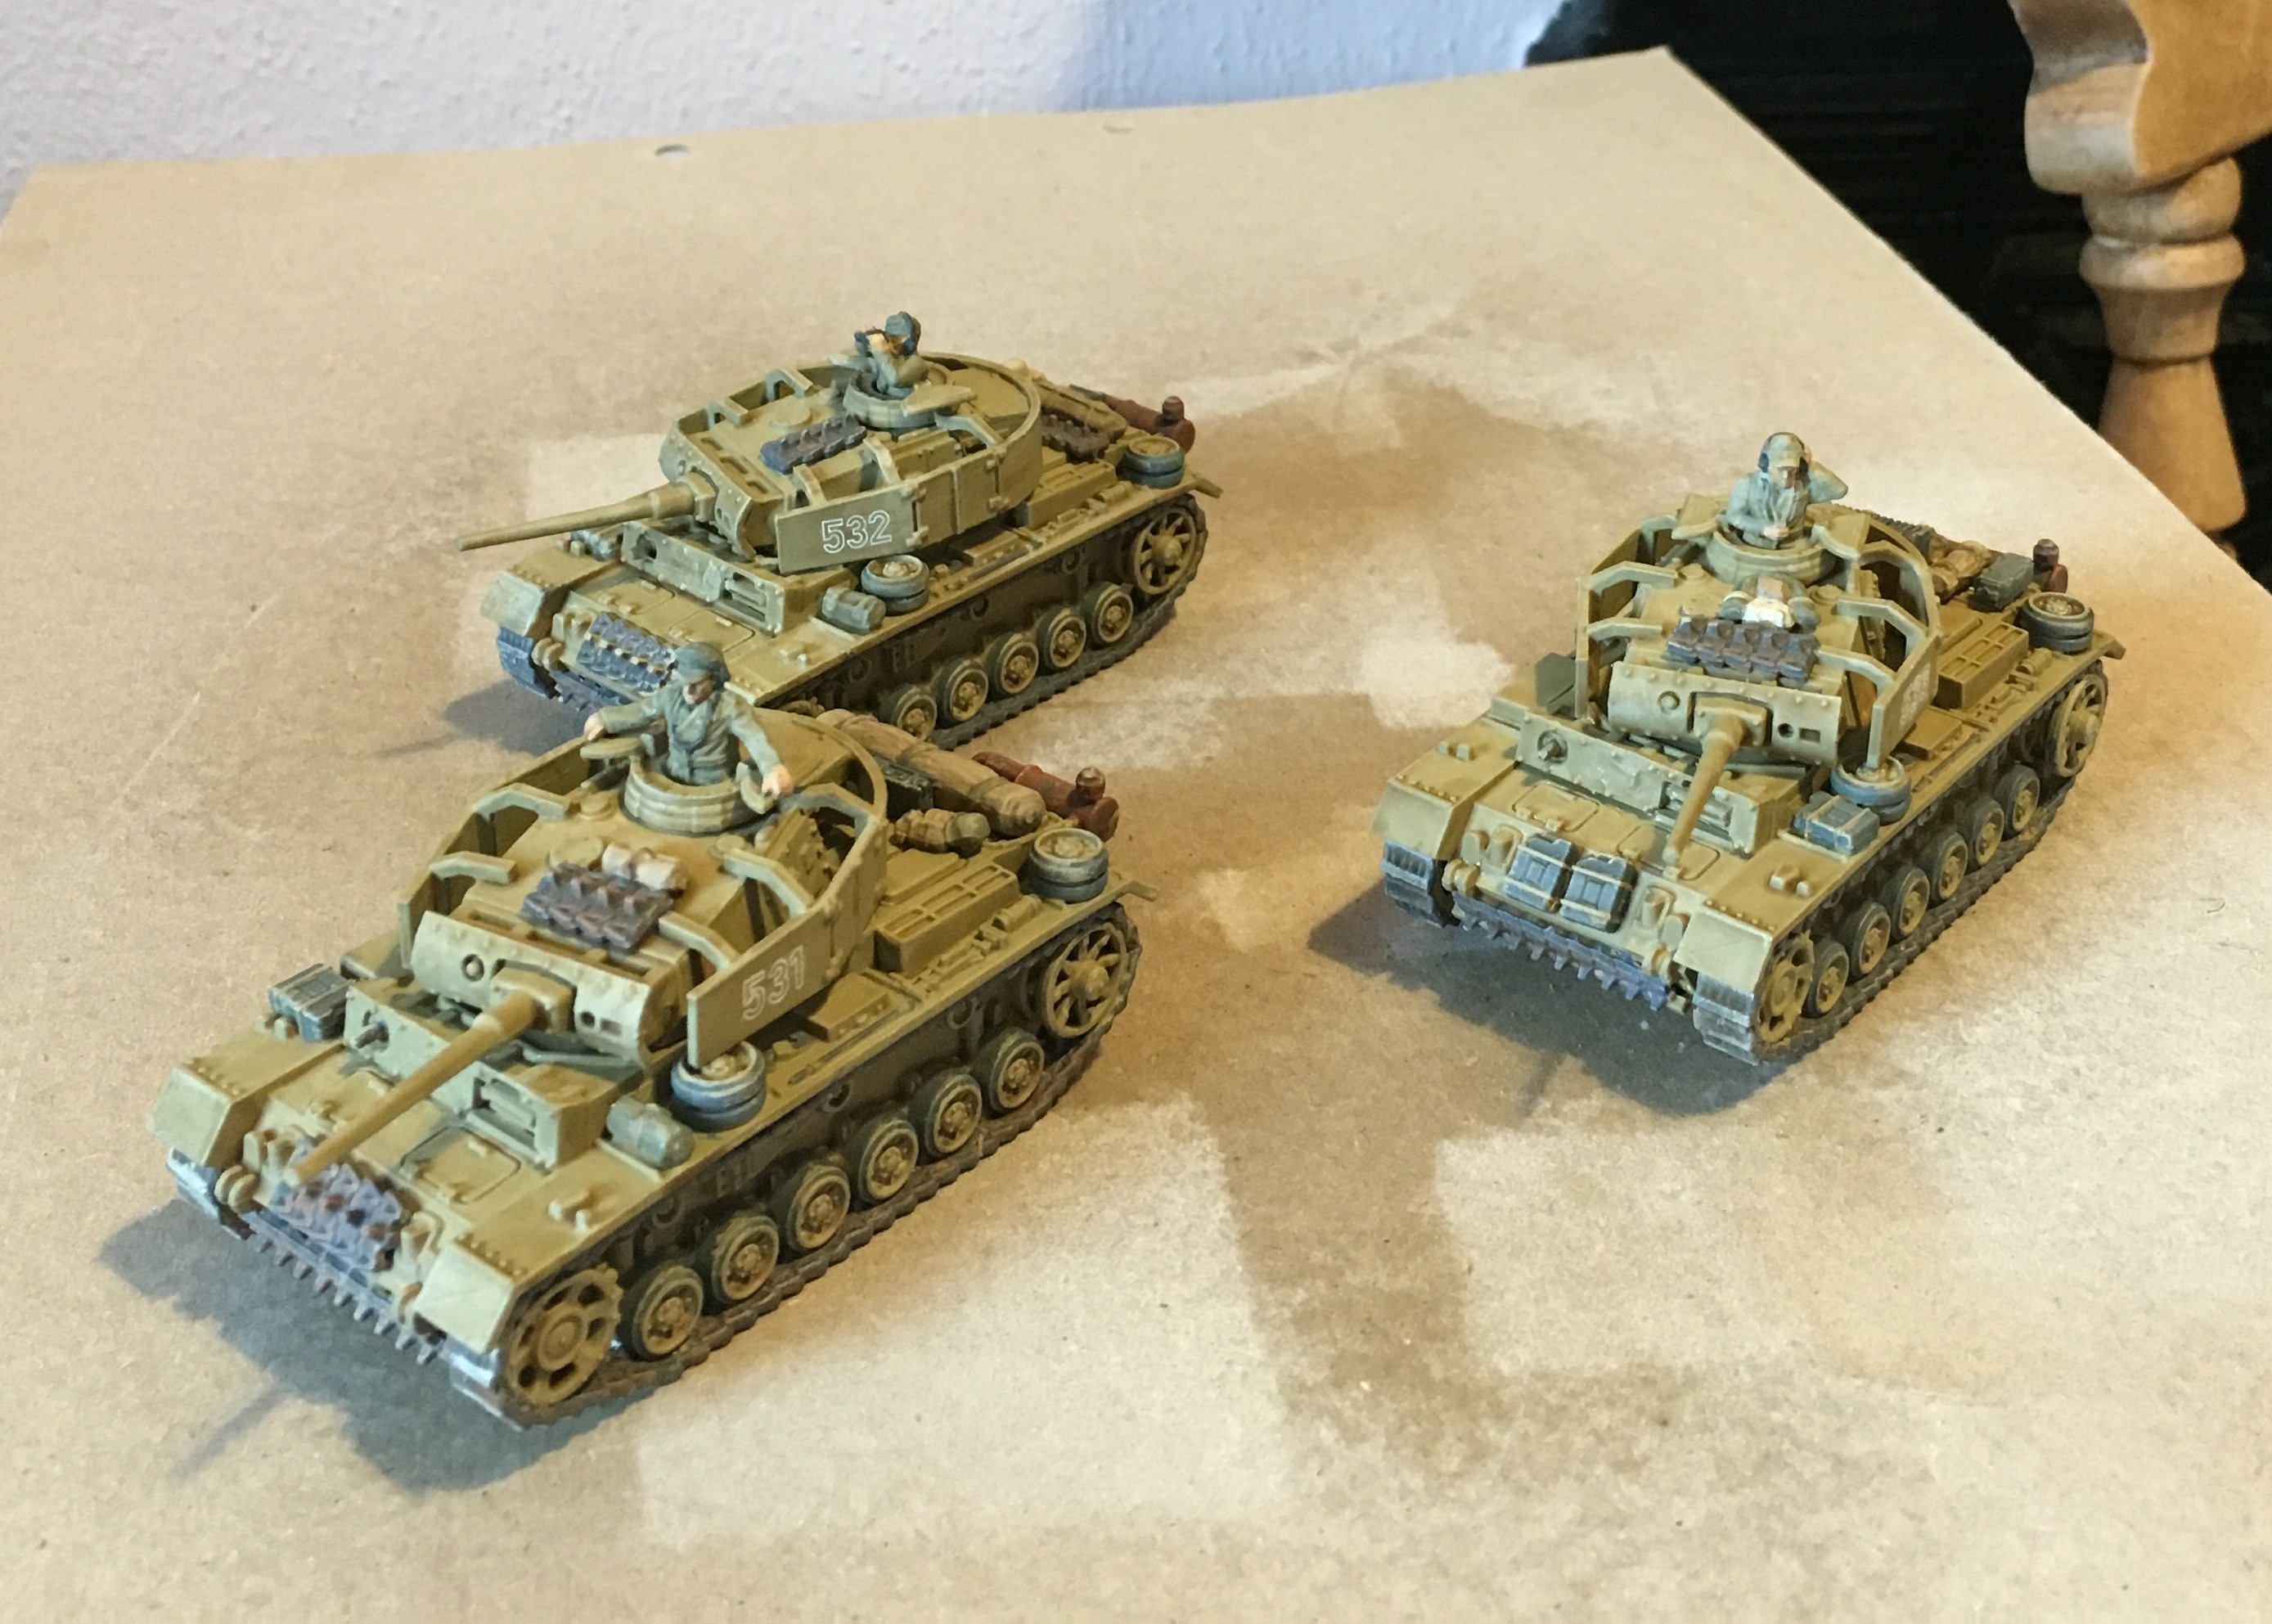
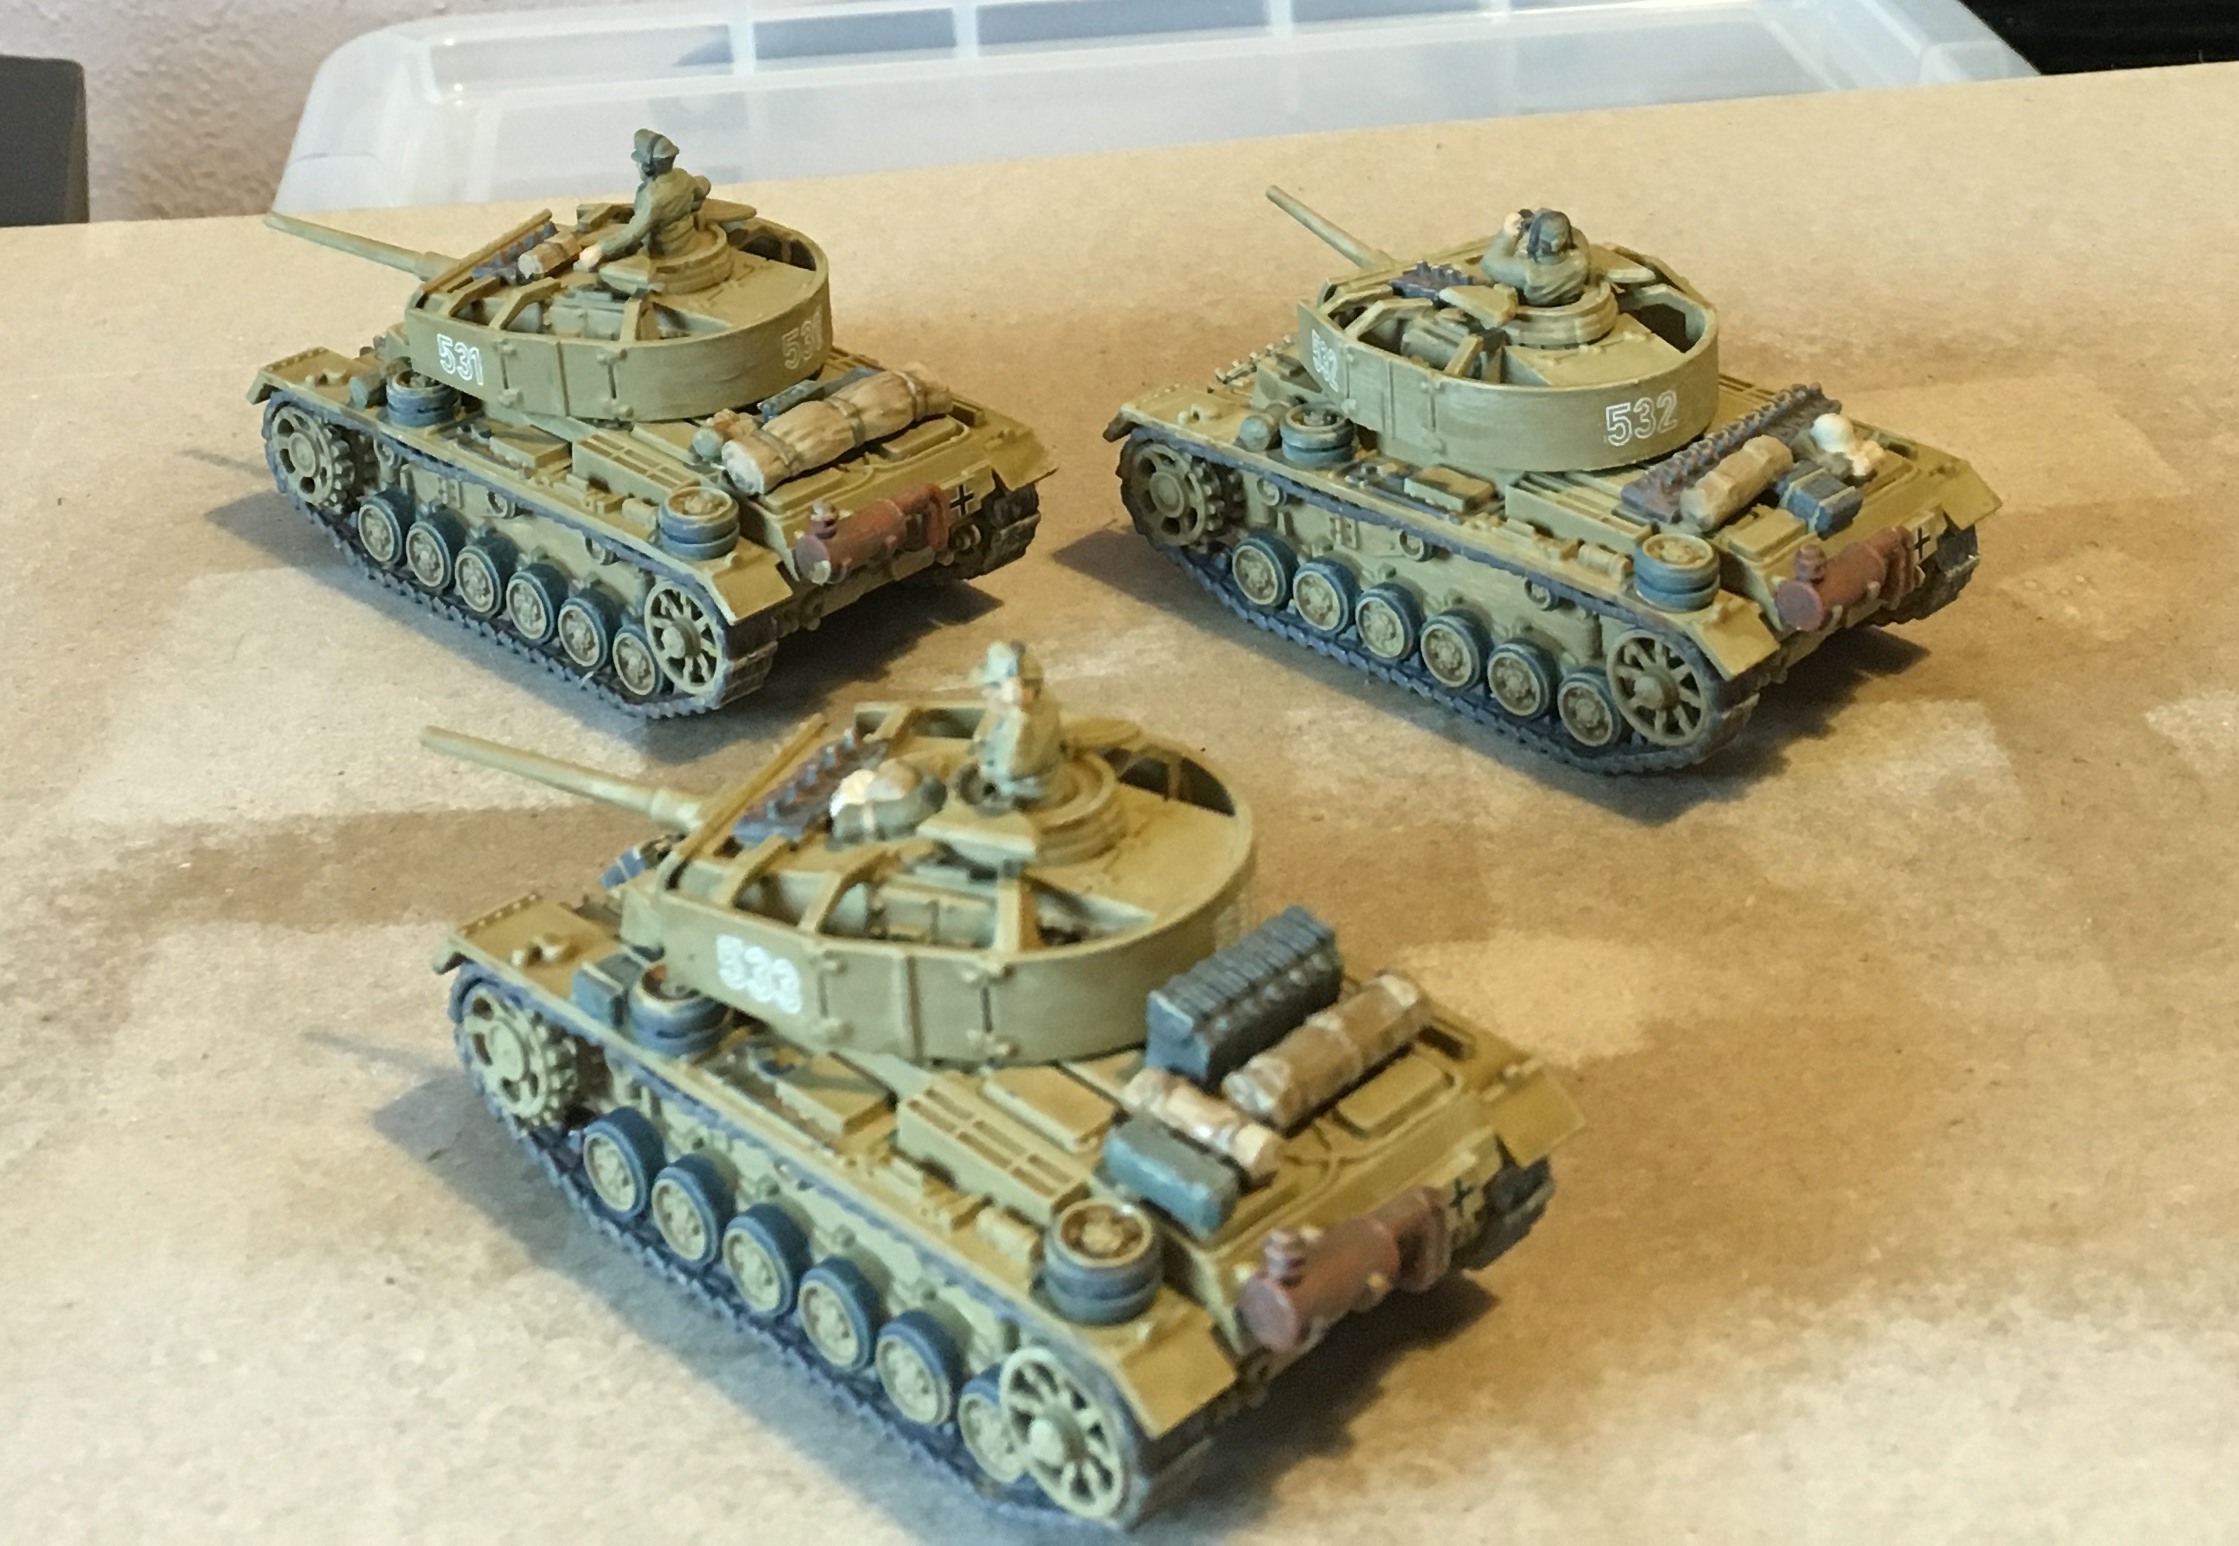
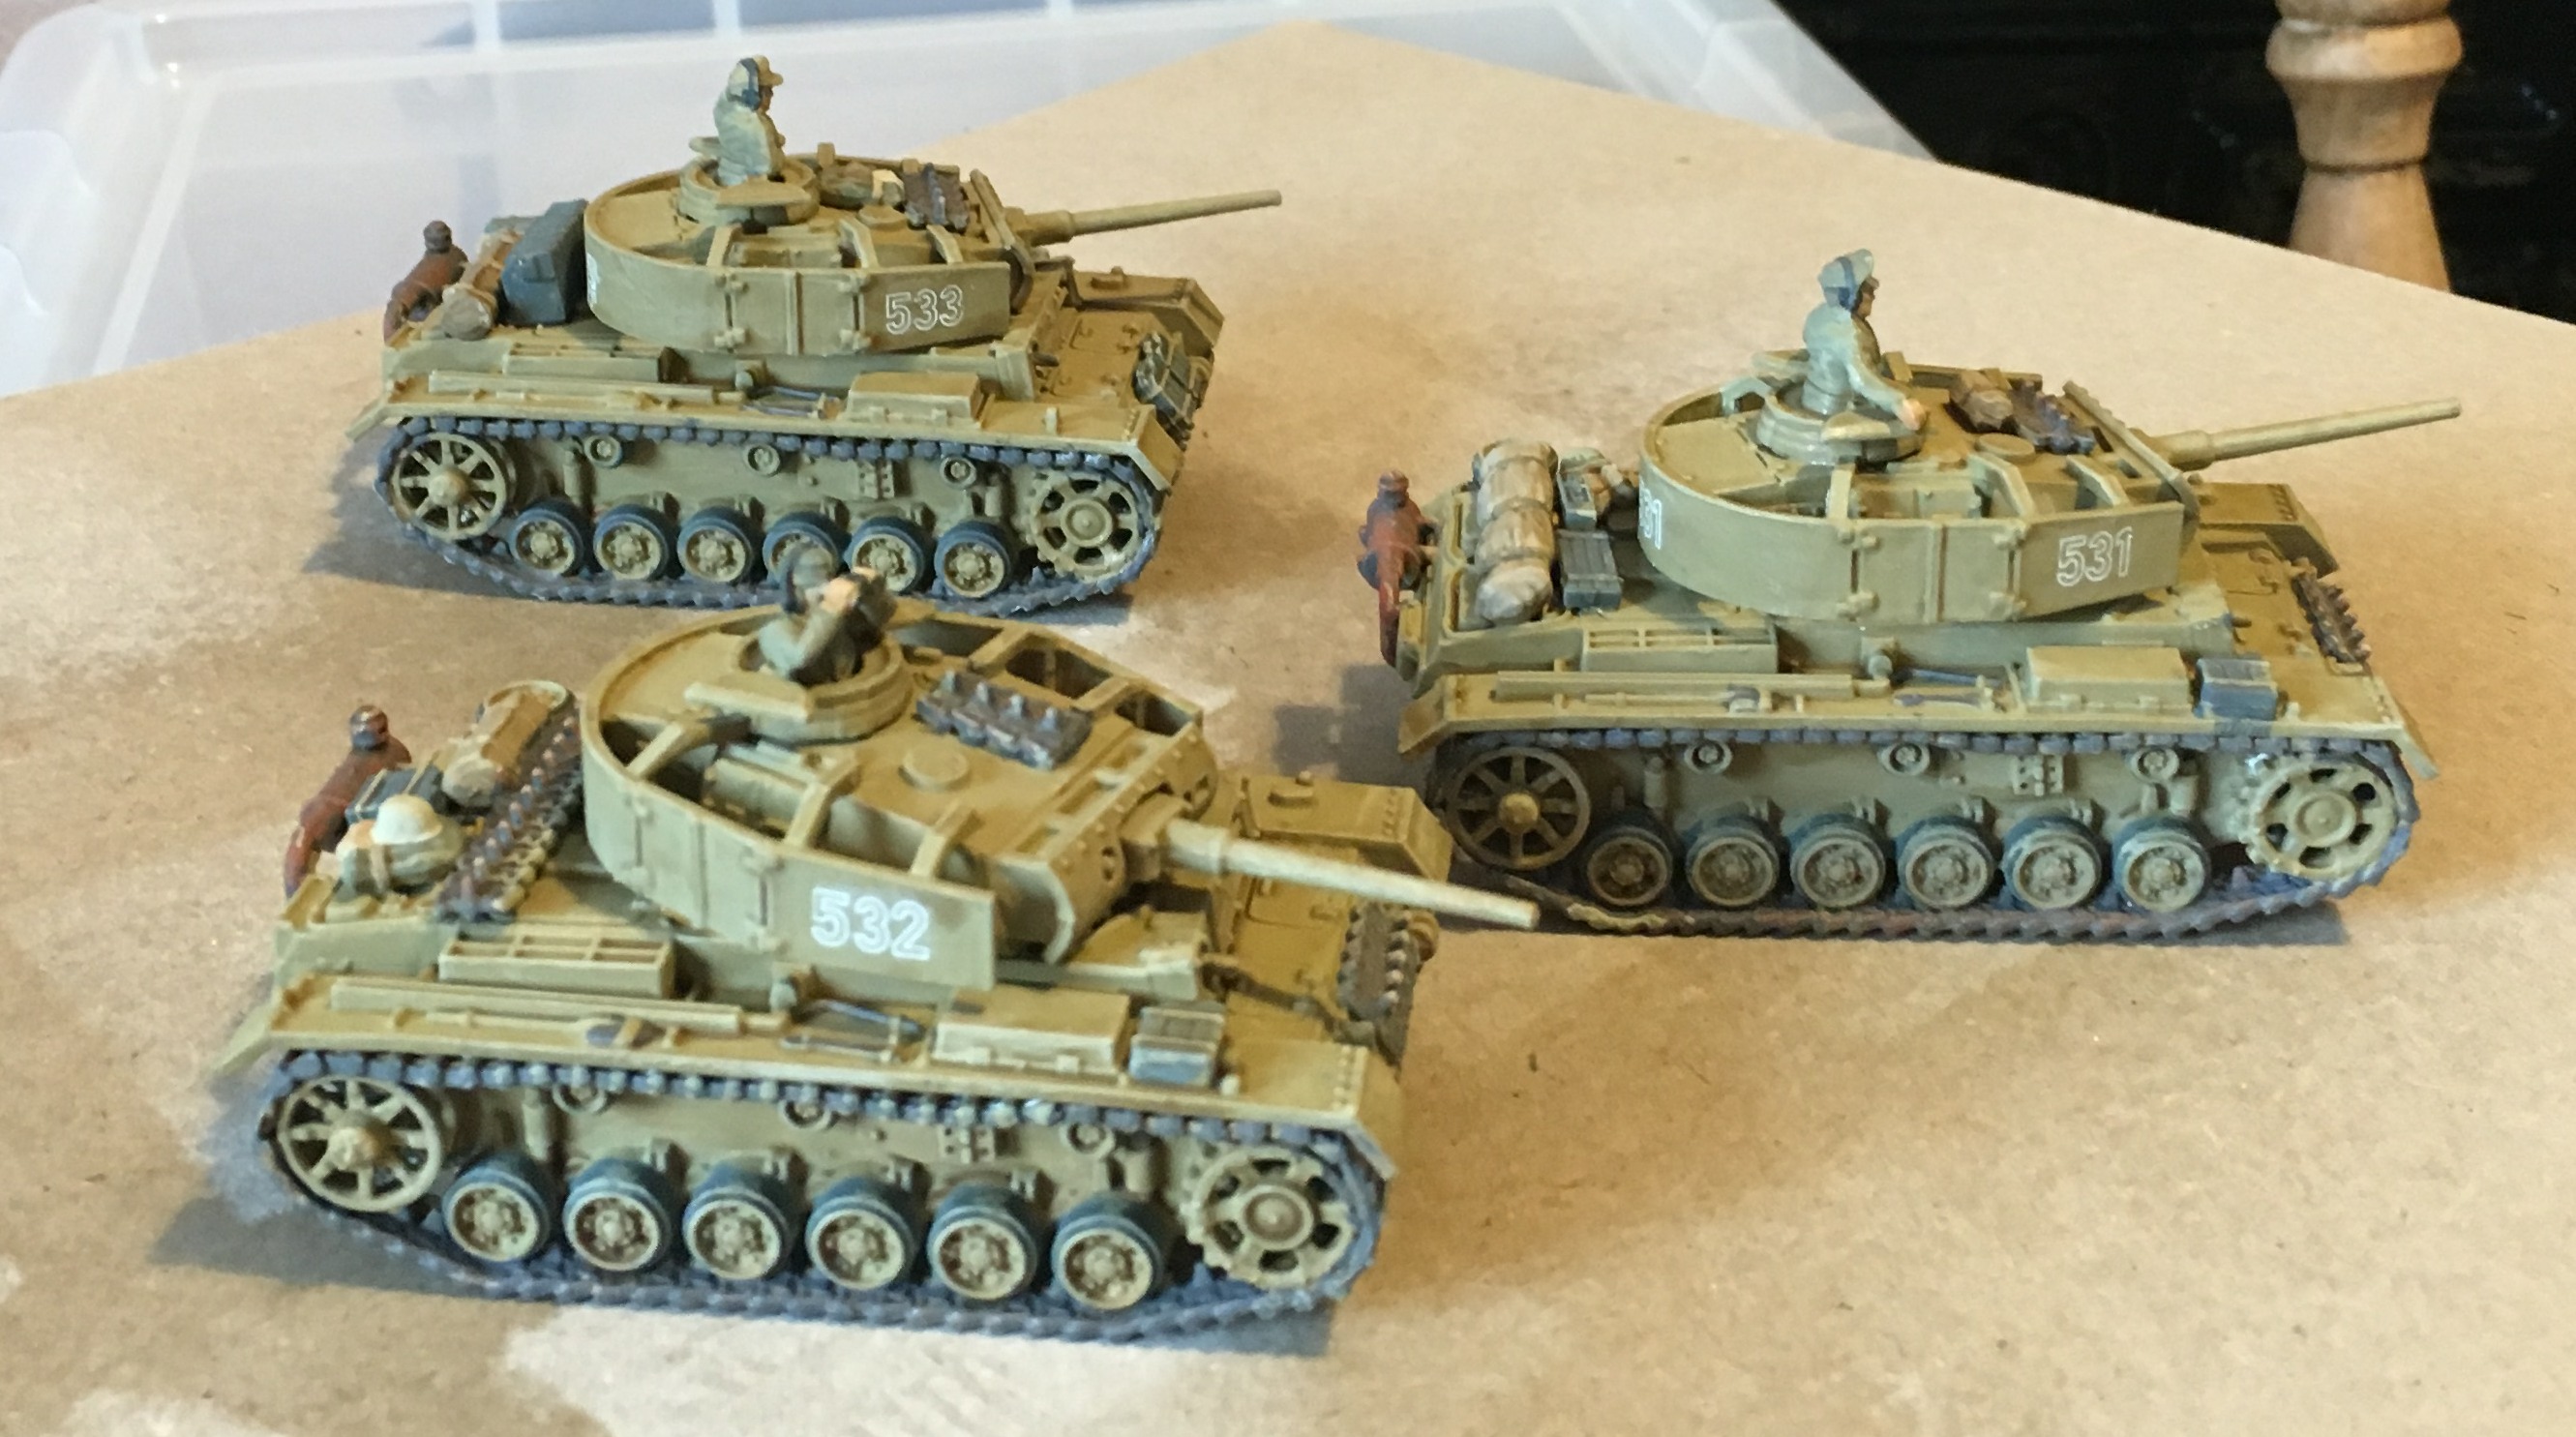
Lets look at them in a bit more detail. First the three Pz IVGs:

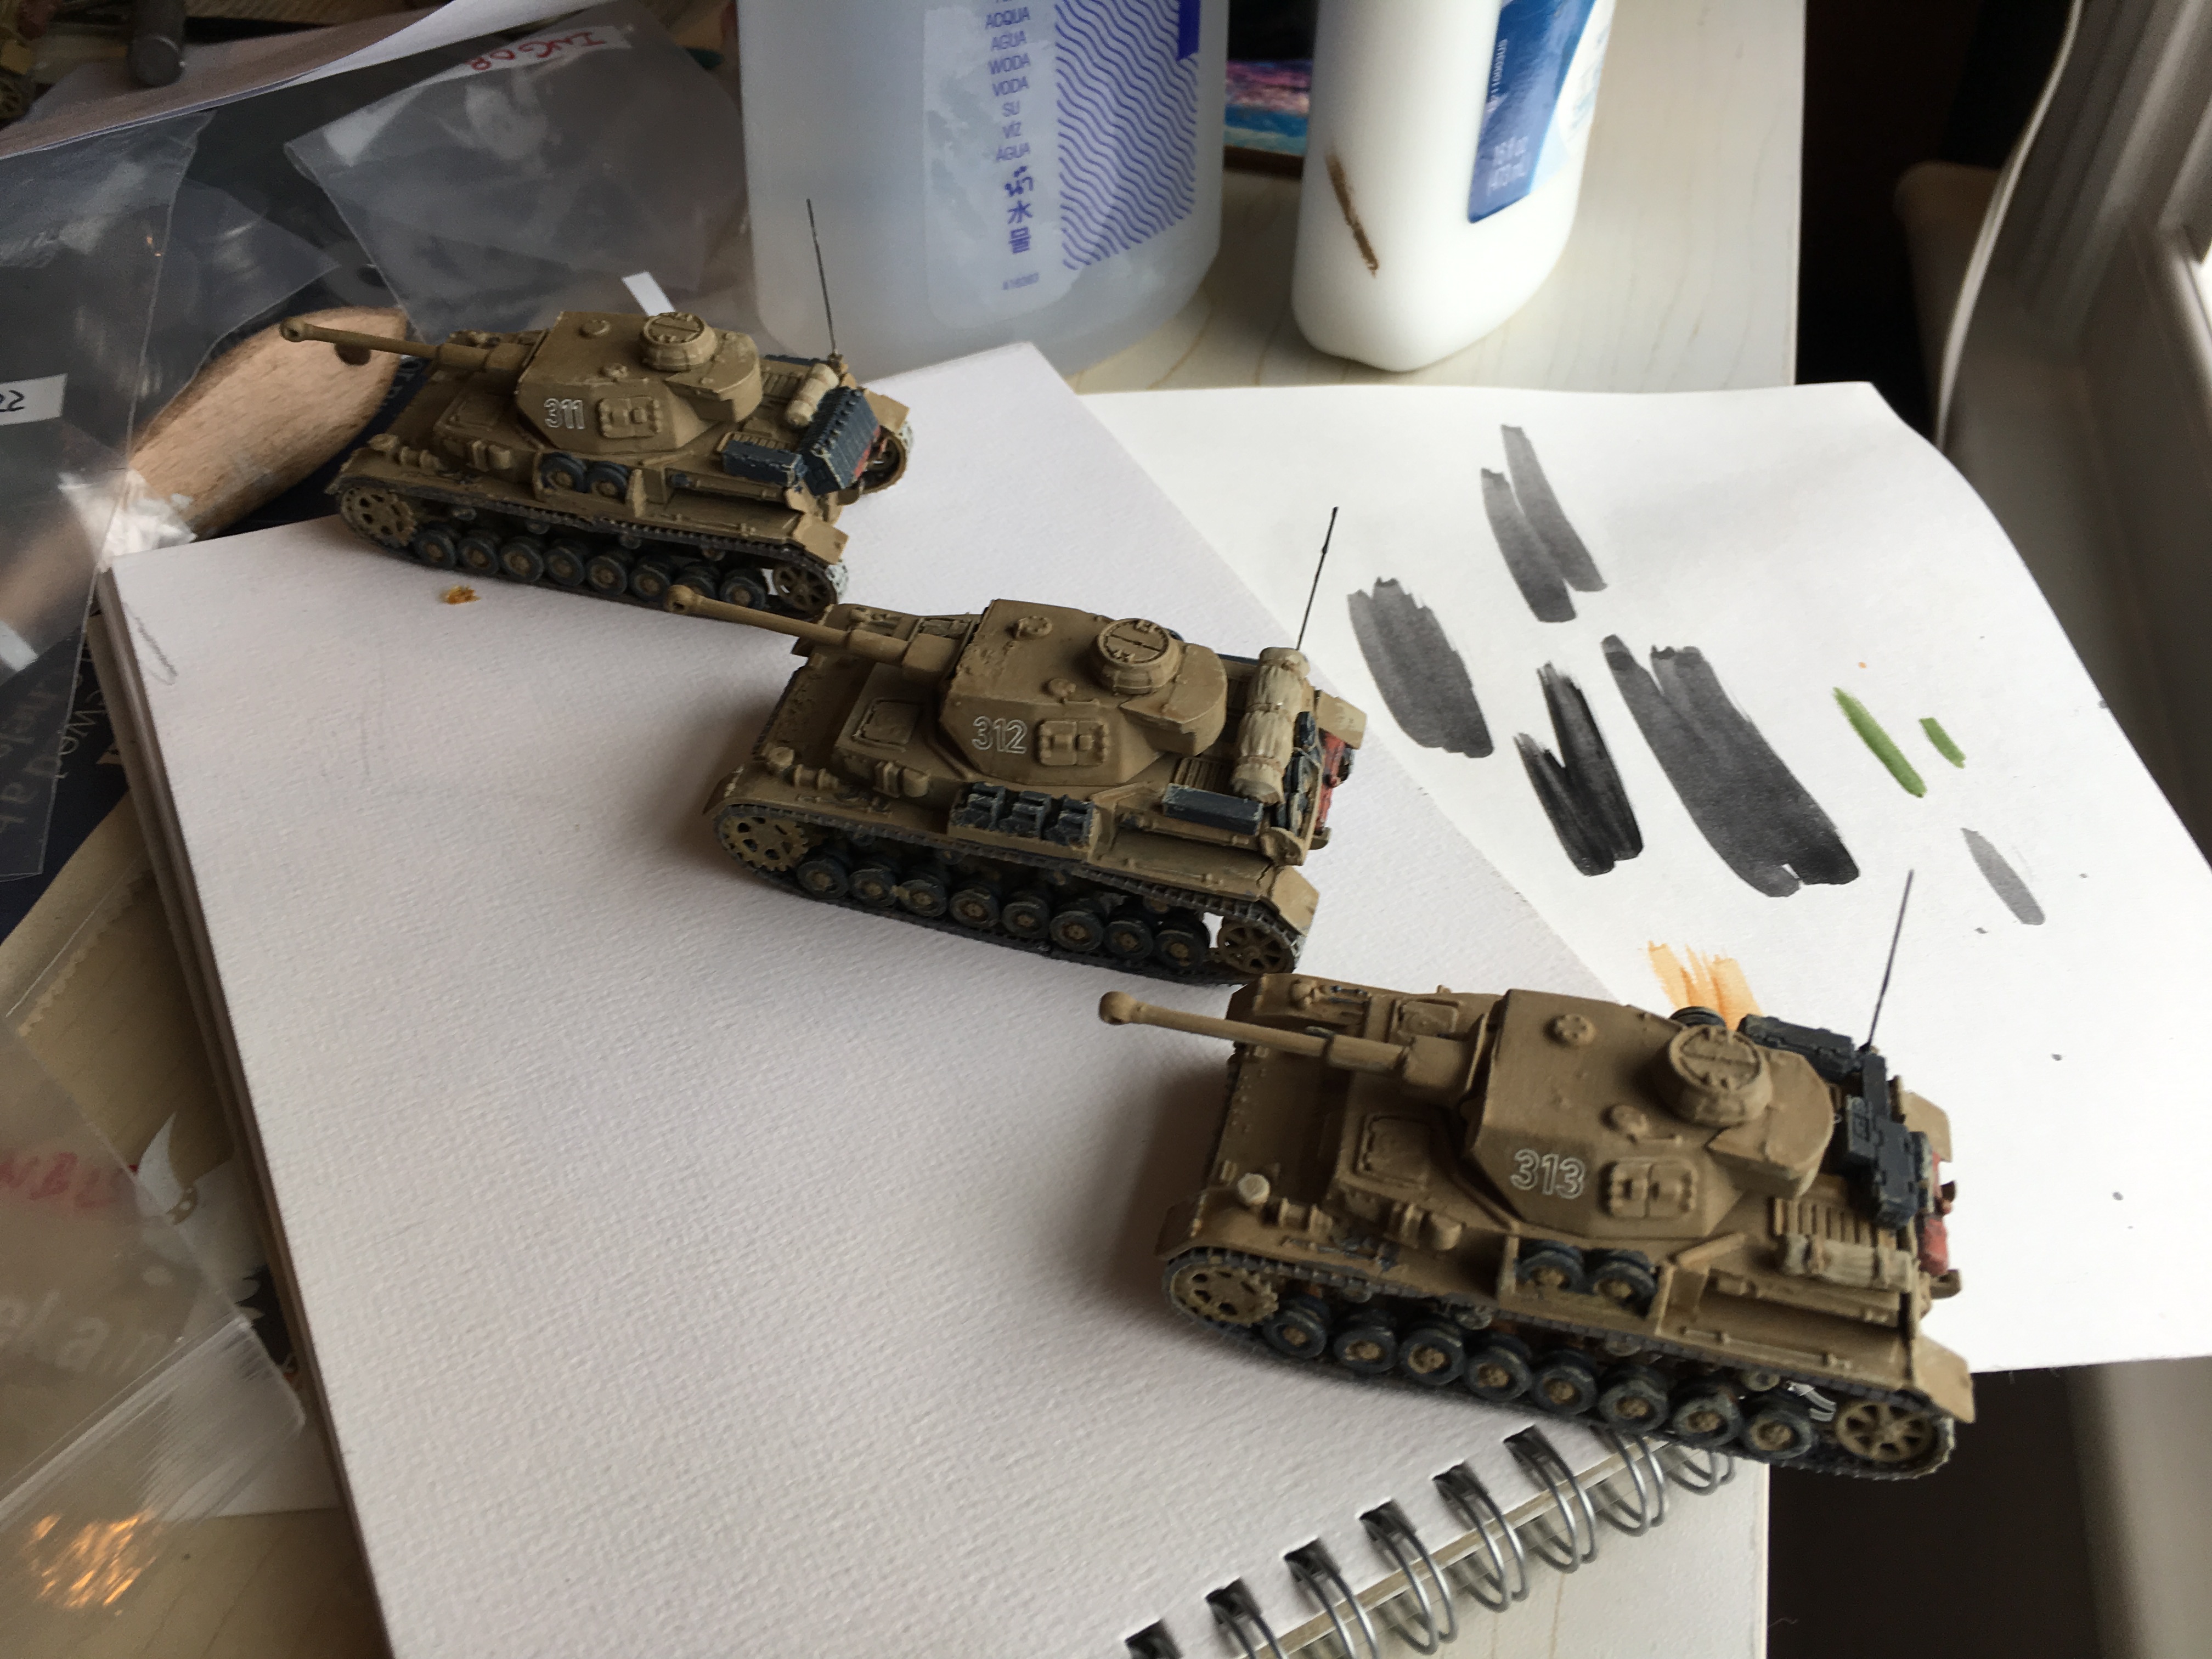
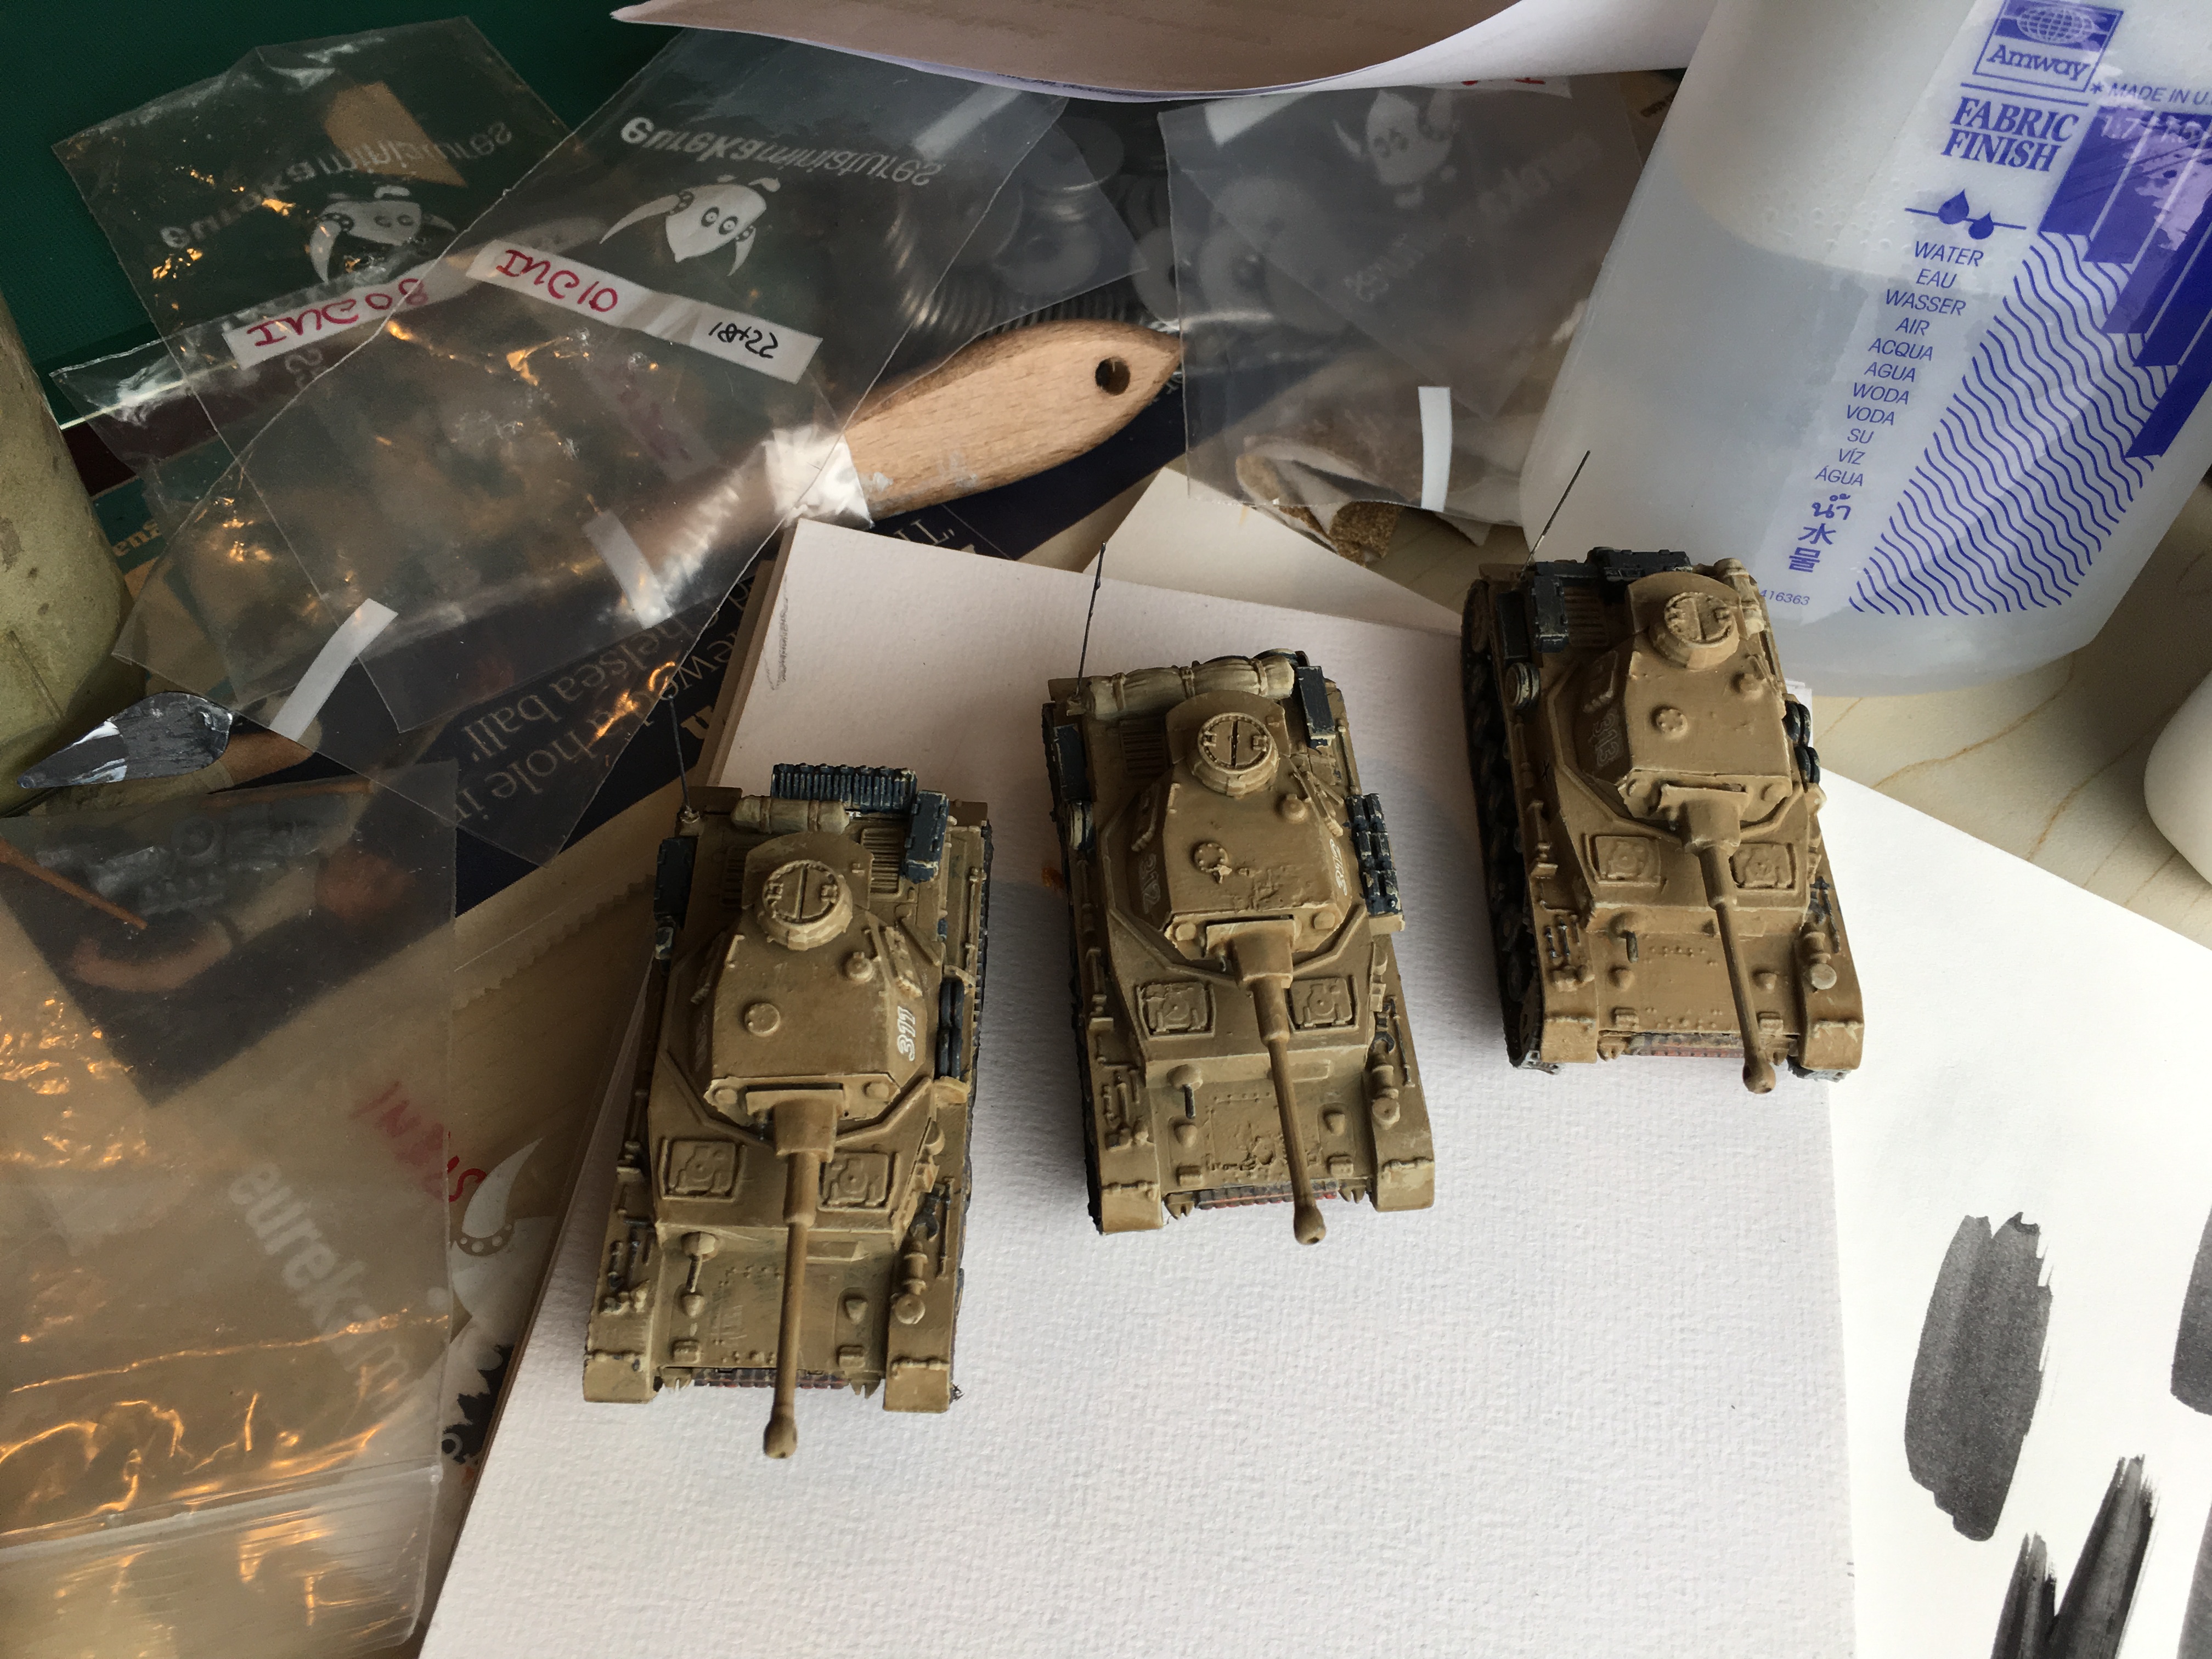
The lighting conditions were a bit challenging, so these pictures aren’t very good I’m afraid. These are Airfix 1/76 kits. I was very excited when these first came out. Until then the only German tanks readily available were the Tiger, Panther and StuG III. These set up very unequal battles with the Airfix Shermans. And this model was of a higher standard too. One of these models (213, closest to the picture) was my first, which I painted green at first (we knew no better). I then repainted in the fictitious desert orange that Humbrol  produced. The layers of paint did the model no favours. The other two models came in later, when I was more serious about wargaming, and had more money. I painted them in the Humbrol dunkelgelb, with (different) camouflage patterns. The models were a bit tricky to assemble, and there are gaps, and some of the wheels are a bit wonky (and one of the top rollers missing). Also my handling of the polythene tracks was very inexpert. This time I did not think it was worth the time to attempt to correct these errors, I painted as was, with a bit of extra stowage. I numbered them as a complete platoon, and these will be useful on the tabletop, until I can produce some smarter 1/72 Pz IVs (which will be Hs with shurzen on the turret).

The aerials, incidentally, are almost certainly in the wrong place for 1943. Like the Pz III, the Pz IV was originally fitted with a solid, tapered  “stern” aerial beside the turret, which folded down when the gun got in the way into a wooden tray on the side of the hull. But this tray is not modelled on the Airfix kits, so I fitted whip aerials at the back, according to later pictures of Pz IVs that I have seen. This creates less hassle with rotating turrets.
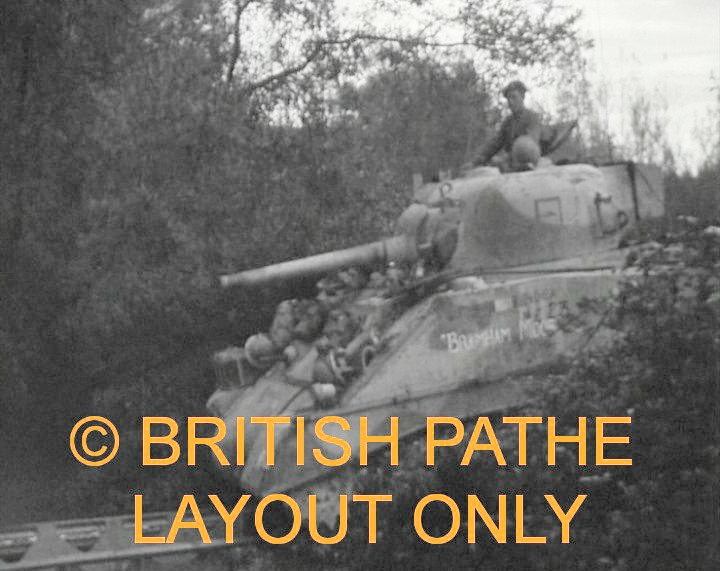
Next the Pz IIIs: 
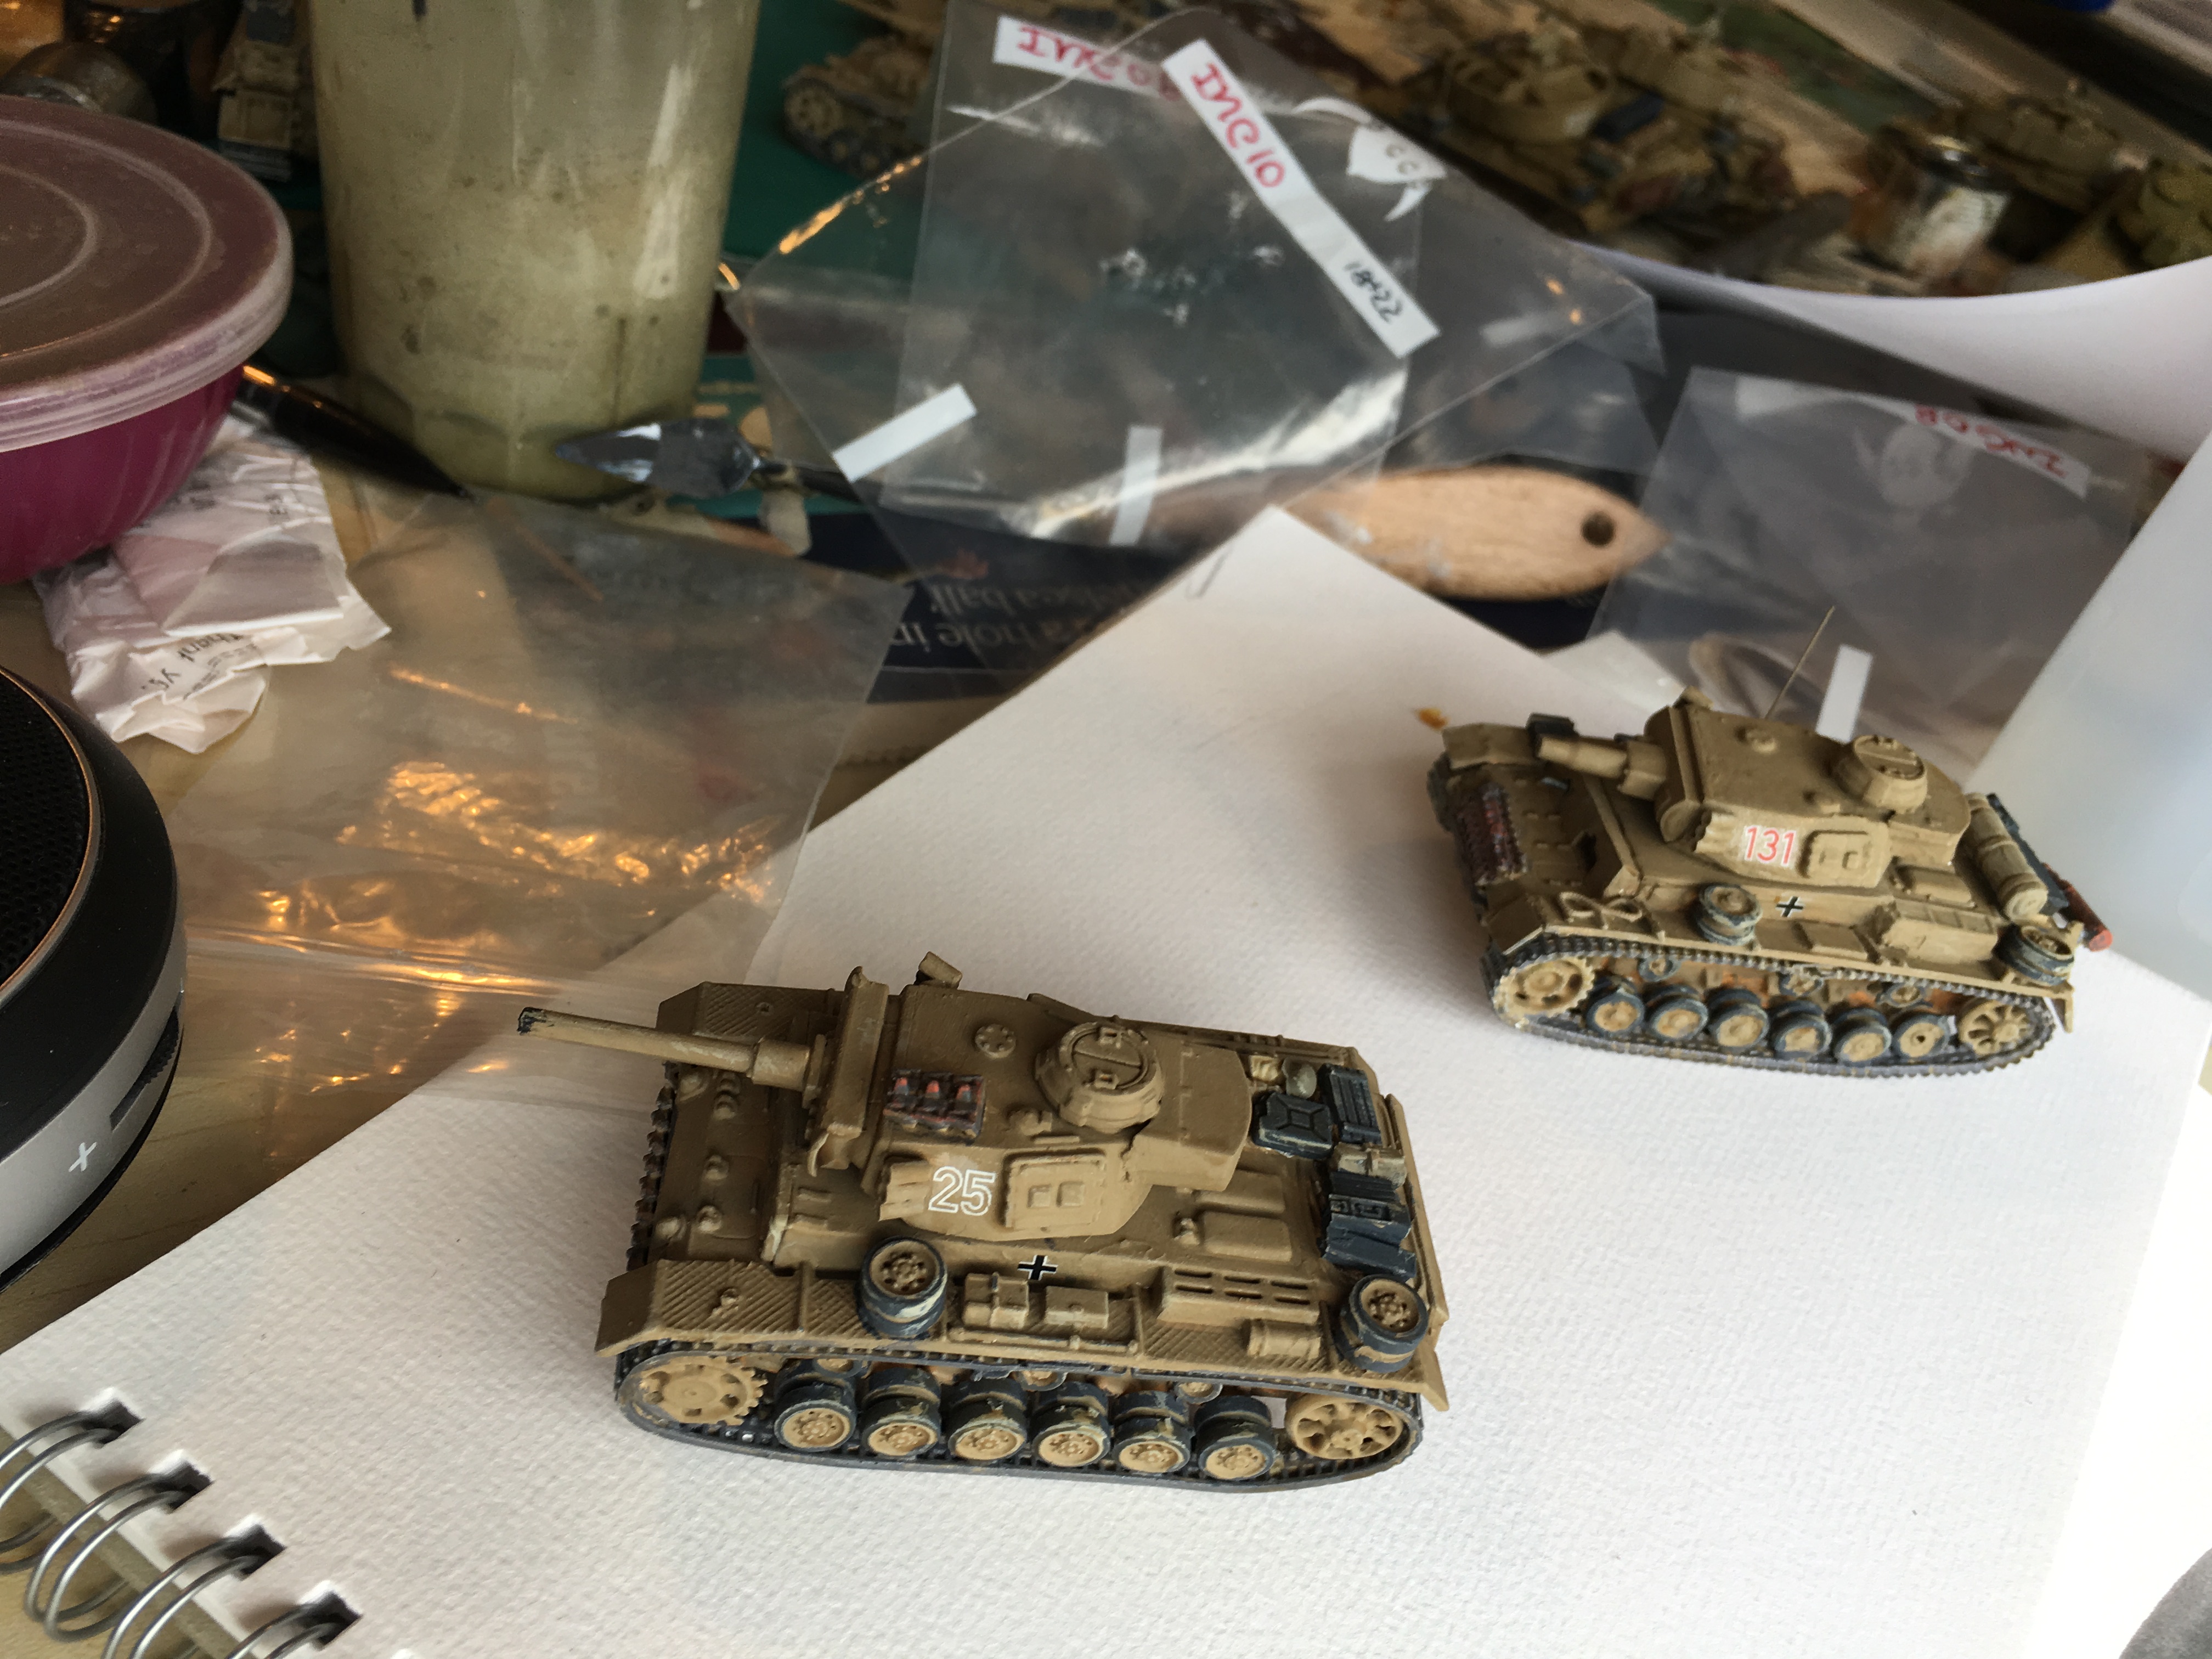
The foreground model is a Matchbox kit at 1/76. This was one of my more recent acquisitions, when at last we had a wider variety of models available. It is a nice clean model, which had fewer of the assembly issues than the other ones. Its only problem (apart from being unable to open the hatch) is that the 1/76 scale makes it look a bit small compared to the 1/72 tanks. For this model I replaced the barrel with the flammpanzer one from the PSC kit, as well as smoke dischargers. This gives me an extra tabletop option – though I can’t deploy a complete platoon, as the Germans did apparently at Salerno, though they proved vulnerable to the Shermans. I did not fit an aerial for this one, for the same reason as the PSC kits. The model clearly shows the stern antenna stowed in its box along the track guard.

The backgound model is a conversion I did from the Airfix StuG III. This lacks the detailing of the proper models, but helps make up the numbers. I replaced the gun and rather crude mantlet with the short 75mm from the PSC kit (slightly overscale, but looks OK), along with the smoke dischargers (I couldn’t fit them to the PSC models because of the turret schurzen). The model is a bit wonky, but it gives a bit of support to the Tigers, with which this sort of tank operated. I fitted an antenna to this one, where the folding stern antenna would have been – though the bristle is a bit too thin at the base. Given the weak detailing on the model I though it would help lift it a bit.

And so to the Tigers:
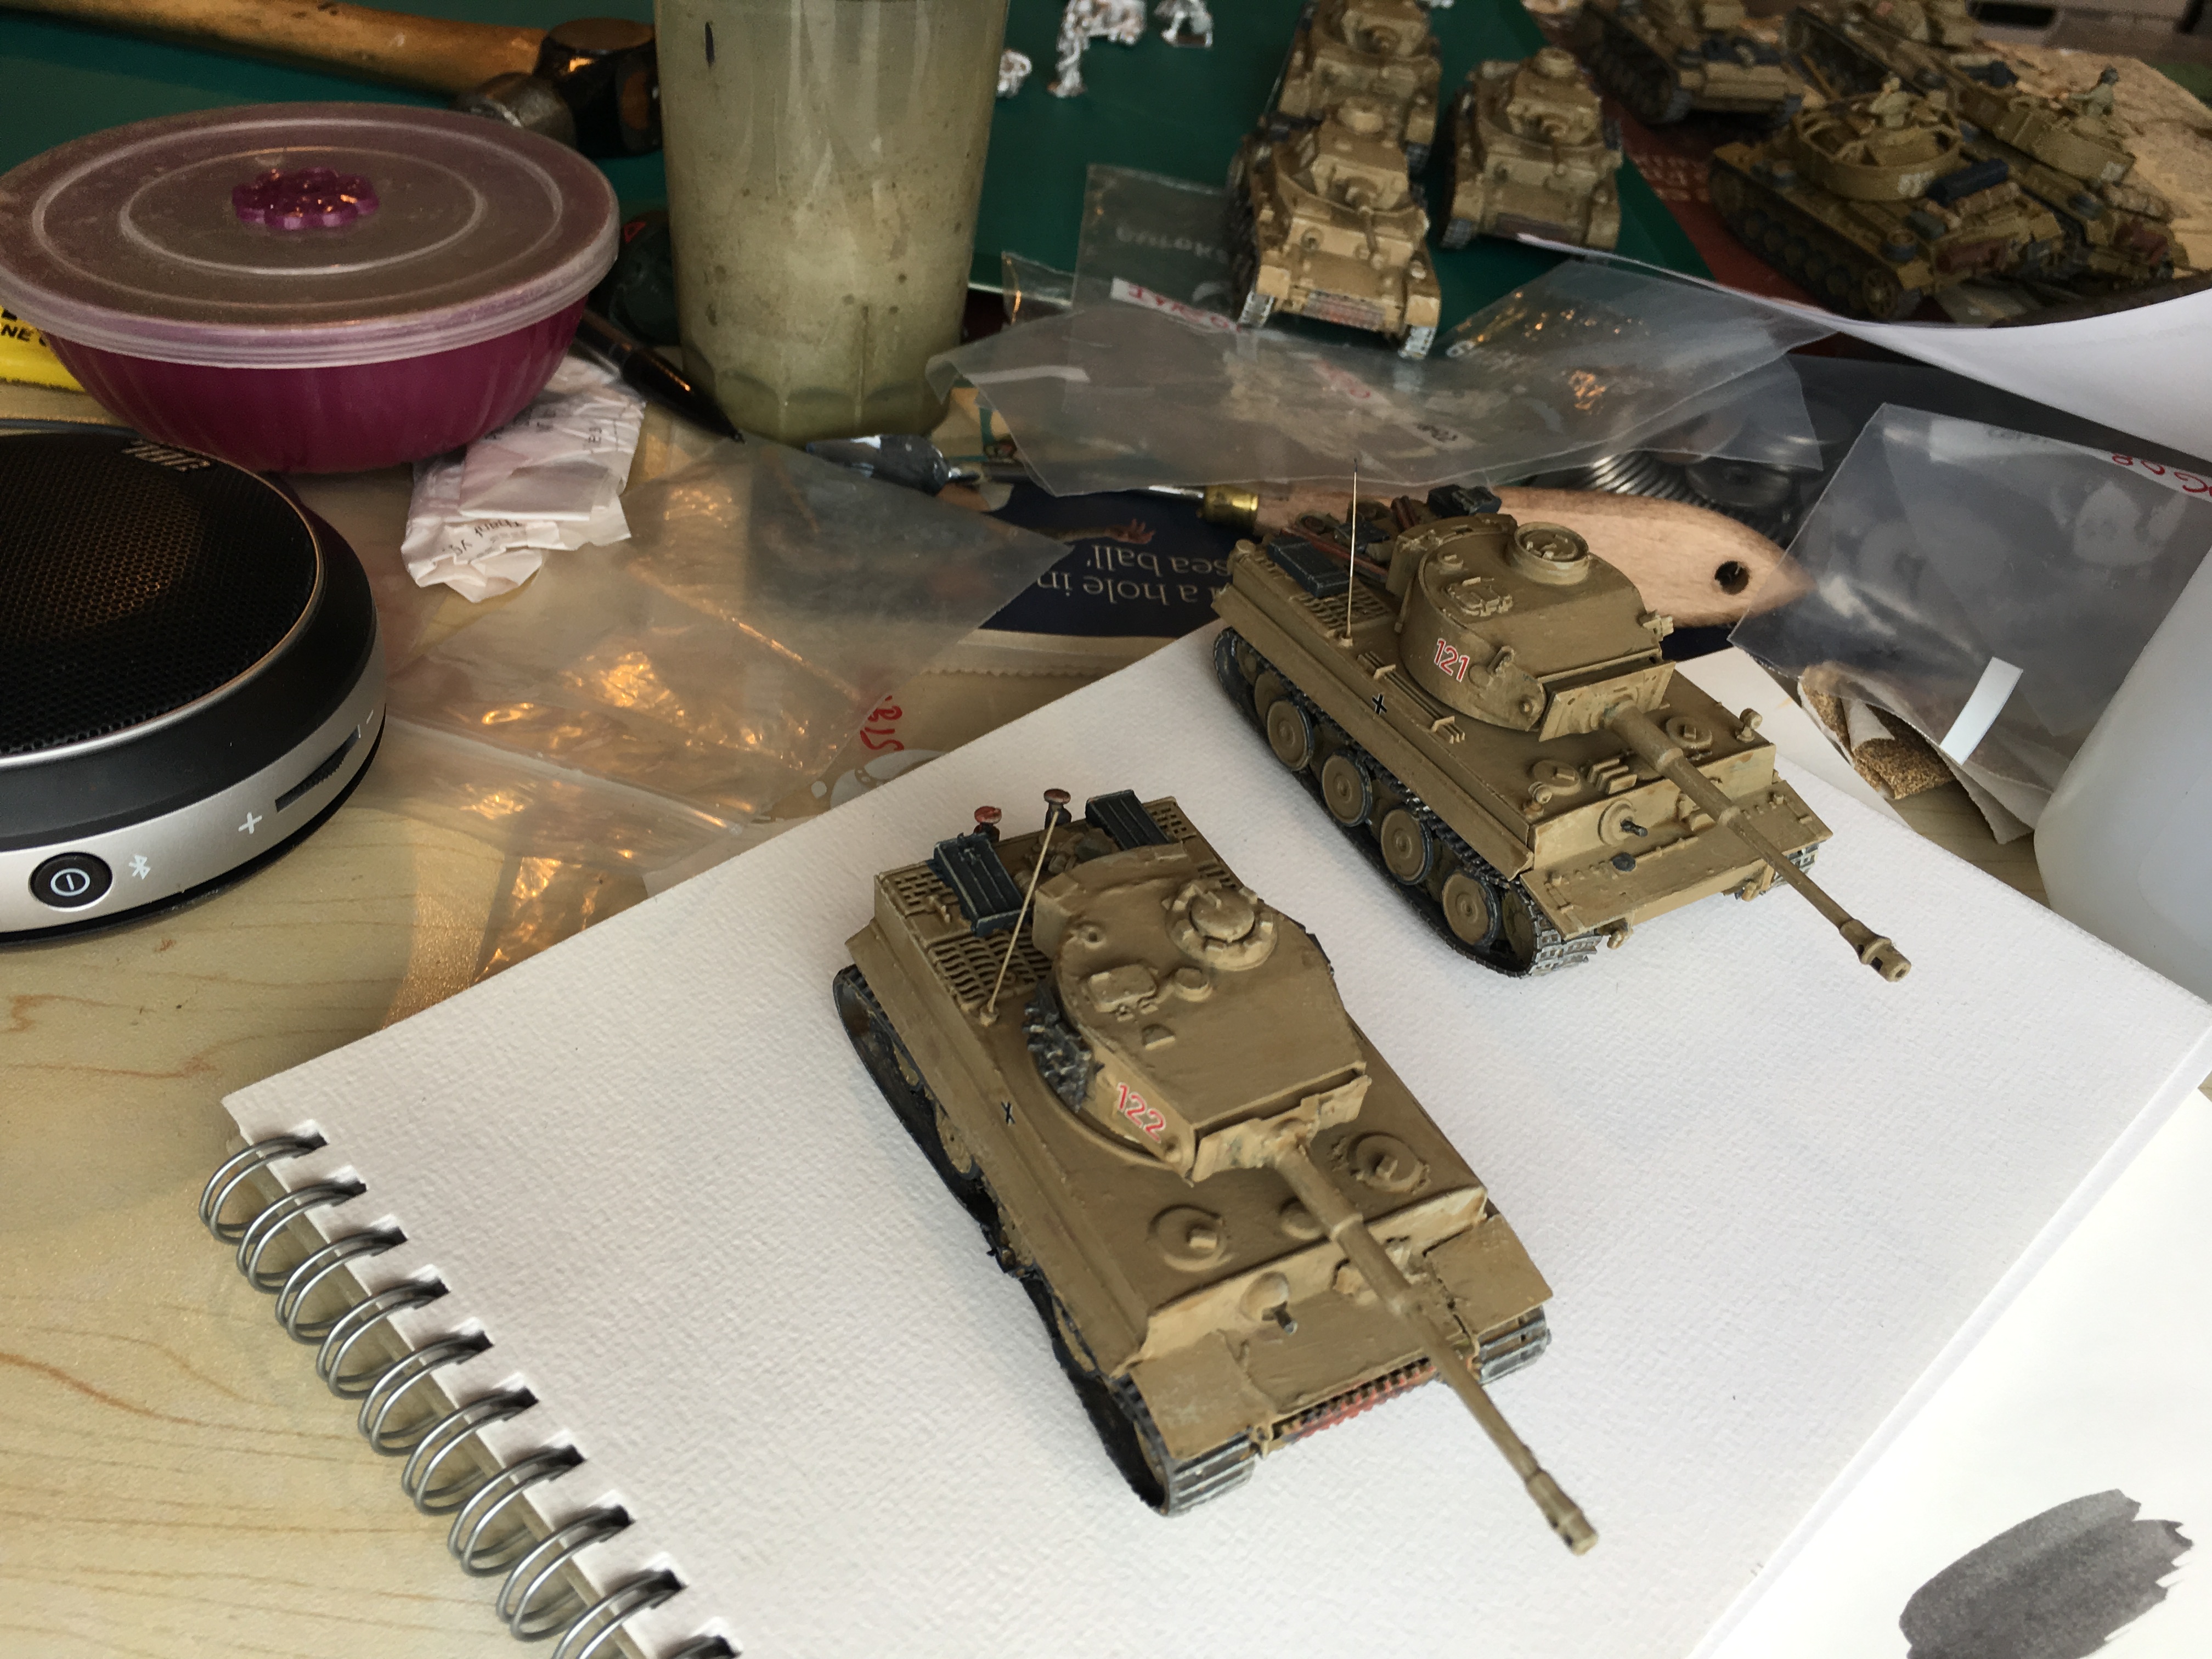
Tigers played a significant role in Tunisia, a minor one in Sicily and were not present at Salerno (though the British kept reporting them there!). I don’t plan for them to be an important part of my games, but I have them, and they will be a handy option. The tank at the front is the oldest German model in my collection – an old 1/76 Airfix kit. This was originally painted dark grey. But when I bought the second kit, I thought it needed a facelift – so I added mudguards to cover the tracks at the front, and a stowage bin at the back of the turret, and then painted it in dunkelgelb. It did the job. There was a bit of an issue with the polythene tracks. In photos these looked heavy and lay on top of the track wheels – something this flexible track wouldn’t do – and it wouldn’t respond to being glued down either. This time I managed to partially glue it down with superglue – though it required to be held down for an hour or more while the glue hardened. The aerial was fitted in the only place that photos show single aerials on Tigers (second or third aerials might appear on the turret or engine deck). It probably should be a stern aerial – but what the hell!

The other model is much more modern, it was from Hasegawa and in 1/72. It’s a much nicer model though I made a bit of a mess with the running wheels, and the polythene track is pretty crude. The track needed the same treatment as the Airfix one, and I also stuck the aerial in the same place. In spite of being different scales the two models can work together for now. the size differential seems to matter less than for the smaller tanks.

These models aren’t to a particularly high standard, but the facelift has improved them a lot, and given the models some unity. Back in the day I tended to make models as individuals. But this exercise shows that I am right to concentrate on more basic wargamer models nowadays, like the PSC ones. The moulded tracks look much better than the flexible ones. The running wheels may be less detailed (you don’t get the double wheels) but they are much less work and don’t end up looking wobbly.

I now have strength and depth in German tanks. While my Sherman project still needs to deal with some complexities (getting crew; making decals; more stowage), I will move on to the infantry. I have ordered a platoon each of Germans and British from AB, and they are now ready to paint!

1943: the Royal Scots Greys’ Sherman tanks

Part of the enduring appeal of this hobby is the occasional detective work. Scrabbling for clues, and trying to make sense of what little you have – and in the process debunking generally accepted wisdom. This may be about what happened in a historical battle. Or it may about the appearance of a unit you want to add to your collection. My idea to model a troop of Shermans from the Royal Scots Greys as they appeared at Salerno in September 1943 is one such quest. I have followed it a bit obsessively for the last couple of weeks just for sheer hell of it. And that is the tale I will tell today.

A bit of background. The RSGs had fought with the 8th Army in North Africa right up to Tunisia, using Grants and Honeys. While the fight moved on to Sicily they were rested and re-kitted with Sherman III tanks (i.e. the diesel M4A2, and not Sherman IIs, with the cast hulls, or the later M4A3s as sometimes reported). They were then assigned to the British X Corps to take part in the Salerno landings. They were heavily engaged supporting the 56th (London) Infantry Division – with a great deal of distinction. They are about the only British tank unit to get a mention in accounts of the battle, even though it fought alongside 40th RTR in X Corps, and the 22nd Armoured Brigade of 7th Armoured Division also landed. It is not wholly clear whether the regiment formed part of the 23rd Armoured Brigade at this point (as the 40th RTR was).

My main source is photos. I have found these online and in a couple of books I have on the battle – the Osprey title and an old book from 1971 from the Pan/Ballantine history of WW2 (a series that I think was earlier called the Purnell’s history, which I dug up out of the attic).

And now to my first picture, from Wikipedia:

This shows the tank “Sheik” advancing towards Naples after the battle in late September (not far from Pompeii by the look of Vesuvius). It is in a very curious colour scheme, and this has drawn a lot of attention. Lots of modellers have been unable to resist representing it, and there is even a die-cast model of the tank on sale. It has a two colour camouflage base pattern, with pale and medium tone components. This is usually interpreted as Light Mud for the pale tone (one of the standard Mediterranean theatre British camouflage colours of the time – a greyish sand colour) and olive drab for the medium, the colour that the tank would have been painted when shipped over from the US under Lend-Lease. There is a darker tone used to give the dapple on the pale tone – probably the Blue Black that was also part of the standard British set. Other points to note are that there is are two aerial pennants, and the red-white-red British identification flash on the side.

The next picture is from the Osprey and Pan/Ballantine books:It shows a tank of the RSGs during the battle (near Battapaglia according to the Pan/Ballantine). Points of interest: there is a two-tone camouflage, but with light-dark tone, not light-medium. This is surely Light Mud and Blue Black, in accordance with standard British practice of the time. There is a tactical mark on the turret – a circle with the number 8. The Osprey says the circle denotes B Squadron; I think C squadron was more likely (B is usually a square). The number is the tank number. The red-white-red flash is visible and there are two or three pennants on the aerial.

The next picture is from just the Osprey I have now found the original from the IWM collection, and substitute here:

THE ALLIED LANDINGS IN ITALY, SEPTEMBER 1943: REGGIO, TARANTO AND SALERNO (NA 6646) Salerno, 9 September 1943 (Operation Avalanche): A Sherman tank and infantry on the road to Battipaglia. Smoke from a burning ammunition ship can be seen in the background. Copyright: © IWM. Original Source: http://www.iwm.org.uk/collections/item/object/205194416

This looks as if it was taken at a very similar time. There are railway tracks in both pictures, and smoke. The barrage balloon indicates that it is quite near the beach. The scan above isn’t that clear – but the camouflage pattern looks the same, and the aerial pennants may be too. But it isn’t the same tank – this one has an AA machine gun on the turret. Of particular note on this picture is the unit ID signs on the left mudguard (i.e. left when facing forward – nautical “port”). The censor has scrubbed them out, but we can see that there are two, and they are both on the left – unlike the normal situation of the Arm of Service marker on one side and formation badge on the other. More on that later. There is a red-white-red flash in the front-centre. Incidentally this tank shows a single-piece nose for the Sherman – instead of the more usual three-piece one for this stage of the war – it is presumably quite a new tank.

The next picture is a poor one taken from the battle and only in the Pan/Ballantine:It is just about possible to see that the camouflage pattern is the same as the previous two pictures (and different from Shah). The regiment’s tanks were clearly painted in a standard pattern. Also note the single aerial pennant, and no AA machine gun. And the rear part of the track guard is still there.

The next picture is from Wikipedia and shows one of RSG’s tanks in the follow up towards Naples, and near contemporary with the Shah picture: Not much to add here except to note that the standard camouflage pattern turns up again. The rear of the track guard is missing -as with Shah and the other later picture, suggesting they were deliberately removed soon after the Salerno battle.

The final picture comes from October as the unit was advancing with 23 Armoured brigade; it comes from the Imperial War Museum:

THE BRITISH ARMY IN ITALY 1943 (NA 8276) A Sherman tank of ‘B’ Squadron, Royal Scots Greys fording the Teano river, 29 October 1943. Copyright: © IWM. Original Source: http://www.iwm.org.uk/collections/item/object/205204405

There are a few points of interest here. Once again it has the same camouflage pattern (a shame though that I have no pictures of the right hand side!), though the contrast is much lower than earlier (and similar to the Shah picture). Either that’s the effect of a couple of months weathering, or the Blue Black has been overpainted – or perhaps it just indicates lower ambient light conditions. Note that the stowage turret box doesn’t have the camouflage pattern on it, and in picture two it doesn’t look as if it has been repainted at all – this may have been a late addition. The red-white-red flash is just visible. The tactical mark is a square (as would normally be appropriate for B squadron), but I can’t see a number in it (incidentally don’t confuse it with the outlined panel behind it on the turret).

And now to a secondary source. A Star Decals sheet (these are a valuable resource):

The first two are of interest. the first is an interpretation of Shah. It shows it with a triangular tactical mark, appropriate to A Squadron (on the back of the stowage bin too), but with no number. It is shown in red, as would be used for a senior regiment in a brigade. It also shows an interpretation of the unit ID on the left mudguard – a thistle on on white over black square  The text says that this sign was visible on tanks earlier in the campaign, but can’t be confirmed for this tank with its new camouflage scheme. It is clearly specific to the regiment – not the more usual brigade or division (the thistle standing for Scotland). The second picture is of a tank named Roosevelt – but not from any photograph I have seen. There is some doubt as to whether this is the RSG or 44 RTR (part of 4 Armoured brigade and not at Salerno). The name apparently doesn’t conform to the RSG naming system (Royal Navy ships) – but otherwise it looks very like the tank from picture 2 (though the number is 10). The portrayal of the camouflage pattern is different, but not by that much (mainly the turret) – perhaps just interpretation from an obstructed picture.

And so what are my conclusions? Shah looks like a one-off to me. Other regiments seem to have been using tanks without a camouflage pattern or with a low tonal contrast one (including the 40th RTR, according to the only picture I have). Perhaps the RSGs received one of these as a replacement and then improvised the camouflage scheme from there. I will use the Light Mud and Blue Black scheme, guessing the right side elements that I don’t have info on. The red-white-red flashes will also appear. Fortunately the Italeri kits I’m using have these in their decals. I will also do C squadron with red circle tactical marks and three consecutive numbers. I don’t have definite information on the numbering system, but a Flames of War graphic for New Zealand units suggests sequences starting with 3, 6, 9 and 12 for each of the main troops (and 15 for the HQ troop – 1 and 2 don’t appear to be used within the squadrons). I have four models, and I may do a further tank for the squadron leader, to act as a senior officer for larger games. Which tanks got the AA machine guns I don’t know – I speculate that it is the troop leader.

The next point is to have aerial pennants. These were subject to considerable variation – sometimes daily. I will give the troop leader two pennants and the others one. Perhaps they all get a red one, with yellow for the troop leader, as suggested by the Star Decals sheet. These will give the tanks a British look.

Another aspect of making the unit look British are the unit IDs. Here all I have to go on is the censor’s scratchings out on picture 2 and the Star Decals suggestion. The lower mark looks quite wide compared to its height. That would suggest a three digit number for an Arm of Service serial. That would be an Army level serial as often used for independent brigades (the numbers being 171-3 or 161-3 for armoured brigades). The formal organisational status of the RSGs at this point is a bit unclear – and this is emphasised by the use of a regimental formation sign rather than the more usual division or brigade. The formation sign is, presumably, the thistle badge, and located above the presumed unit serial. I am not sure what I am going to do here. I am tempted to leave these off (as I will the registration numbers and tank names) – but, then again, they do make the tank look British.

So most of the pieces of the jigsaw are in place. What is clear is that I will need to print my own decals on this, for the tactical signs and the unit ID, if I use them. A new challenge!

Update 27 August 2017

I continue to scratch the itch on this one. Some more Google searches have taken me to some new bits of data. First there is this online discussion from 2007 in which the RSG Shermans are discussed. Alas all the picture links are deceased, as it includes one or two pictures I haven’t got – including one which shows the unit thistle badge. There are a number of items of detail that I will ignore – I don’t need the model to be 100% accurate on the technical details. However it did draw me to this Pathé film. Amongst other things it includes the river crossing by the RSG tank in the last picture above. Here is a still from it. You can just about see the thistle badge on the front mudguard (take my word for it – though you do need the eye of faith). Also of interest is that the the front door of the commanders’ hatch has been removed – a common British practice apparently. The Italeri kit has the hatch moulded closed (the one point I don’t like about it). I was going to carve out the closed hatch anyway; I won’t have to make the front hatch door!

I have unearthed another couple of interesting pictures. This is from another unit at Salerno (the London Yeomanry, part of the 7th Armoured division): The camouflage scheme is similar but not the same. The dark colour may not be Blue Black though. The markings on the front mudguard are temporary identifiers – no doubt this is what those mysterious scratched out marks are on Picture 3 (apart from the thistle badge).

And then there is this picture of a tank from an unknown unit in Italy: Of interest is the right side camouflage pattern, broadly consistent with the RSG. The RSG pattern appears to be based on a standard recommended pattern issued by the army, though some of the darker stripes are a bit broader, and there is no stripe on the back of the turret. This pattern gives me something to work on for the missing bit. I have not been able to find the original diagram that was used though, amid all the verbiage on camouflage patterns. All I know is that the patterns aren’t the same as those used earlier in the desert.

And after I had written that I searched all the Imperial War Museum’s collection on Salerno and found this one:

THE BRITISH ARMY IN ITALY 1943 (NA 6725) A Sherman tank comes ashore at Salerno, September 1943. Copyright: © IWM. Original Source: http://www.iwm.org.uk/collections/item/object/205204309

It’s the missing link. The thistle insignia is now clearly visible, above the temporary number. And there is also a clear picture of the front camouflage pattern – though I think there is a bit of variation with the other pictures. Two flags on the pennant. This tank has the three part nose, but is missing the rear track guard. Zooming in I can just make out a circular tactical mark, indicating C Squadron, but not the number in it.

1943: what next?

My hope was not to spend too long messing around building up the armies for my 1943 project, but to get a small club-ready game as soon as I could – and for that game to look something like the finished product on the table – without the fielding of half-finished elements. I want a bit of a wow factor – in contrast to most of the games I play at the club.

So the logical thing was to build a tank and infantry platoon for each side, plus some command and support elements, and then turn to the scenery, with some thought for player aids (markers for knocked out vehicles. etc). I did the support elements first: mortars, heavy machines guns (German ones still need to be painted) and anti-tank guns. I now have a German tank platoon. But after that I need a bit of a rethink.

The obvious next step is to work on a British tank platoon. My first idea was to paint up my old Airfix Shermans. I’m not happy with that, though. The old Airfix models won’t be up to standard next to my new Pz IIIs, both because of size (they are 1/76 rather than 1/72) and general quality. The final straw was realising that I would not be able to open the hatches and put crew figures in. I think this adds to the appearance – and mostly commanders would only want to pull the hatch down in extremis – visibility is so much better outside. I still want to paint these old tanks up, and to use them to bulk up for larger games, and to provide a few extra options on the table (the Tigers for the Germans, for example). But for my first British tank platoon I’m going to need some new models.

And it is pretty obvious what those models should be: Shermans. In 1943 they dominate British armour. It’s true that in Tunisia you also have an assortment of other tanks: Grants, Honeys, Valentines and Crusaders (as well as Churchills, which continued into Italy). But few, if any of these make it to Sicily, let alone Salerno. And the Sherman type that predominates at this stage is the Sherman III, the US M4A2. This came with a diesel engine and was mainly used for export (to Britain and Russia). The examples I am most drawn to belonged to the Royal Scots Greys at Salerno. There are a few pictures, and they were heavily engaged. These have the classic sand-skirts covering a the top part of the running gear (as did the desert tanks) – though not all British/Canadian Shermans had these in Sicily or Salerno. It turns out that the Airfix Shermans aren’t such a good match for these anyway – they don’t have the engine deck for the M4A2, and no track-guards at all. Apparently they aren’t a precise fit for any known version of the tank, but look not that bad for the earlier Sherman I. My first point of call is now Plastic Soldier Company (PSC) – their products seem to have just the right balance of production values and options for me. But they only have the cast-hull M4A1 (Sherman II in British service – used in North Africa, but I haven’t seen pictures of them in use by the British in Italy) or the M4A4 (Sherman V) which had a longer engine deck and more spaced out wheels – though both seem to come with the sandguards as options. Neither is going to work.

After doing a little research I thought I had the answer: the Armourfast M4A2. Armourfast (who now produce models formerly by HAT) produce cheap models with few parts and low cost (£7.50 for a pair – compare PSC £17.50 for thee) for wargamers – but which are crisply moulded and accurately proportioned. I bought a box (alongside another couple of items). It was a bit of a shock. There is one simple sprue per tank (PSC have 2 bigger sprues each), and no options, stowage items, crew, etc. I actually knew this would be the case from reviews, but it was quite stark when I opened the box. But I thought there would be sandguards (from either misreading a review, or a review based on an earlier version). And the mantlet is the later war version, though I think this might be convertible. While pondering this I discovered Italeri made a version of the Sherman that was exactly what I was looking for, so I immediately ordered a couple of boxes (4 vehicles) – but they haven’t arrived yet. I will do something with the Armourfasts, but I haven’t decided what yet.

So how about the infantry? But there’s a problem here too! I fell in love with the AB metal figures, and bought a batch of them for command and support elements. It is these that I have painted up for the mortars, machine guns, and a 6-pdr crew. They are lovely figures. But the more I looked a pictures from 1943, the more I realised they weren’t quite right. The soldiers wore a hybrid between the 1944 north Europe kit most popularly portrayed in miniatures (including these AB ones) and the 1941/42 desert kit, also widely available, including at AB. This is within fudge range for the Germans, and can be covered mostly with a paint job. They mainly wore helmets in Italy (caps dominate in Afrika Korps representations) – and from a distance you can’t tell whether they are wearing shirts or tunics; no doubt some Afrika Korps figures can be mixed in to give more of a tropical look – these are usually made wearing trousers rather than shorts. For the British it’s a bit harder. They mainly wore trousers rather than the shorts they wore in the desert – but the helmet is an earlier version than 1944. They too typically wore shirts rather than the battledress blouse, and they usually had sleeves rolled up. I was going to overlook all of this (so at least my infantry would look OK for later war scenarios in Italy and France), but I saw that SHQ (whom I’m using for harder to get model vehicles) had a Mediterranean series for both British and Germans that might be suitable. Representing human figures is a very personal thing, though, and I don’t know if I will like them. I ordered some examples to take a look. That was last weekend and they haven’t arrived yet (it’s August I guess).

So what I think I will do next is a large batch of upgrades to my existing 1/76 German tanks: 3 Pz IVGs, two Tigers and two Pz IIIs (which I will convert to a Flammpanzer and an N with short 75mm gun). Since the paint I so laboriously mixed up for the Pz IIIs is still on the go, this makes some sense. I also have more idea about how I want them to look than I do with the British. I’m not going to attempt the sames standards of finish as the mainstream elements, but I will take on some new challenges, such as representing the radio antennae. Here they are, with conversion work on the Pz IIIs under way:

Finishing my Panzer IIIs

My Panzer III platoon is very much a learning exercise, as it is the first time I have put together AFVs for the tabletop (except some microtanks) for 40 years. This has proved to be the case in particular with the finishing.

But first here are some pictures of a real Pz III on show at the recent Bovington Tankfest.

This is an L captured at El Alamein. Bovington have painted it dunkelgelb (dark yellow) which became the standard German base colour in 1942. I don’t know whether this because the original was painted this way, or whether it was in fact painted in one of the desert colour schemes in operation at the time. Regardless, it is this dunkelgelb that I want to reflect on my model. The first thing you get from these pictures is how different the colour looks in different lights! Still it looks nothing like the “authentic” Humbrol desert sand sold in my youth, which can be seen on the Pz IIIL model in my last post. That is a brighter and redder shade; quite where it came from I don’t know. The desert colours used before the dunkelgelb were  yellow-browns (alongside greys) – a bitter redder, no doubt, than the dunkelgelb but much more muted than that paint.

This is important because I have decided to use artists acrylics on my models and figures, and not hobby colours. I already do this for my Napoleonics, and I fancied the challenge. I get to skip those endless debates about which precise shade of Vallejo colour I should use, and mix a colour from standard pigments as an artist does. This means I need many fewer paint hues – and no new ones. But for WW2 this approach isn’t for the faint-hearted. Getting theoe muted browns, greens and greys to look right is hard work.

But first I wanted to prime the models. I don’t use aerosol paints, because I have no suitable space to apply them. I do have a patio at the back of the house, but it is palaver to get the gear down there and protect the garden furniture etc. from stray paint – and the weather conditions have to be right. I have tried this for my Napoleonics and given up. I also had a problem to make sure that every part of the miniature was properly covered. The exception for aerosols is the final coat of varnish, which I don’t think is as risky. So I apply primer by brush. I use a special metals primer from Fortress, acquired at a DIY store, in white – the water-based version. I works well enough for my metal figures, where I apply it diluted with water. But it was problematic on hard plastic (polystyrene). The surface was slightly repellant. But with a bit of poking I was able to get complete coverage – though it was hard work, and wrecked the brush I was using: I have ordered some cheap acrylic brushes for future work! Next time I will try the primer undiluted – though it is quite thick. But it dried quite nicely and provided a good surface for subsequent layers of paint. It may also help if the models are washed with detergent in advance.

Next came the base coat. This was going to represent the dunkelgelb. The important point to make here is that painting a model is not like finding an authentic shade for a full-sized replica or museum piece. Authentic shades for the latter will not look right on models. I think this may be the problem with the old Humbrol “authentic” dunkelgelb – which I used a lot on my teenage models (including the Pz IV in the picture on my last blog, with camouflage green). It looks too dark and a bit too green – this may simply be a scale effect – the darkness surely is. What counts is finding what looks right on a model in normal indoor light conditions (daylight for me).  German dunkelgelb is not an easy shade to mix (unlike practically all the colours used in Napoleonic uniforms!).

It was obvious that I should start with Yellow Ochre or Yellow Oxide (much the same thing), and that quite a bit of white should be mixed in. But this is too bright – it needs to be dulled down. Using conventional colour theory I at first used a deep purple pigment for this (purple is complementary to yellow, meaning that it will neutralise it rather than change its hue). But the result, on my Pak 38 AT guns was much too red. So my next attempt was to mix in a reddish blue (Ultramarine), but this came out a rather horrid green shade (there is some of it on the Leopard tank in the background of the picture on my last post. My ideal in colour mixing is to use two (complementary or near) colours and white. This wasn’t going to work – I would have to balance three colours and white – something that is a bit tricky. I used Prussian Blue and a red-brown to go with the yellow ochre). For the base coat, incidentally, I was using cheaper “student” paints rather than the higher quality “artist” ones – having noticed that 20mm models soak up paint much faster than 15mm figures. (The better quality pigments are much better for painting details, where you need sharp lines) This took three goes. On each occasion I was convinced that I had the right shade, but as it dried it looked wrong, compared to my pictures taken at Bovington, and other sources. The colours did dry a bit redder than when wet (perhaps because of the lower quality pigments – drying true is one of the marks of better quality pigment) – but a lot of it is simply that it is hard for such muted shades, where is slight shift in the mix makes a big difference. Provided the paint isn’t too thick (and it shrinks quite nicely on curing, so it’s generally OK), this layering isn’t such a bad thing – it can give a bit of texture and “depth” to the model. Still, there are a lot of nooks and crannies on a model tank (especially with the turret schurzen), and so it was hard work and not good for the brushes. Eventually I had something I was pleased with.

Next step was detailing – the tracks, the tyres, the commander figures, the exhausts and the stowage. I had a little trouble with the uniforms of the commanders – where I was trying to get a faded tropical look. Another problem was the tyres on the running gear – as these were a single moulding in order to reduce the assembly time, so you don’t get the double wheels, so they don’t look quite right – I just hope they won’t be very visible. All this took slightly longer than I wanted – a couple of sessions rather than the one I hoped. I finished with a bit of drybrush with a pale dusty mix – this was a bit heavy handed in places – it’s a technique that is going to need more work. Next came a layer of Quickshade. This is to pick out the recessed detail and generally create depth. It also creates a good surface for decals (otherwise the flash will show horribly, as they do on my old models). I was a bit worried that the brown in the Quickshade would distort the base colour by reddening and darkening it -though the end result is OK, and the photos below sho it to be a bit too green if anything. I have three tins of Quickshade (three grades of colour), though one is dying. Once these are done with I will try to create my own with the floor polish the product it is based on – and that will allow me to have more control over the colour of shading – a dull purple would have been better in this case (the French Impressionists would have approved of that!).

And then the decals. This has been a bit of a headache. I want turret numbers for tanks in the same platoon (with the platoon commander in tank 1). Commercial decals have two problems: they tend to focus on individual tanks from different formations, and they supply two numbers (one for each side), rather than the three that was more typical at this stage of the war (one at the back too). And they are pricey. None come with the PSC box kit. I acquired some generic numbers on eBay. But I decided to base my platoon on some tanks of the Hermann Goering division in Sicily, with numbers 531, 532 and 533. My decal sheet not only had only pairs of numbers, but they did not have any starting with 5 or above (this is the company number – the second battalion in a regiment usually had company numbers 5 to 8). This meant I had to assemble the turret numbers in pieces, and individual numbers in some cases. So applying them was a bit trickier than it might have been, and I did well to lose only one number. Balkankreuse were applied at the back of the hull, from a commercial sheet. I did not attempt a divisional insignia. After that I decided to seal them with some polyurethane varnish. That was very nearly a catastrophe. The decals are quite delicate, and unless the varnish was dabbed on softly, they get damaged by the application. One number was quite badly damaged; I applied a bit of paint to represent the damaged bits being obscured by mud (it was a rear number, and is obscured by some jerry-can when the turret is facing front, which helps). It could have been a lot worse. For the British I’m going to have to print my own decals; this will solve some problems – but white or white-outlined numbers can’t be done this way – (nor balkenkreuse for that matter). Fortunately the Germans used quite a lot of straight black numbers, which can be home-printed.

Finally an application of Windsor & Newton aerosol matt varnish. And here’s the result (albeit shot in partially artificial light given a very overcast sky this morning) – and with less than ideal focusing from my iPhone):

I have to say that I’m pretty happy. Each of the models has mistakes, and they aren’t “professional” quality. But they’ll look great on the wargames table.

1943: PSC Panzer III platoon

I started my 1943 project with a couple of Pak 38 50mm anti-tank guns, and two 81mm mortars for the Germans, and a 6pdr, two 3in mortars and two Vickers machine guns for the British. These were trials for painting and basing techniques. I will come back to them. I want to start my regular blogs with a full-scale platoon. These are Panzer IIIL/M tanks, with the long 50mm guns, using the 1/72 plastic kits from Plastic Soldier Company (PSC).

Why these? I wanted to break away from the late-war pattern of games being dominated by superior German armour. This is what happened with my initial game and its Tigers. So I thought that one platoon of Pz IIIs and one of Pz IVs would be the core of my German tank force. I already had the Pz IVs (Airfix F2s in 1/76), so I thought late Pz IIIs would work well beside them. I had two 1/76 models in my collection, not enough for a platoon. One was a conversion from an Airfix StuG III model (my first ambitious armour conversion), and the second a Matchbox model, which came out after I had made that model (rendering the need for that conversion redundant), and which doesn’t look too bad beside it. Rather than try to find a 1/76 model (like the Matchbox one) and make that up, I though I would try out PSC’s fare, designed for wargamers. The surplus models could then be used as Ns, with the short 75mm guns, to operate alongside my Tigers, as was the German practice at this stage of the war (the Pz IIIN in the Bovington tank museum was captured in Tunisia alongside its famous Tiger). So I ordered a box of three PSC Panzer III J-Ns.

When I opened the box I found the models up to expectations. I quickly decided that the PSC models should be made up as a complete platoon. I could use the parts in the box to make the Ns from my existing models. I then realised that in the sorts of games I was likely to play, I would only want to use one model for such supporting weapons as the N. The other model could be used for an FL, the flamethrower version. There is a picture of one these, knocked out, at Salerno, which is becoming the central campaign for my project, so I know they are in theatre. I can use the Matchbox model for that, and my conversion can be the N, as that means I can discard the rather ropey mantlet that I made for it.

The next decision was what sort of Pz III for the main tank platoon. My first idea was an L, like the Matchbox model, done up in Afrika Korps colours, as seen in Tunisia (to face of against my Grants, which never made it to Italy, and which I plan to do in desert paint). But as I started to focus on Salerno as my central campaign, I decided to go for M, with its schurtzen – spaced armour. However, since the Germans in Italy mainly only kept the schurtzen on the turret, I would skip the side-skirts. Apparently the narrow roads in Italy made the side armour more trouble than it was worth.

And so on to assembly. I decided to assemble the complete model, including commander and stowage, before painting. I think this adds to the artistic coherence of the resulting model (if I can be so grand) – but we’ll see how that goes. Assembly took slightly longer than I thought. It needs to be done carefully, and the first one took me nearly an hour, in spite of it having many less parts than the old models of my youth (most of the wheels are moulded into the track assembly, for example). Particular care was needed on the turret shurtzen, as this is in two pieces, and the join needs to be as inconspicuous as possible. A modelling knife and file were needed to deal with the sprue attachment points. The next two models were much quicker, perhaps half an hour each. Mostly the mouldings were of very high standard, and fitted together very neatly. The one problem as a bit of a dimple on the extra armour plate on the front hull below the turret. I have tried to fill this in using a bit of gesso (as well as using it to cover the join on the schurtzen). I used to use a product called “body putty” for this, but I don’t have it now and haven’t seen it on offer anywhere. We’ll see if the gesso works.

After the main assembly, which included the tank commander poking out of the turret (in contrast to the closed turrets of my youthful models), I added various items of stowage. These I got from a separate PSC item of tank crew and stowage. I was a bit underwhelmed by this offering, which consists of three identical sprues, with crew figures (for poking out of hatches), jerry-cans, bits of track, tarps and ammunition boxes, and other bits. It also has various small arms. I used one of the crew figures, to contrast with the two alternative poses that came with the main kit. And tarps and jerry cans from one of the sprues. The original kit comes with a few short lengths of track, which are useful. Mostly I piled things up on the rear hull, as this seems to be where the stowage mostly went in practice, with a few other bits elsewhere. We’ll see how it looks in the final mode, but it looks promising. One nice thing is that stowage helps to individualise the tanks.

The next point to ponder was a radio antenna. These are almost never provided in models of this scale, but can add a lot to the tabletop appearance (it is tricks like that, rather than detailed painting that lift the appearance of tabletop models). However, with the Pz III (and Pz IV) there is a problem. They had a big aerial poking out of the track guard next to the turret.  It got in the way of the turret gun as the turret rotated. They were design so that they would fold down when this happened – they could be folded down by the crew in advance (in the case of the Pz III this could be done from inside the tank). In many photos the aerial is folded away. Rather than find ways of dealing with the issue on models, I decided to model with folded aerials, allowing the turret to rotate fully. The mouldings represent this quite adequately. Did this mean the radio was not operational in combat? Or just that the range was reduced? No doubt I will find out in due course!

And now to the big issue (before painting – which I haven’t got to yet). How do they look? Generally excellent, but there is a problem. They’re quite big. Modelled at 1/72 I expected that – but I was surprised at how well my two old Tigers worked together (one at 1/76, the other at 1/72). I have a suspicion the PSC models are a tad over-scale. Putting the PSC models next to the Matchbox model (in front in the picture), and they look a lot bigger. They even look bigger than the 1/76 Pz IV (also in the picture). What also doesn’t help is that the moulded plastic tracks are a bit prouder than the flexible polythene ones on the older models. Part of the point of my project is to re-use my old models, if only for old times’ sake, but this going to need more care than I thought. Most modern plastic models are 1/72, so I going to have to find ways of living with this. And these are much cheaper than the 1/76 resin models from people such as SHQ and Milicast. Still, let’s not exaggerate. The different scales can be kept in separate units (except the Tigers, which I think are OK).

But the next point is to finish these models. This means handling another set of issues – which I’ll deal with in my next post.


Update on Dining Table Napoleon

First, an apology to my email subscribers. The notification for my most recent post (yesterday) never went out. I don’t think the one for the previous post to that (back in December) went out either. I think I’ve resolved the problem, but I’ll only know once I’ve posted this one.

What I announced yesterday was my plan to digress into WW2 gaming with my 1943 20mm project. Apart from that digression, my hope is to post more frequently, to provide a record of what I’m doing.

How is my original, Napoleonic, project going? My last game was Salamanca when I used a personally adapted version of Horse, Foot Guns rules. I will probably rerun this game later this year, amending the command rules a bit to address the problems faced in that game.

Meanwhile I have been plodding on with my new rules for big battles. I have had several false starts. The pattern is that I have several bright idea, but as I work them into a prototype, I realise that my creation is vastly over-engineered, and so I’m back to the drawing board. My basic concept now is to have units similar to Bloody Big Battles (BBB), but with more cavalry and artillery bases. The game will be divided into hourly “turns” but these may be subdivided into two or three moves by each side where there is interaction. That is quite a complicated idea, so it’s no wonder than I am struggling to turn it into simple mechanisms. But the show goes on – I think something very interesting will emerge eventually.

Meanwhile, I will give some serious thought to reviving BBB. There have been a couple of interesting articles in the wargames mags on adapting it to Napoleonic or near-Napoleonic, away from its original brief for Bismarck’s wars. This presents the best chance of getting my Napoleonic metal into a club night game. The rules are simple, and relatively easy to bring into a multi-player format.

But the focus for now will be 1943!

Matthew

1943: my new project

My main passion in wargaming is Napoleonic big battles. This is what my rule writing efforts are directed at. But as I labour with this, I have been up against a major snag. It is a long and complicated process, with very little in the way of playable games in the meantime. So what do I play?

And then there is a second problem. These big battles aren’t easy to set up on a wargames club night. It needs a day game at home. Maybe I’m giving up too easily on this – perhaps I could adapt BBB to a club game. But that doesn’t suit my current figure collection. What would work best is an 1813 style game with multinational armies. So I would need to digress from my Prussians. Even then it takes quite a bit of lead on the table.

So at the club I have been playing mainly micro-armour modern (and some WW2) games using Fistful of TOWs (FFT3) rules. This hasn’t proved very satisfactory, and I’m not sure I want to build up the terrain and armies needed (though I bought a US WW2 army), even though they are quite quick to build. Other players at the club have their own stuff, and I don’t have a unique take on this.

Then I became entranced by something else. When going through my attic I dug up some 1/72 and 1/76 (generally 20mm) British and German models that I had made as a teenager for WW2 mid-war – Tunisia and Italy. Why not try something with these? So I bought some rules based on a magazine review: Battlegroup. I put together some forces based on what I had, including my Airfix plastic figures. And I ran a four player game. It wasn’t a particular success. There are all sorts of reasons for this, all them retrievable. But the question, was: did I leave it there?

The answer was no, because by then I had the bug. The main thing that was attracting me (apart from quite a bit of hinterland from my teenage enthusiasm for WW2 stuff) was that it is (relatively) easy to build up a really good looking club night game in this format. The forces fielded by each side can be kept relatively small. The BG rules play quite quickly (or should…), and what the club has that I don’t is space. At home I can’t do wider than a 3 foot table (unless a buy something to go on top of the dining table, but that would only extend it to 4 foot). At the club 5ft by 5ft is standard, and you can get bigger (though given the time limits, that isn’t advisable for an evening game). I have seen some great looking games, including WW2 Normandy-style in 20mm and 15mm.

By concentrating on 1943, I can do something a bit different, with a Mediterranean-look table. The forces are relatively evenly matched too, provided that I’m sparing with the Tiger tanks (my use of my two Tigers in the club game was one of the things that didn’t work so well – though they gave a lot of tension to proceedings). They will be different from the very popular 1944 games, and also quite popular early war ones.

Quite exciting but also a lot of work. My current armies look awful. I love attractively put together games, with nice terrain, vehicles and figures. None of what I have matches up. The vehicles will need a repaint and general facelift, and there are quite few gaps needing new purchases. I really don’t like my plastic infantry. And I need to make a fresh start on the terrain. But by developing each of these in parallel I hope I can get a really good looking visual appearance. This is something I want to achieve for my Napoleonics, but that’s a much bigger job. I can learn a lot from this smaller, project.

And I will blog about it as I progress. One of the issues I have is that I don’t always remember exactly what I have done and why, when coming back to things later. If I create a record on the blog, this will be useful. And if other people are interested in reading it, then so much the better!