I’ve had more trouble with German Dunkelgelb, the standard base colour for vehicles and equipment from 1943, than any other colour. I first attempted to mix it on my batch of Panzer IIIs in 2017, and it took me several goes before I settled on something – and even that does not look quite right to me now! However, on my most recent batch of German vehicles, I have hit on a formula that I think works.
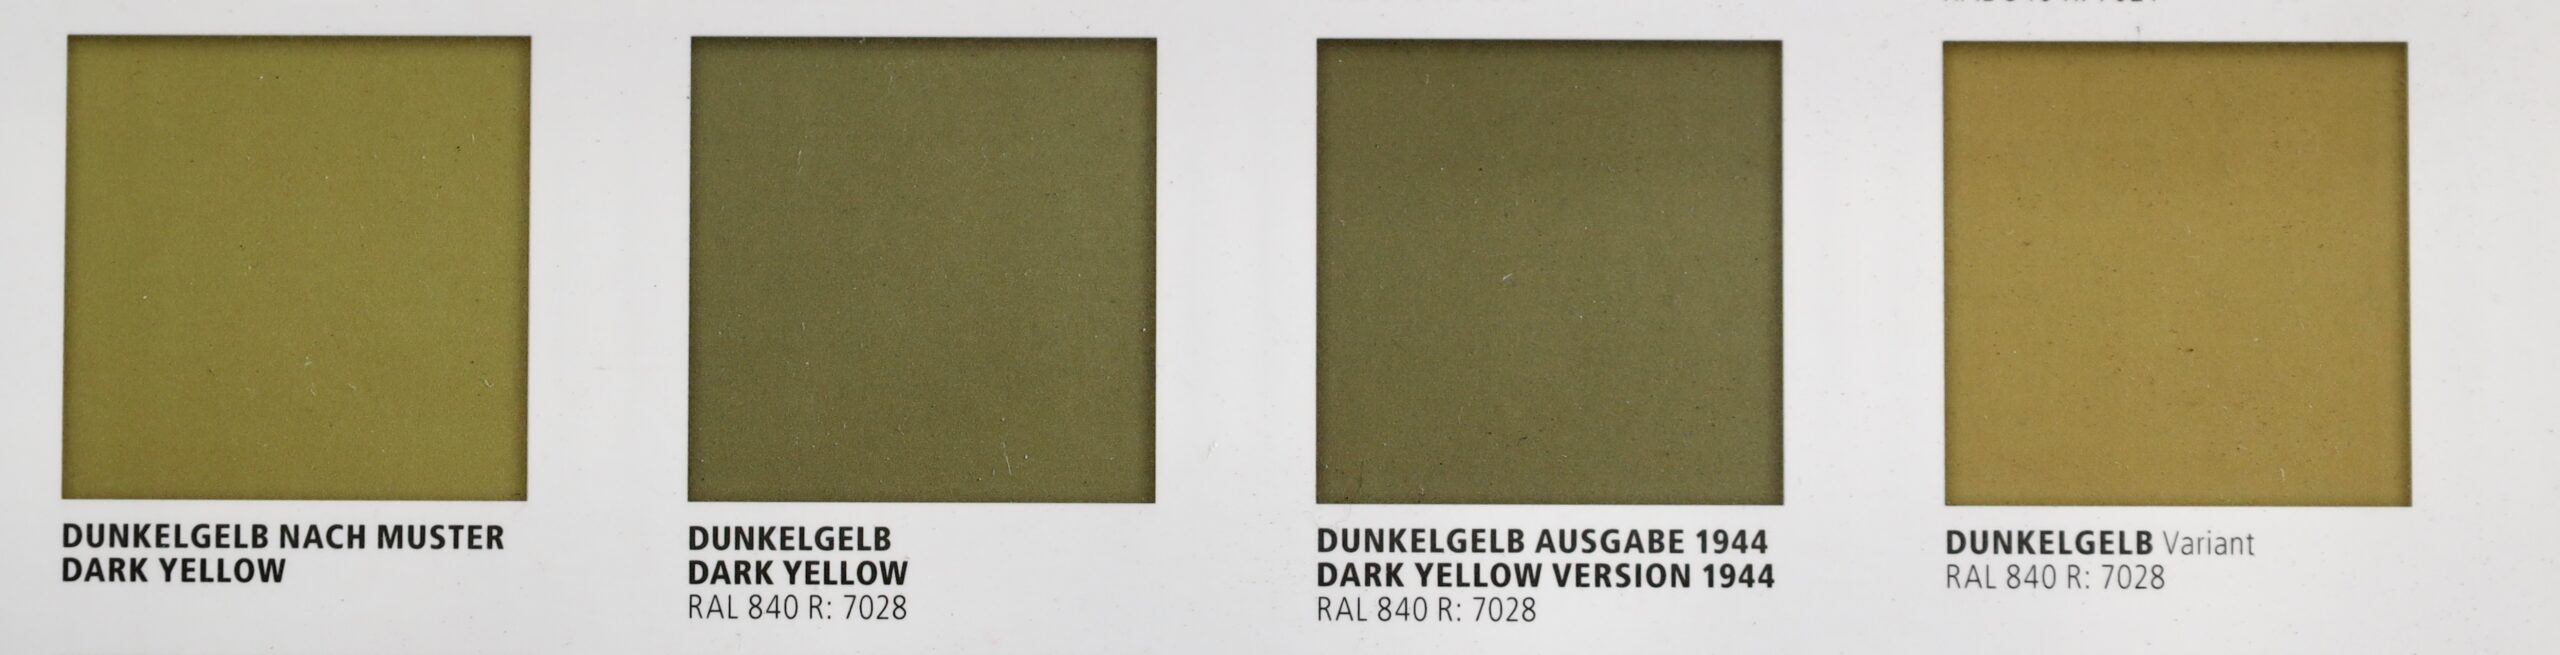
Much has been written on the topic of Dunkelgelb by modellers, as each hobby paint manufacturer has its own version. It’s a real rabbit hole – like US Olive Drab, which I have also struggled with. My main authority now is the book Real Colors of WWII by AK. This is based on quite a bit of research, including examining bits of surviving equipment. They produce for swatches to show the variation, even before various field factors intervened. The photo above shows the four swatches in this book, though it does not do justice to the actual colours. They give some idea of the degree of variation, though. The first, Dunkelgelb Nach Muster, came with the original directive in February 1943 saying that all vehicles should be painted in this colour, with camouflage over painted in olive green and red brown. Some suggest that this shade was never actually used. The second swatch shows the RAL 7028 standard for the colour registered in March 1943 – RAL referring to to the German colour standard system, which is still in use today, though RAL 7028 is now defunct. This is greyer than the earlier version. The RAL system was reworked in 1944 to reflect wartime exigencies – and the third swatch shows the even greyer version in this. And finally, for good measure in the fourth swatch they produce shows another variation from actual samples, to give an idea of the amount of variation there was in the field. This is even yellower than the original sample. What to conclude? There is a lot of scope for producing whatever variation you happen to like – but as the war progresses, the greyer it gets.
The starting point for mixing the colour was always clear: Liquitex’s Yellow Oxide. This pigment is based on Iron III oxide-hydroxide (FeHO2); it is an industrialised version of the ancient yellow ochre, which is usually slightly redder. This is almost certainly the pigment the Germans actually used for the colour – as it cheap and light-fast. But by itself, even with added white, it is much too bright. Back in 2017 I was heavily influenced by artist’s colour theory for mixing pigments – so I sought the colour’s complement to dull it down. This is purple – but the purple pigment I had was very bright and I could not get the results I was looking for. It was my introduction to the fact that colour mixing in practice does not follow the standard theories (there is a good theoretical reason for this, but I digress). Easier, I thought, to use a combination of a dull blue (Prussian Blue) and dull red (Venetian Red). I mixed these straight into the yellow, along with the ubiquitous white. From this I learnt never try to achieve a colour by mixing three different pigments. It was very hard to get the blue/red balance right while minting the right balance with yellow. In fact I should have mixed the blue and red prior to mixing into the yellow.
Years passed before I was next to attempt to mix the colour – for my recent German soft-skin project. I was older and wiser by then. I had got past my idea that you should not use black (or neutral grey – a black and white mix) in colour mixing – to satisfy my inner Monet. So I thought I would try mixing some Neutral Grey into the yellow, before I tried a purple. Immediately this proved to be a direct hit. I could get close to all four of the colour swatches (allowing that they should be a bit lighter when used on a model vehicle) by varying the balance of yellow to grey. The Neutral Grey got pretty close all on its own, but for tweaking I used Mars Black and Titanium White. This was much easier than my earlier efforts – and it got better. By upping the ratio of black to yellow, I got something greener, which looked a lot like the olive used for German tropical uniforms (and in turn more added white could replicate the fading these uniforms showed). Of course it is quite likely the Germans themselves mixed the paint using yellow oxide and black pigments – increasing the black element as the yellow oxide got scarcer.
Interestingly enough, yellow oxide mixed with black and white is also what I have used to replicate US Olive Drab – to say nothing of Napoleonic French gun carriages (which used paint mixed from yellow ochre and black…). In fact the US colour can be a bit greener than this, and they often used a green pigment.
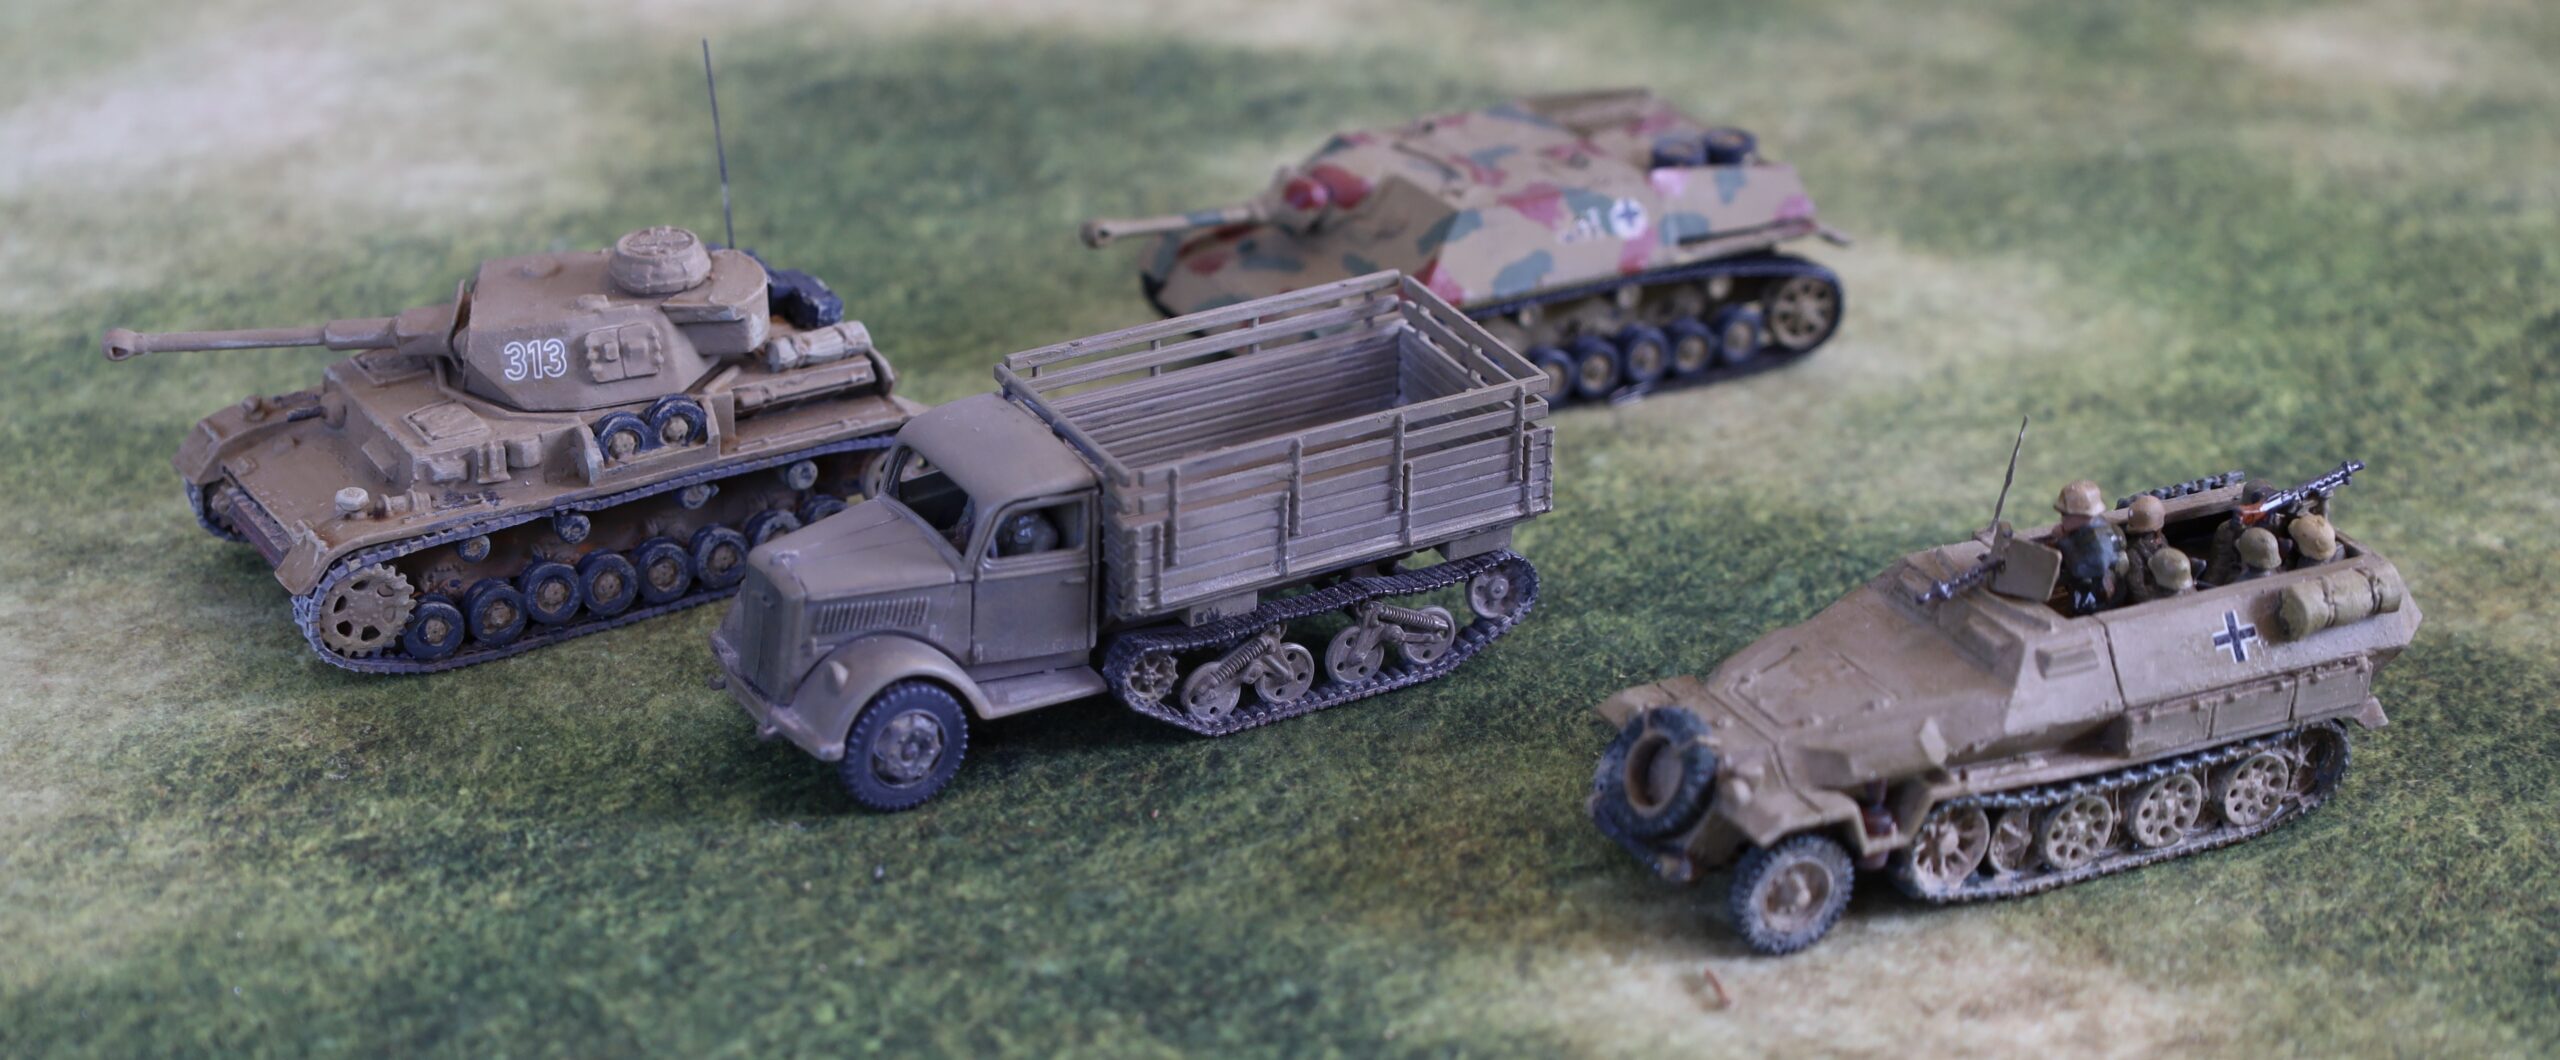
Anyway here is a picture of a selection of German vehicles in my collection, to illustrate the sort the variation.
The Panzer IV is an Airfix model from my original collection from the 1970s, repainted in 2017. The Sdkfz 250 is a PSC model painted not long after, using the same technique. The Opel Maultier truck was in my most recent batch, using the yellow-grey mix. Behind it is a Jagdpanzer IV, which I converted from the Airfix Panzer IV kit in the late 1970s, in its original Humbrol enamel paint, using the “Authentic Colour” range straight out of the pot. The Panzer IV and Sdkfz 250 are not far from the “Dunkelgelb Nach Muster”; the Maultier is close to the RAL 7028, while the Jagdpanzer IV is a fit with the fourth variation swatch from Real Colors.
I am still left with the question of how pale the colour should be. The swatches are dark; contemporary photos look quite a bit paler, as do photos of surviving equipment. Why this should be is a much debated topic – there is the hotly debated “scale effect” suggesting that scale models must be paler to simulate atmospheric effects; colours tended to fade when exposed to the open air and especially sunlight. Part of the problem may even be that the models are usually seen indoors in shade or artificial light, while the photos show vehicles in direct sunlight. My Maultier is maybe a bit on the dark side.
There remains a question of whether Dunkelgelb is the right colour for Tunisia, where my 1943 project begins. The German vehicles used there were all recently manufactured. There were just about no survivors from the old Africa Korps after El Alamein and the retreat, and most of the German troops were reinforcements anyway. These would have been units refitting in Europe after being withdrawn from the Russian front, doubtless leaving any surviving vehicles in theatre there. All the pictures from Tunisia show vehicles in fairly pale colours (i.e. not the old Dunkelgrau), and the Tank Museum has painted its captured vehicles from Tunisia (notably a Tiger and a Panzer IIIN) in what lookes like a yellower version of Dunkelgelb. From this I assumed that Dunkelgelb was the appropriate colour (though without the camouflage green and brown – not visible on phots from this theatre until much later). But the directive to use Dunkelgelb was not issued until February 1943, by which time most of the equipment would have been shipped. In fact it is more likely that the vehicles would have been painted in the previous tropical colours of RAL 8020 Gelbbraun (the primary colour) and RAL 7008 Graugrün for camo patterns taking up to one-third of the vehicle). RAL 8020 Braun and RAL 7027 Grau were authorised substitutes for each of these respectively, given shortages. The Gelbbraun is really not very far from the greyer version of Dunkelgelb, according to the swatches, but has a slightly warmer tinge. The Braun is distinctly redder, and may be the origin of the Humbrol Africa Korps desert colour in issue back in the day, which was quite a bright orange shade. I might try replicating these in a future project for vehicles especially destined for the Tunisia phase of operations – though alas too late for my Tigers and Panzer IIIN.
Anyway, Dunkelgelb is the right colour for Sicily and later, and I’m very glad I have found a way of replicating it without too much trouble.
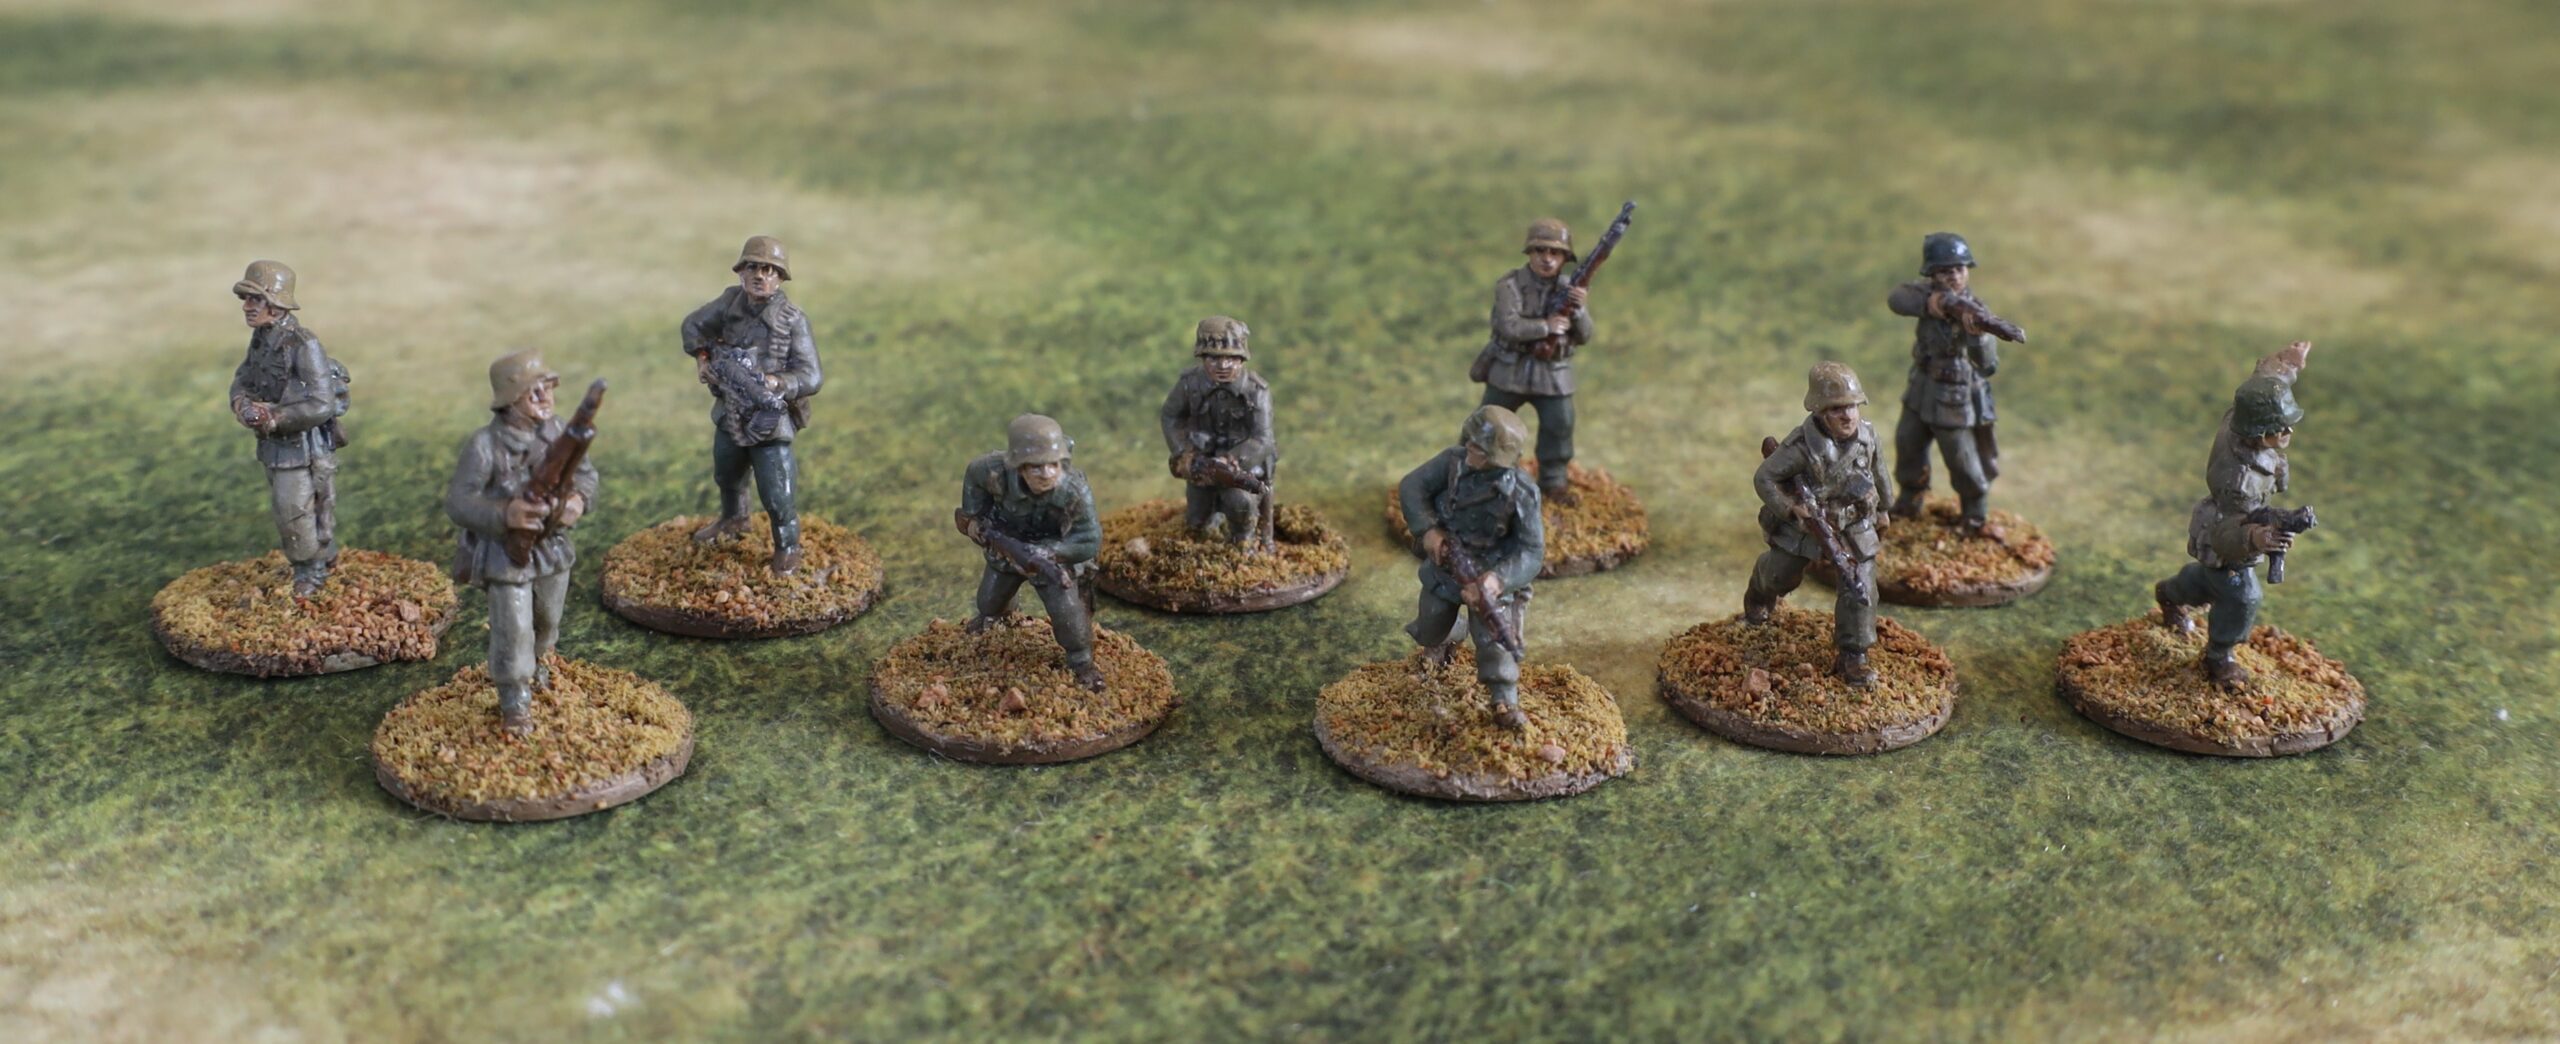
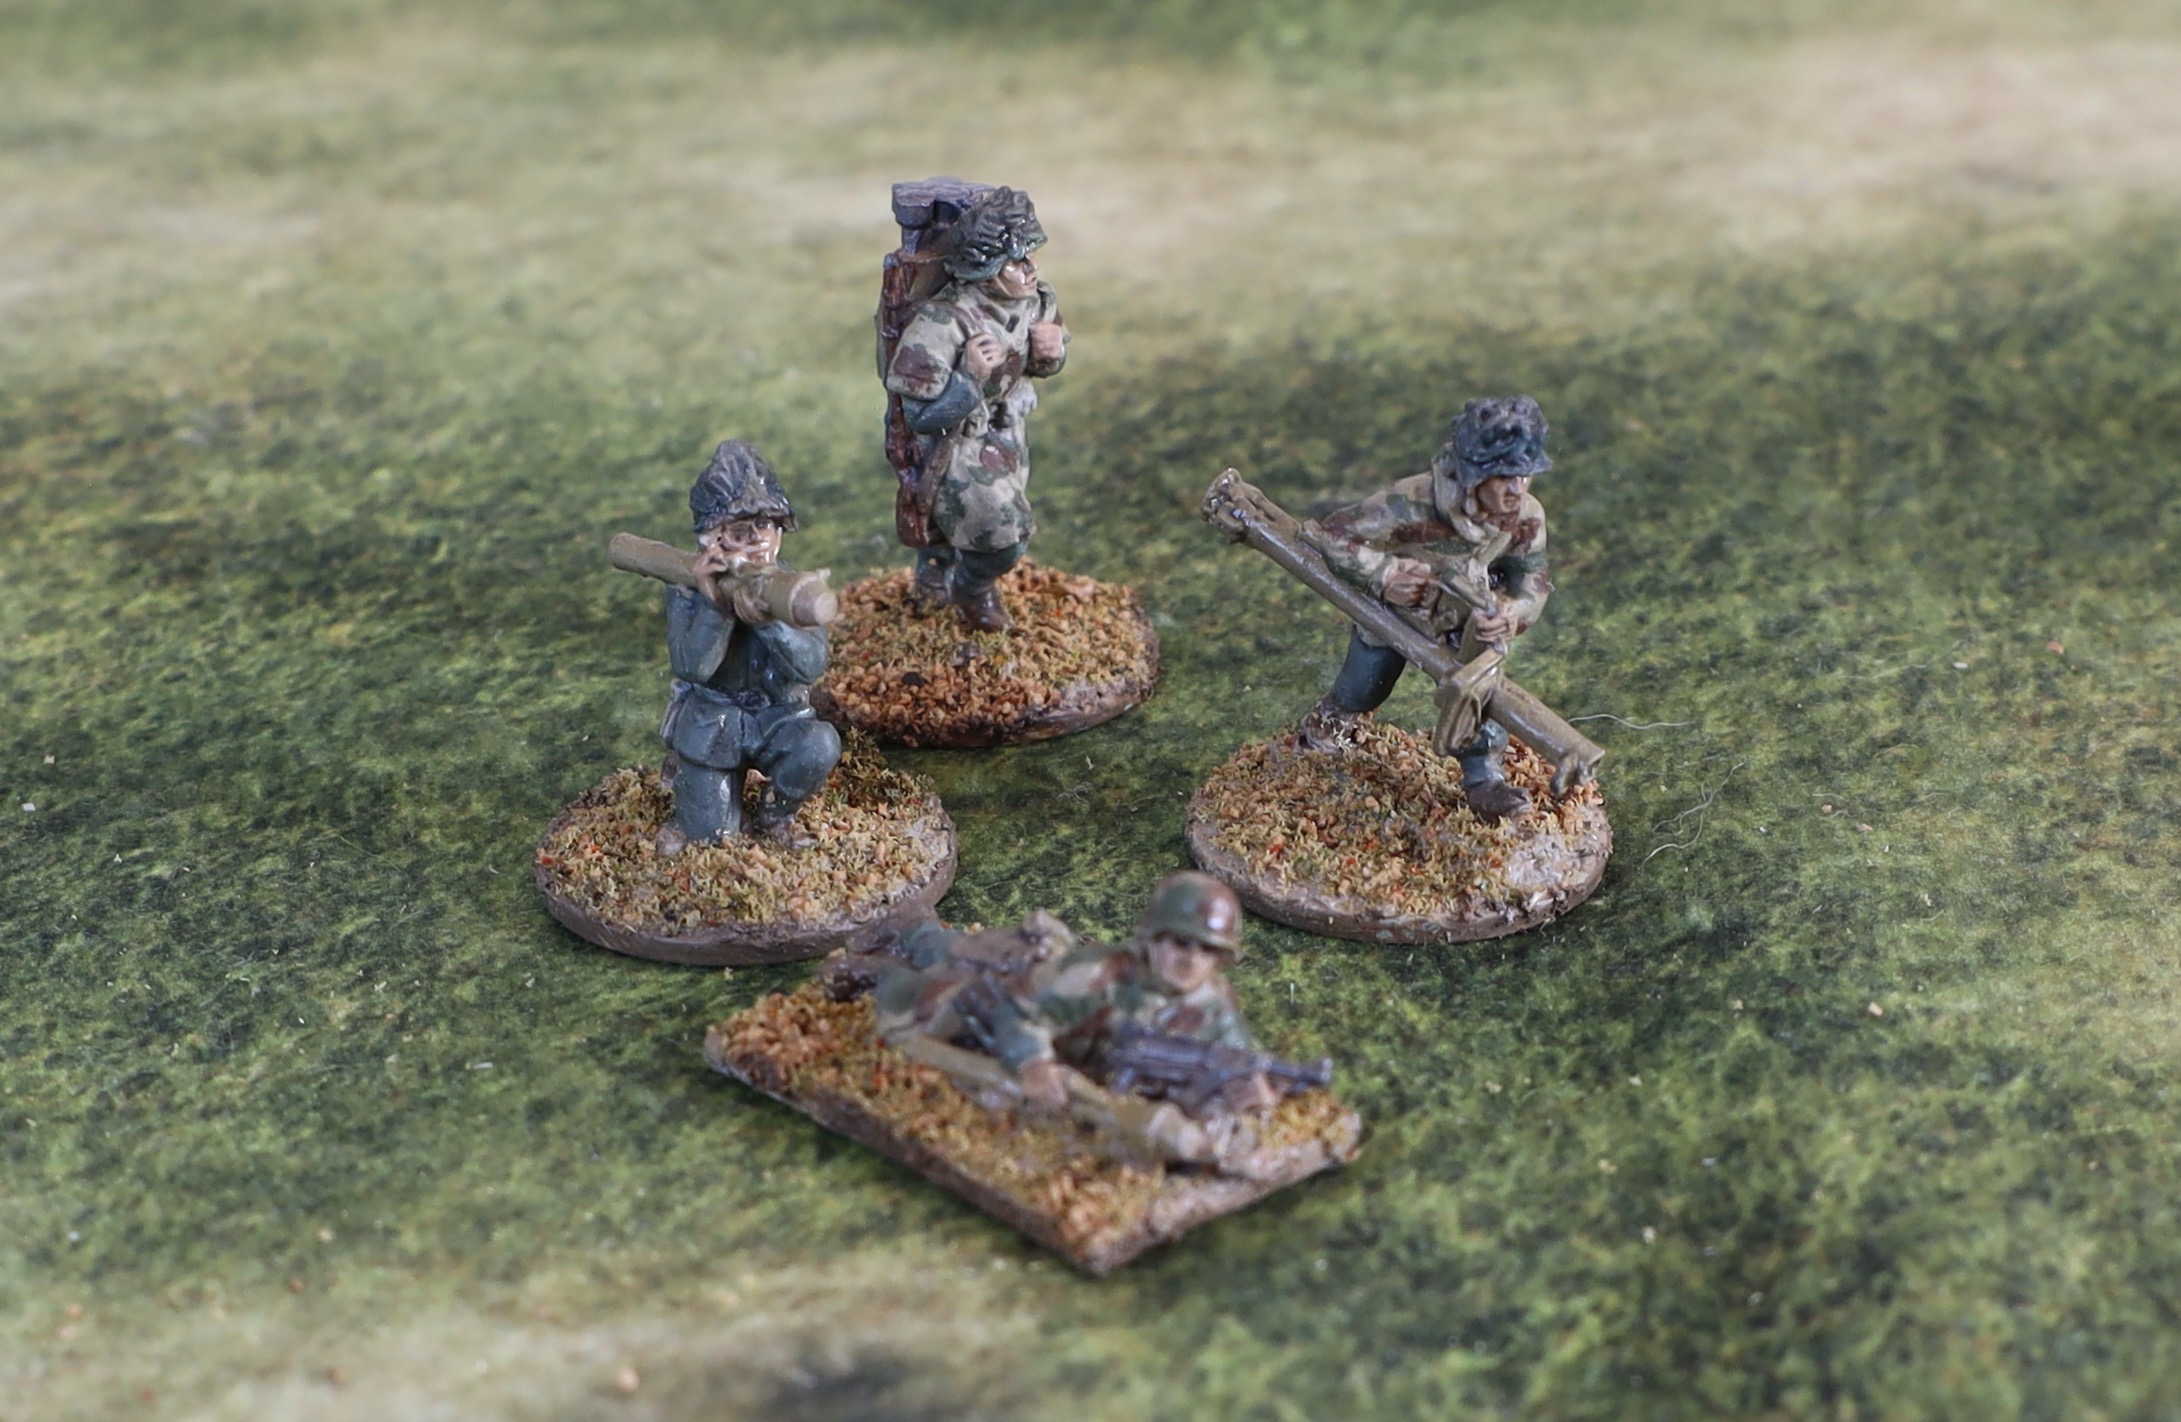
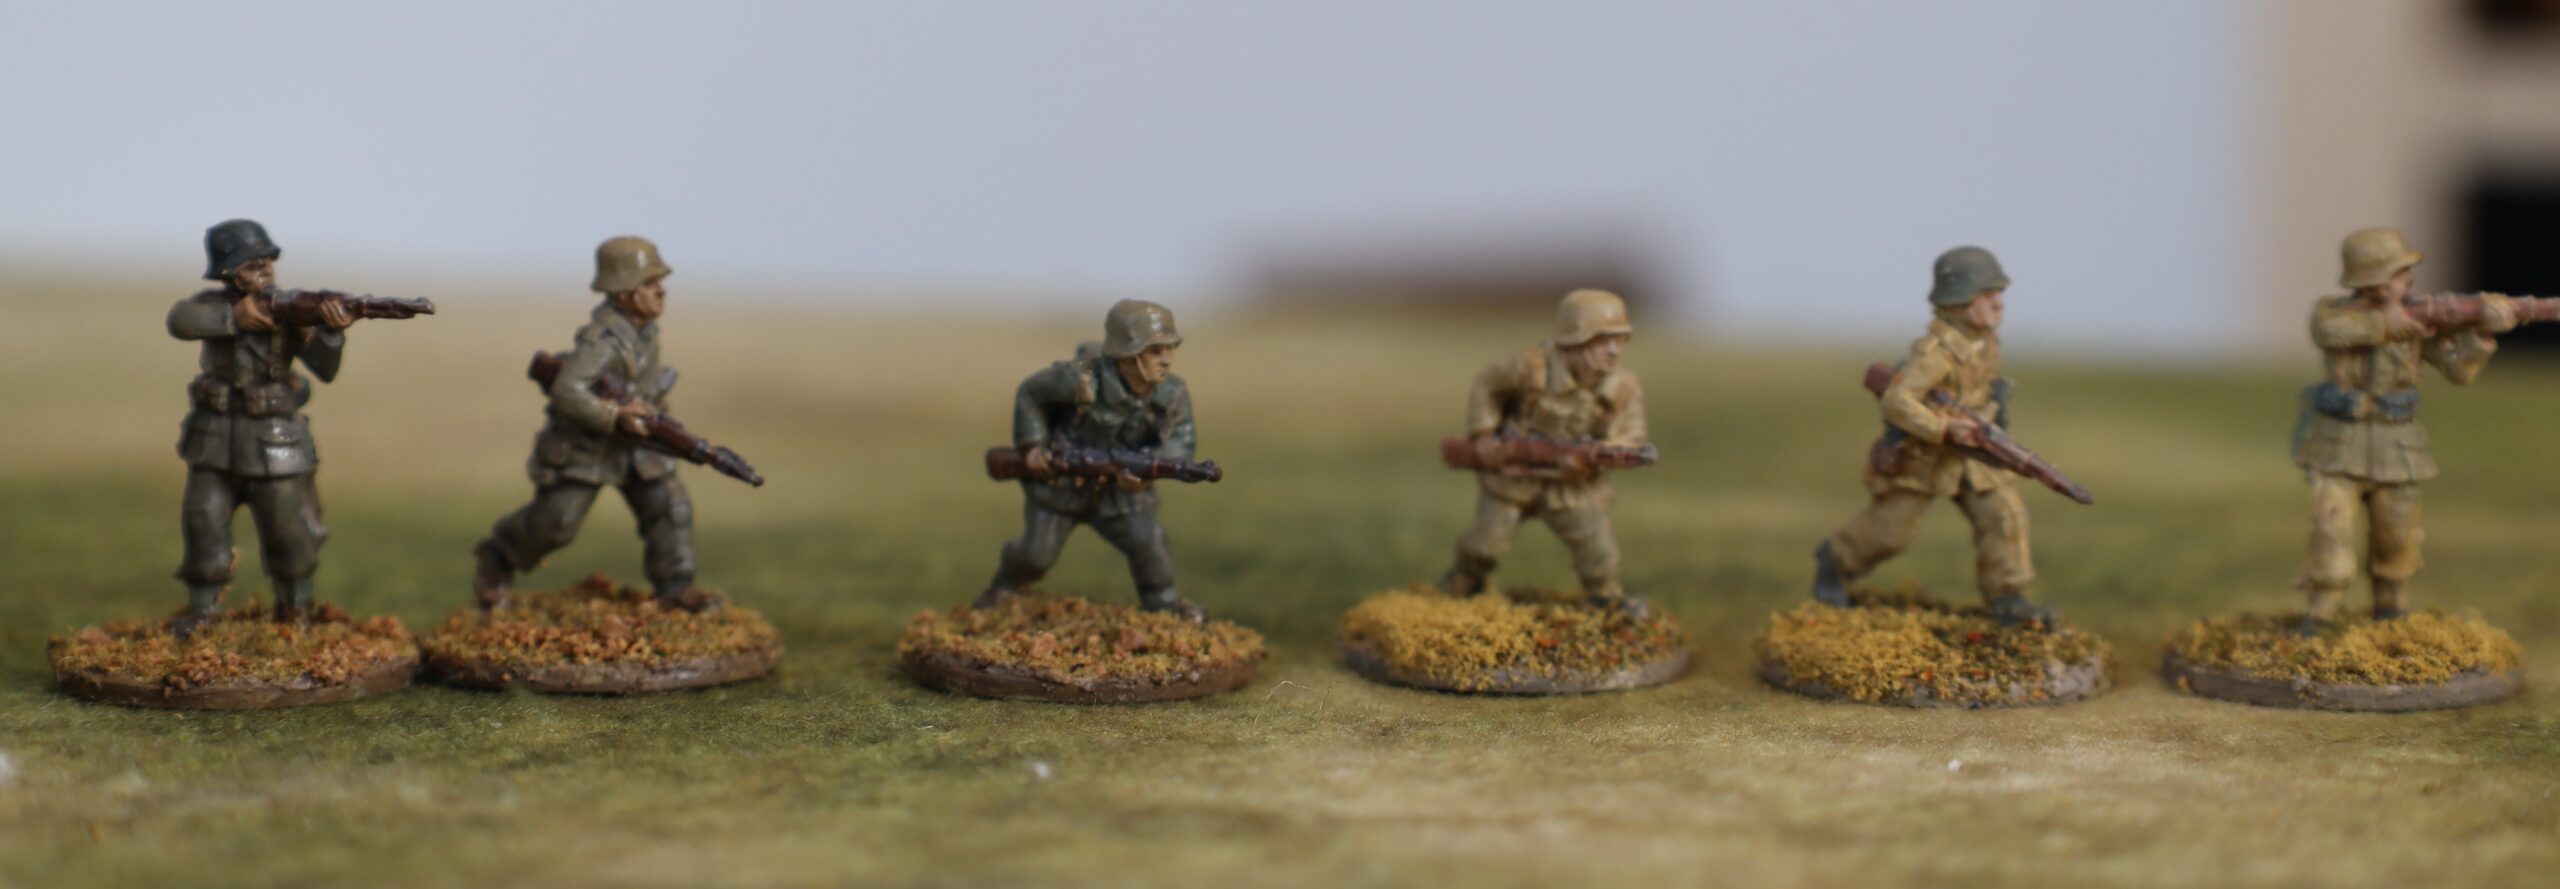
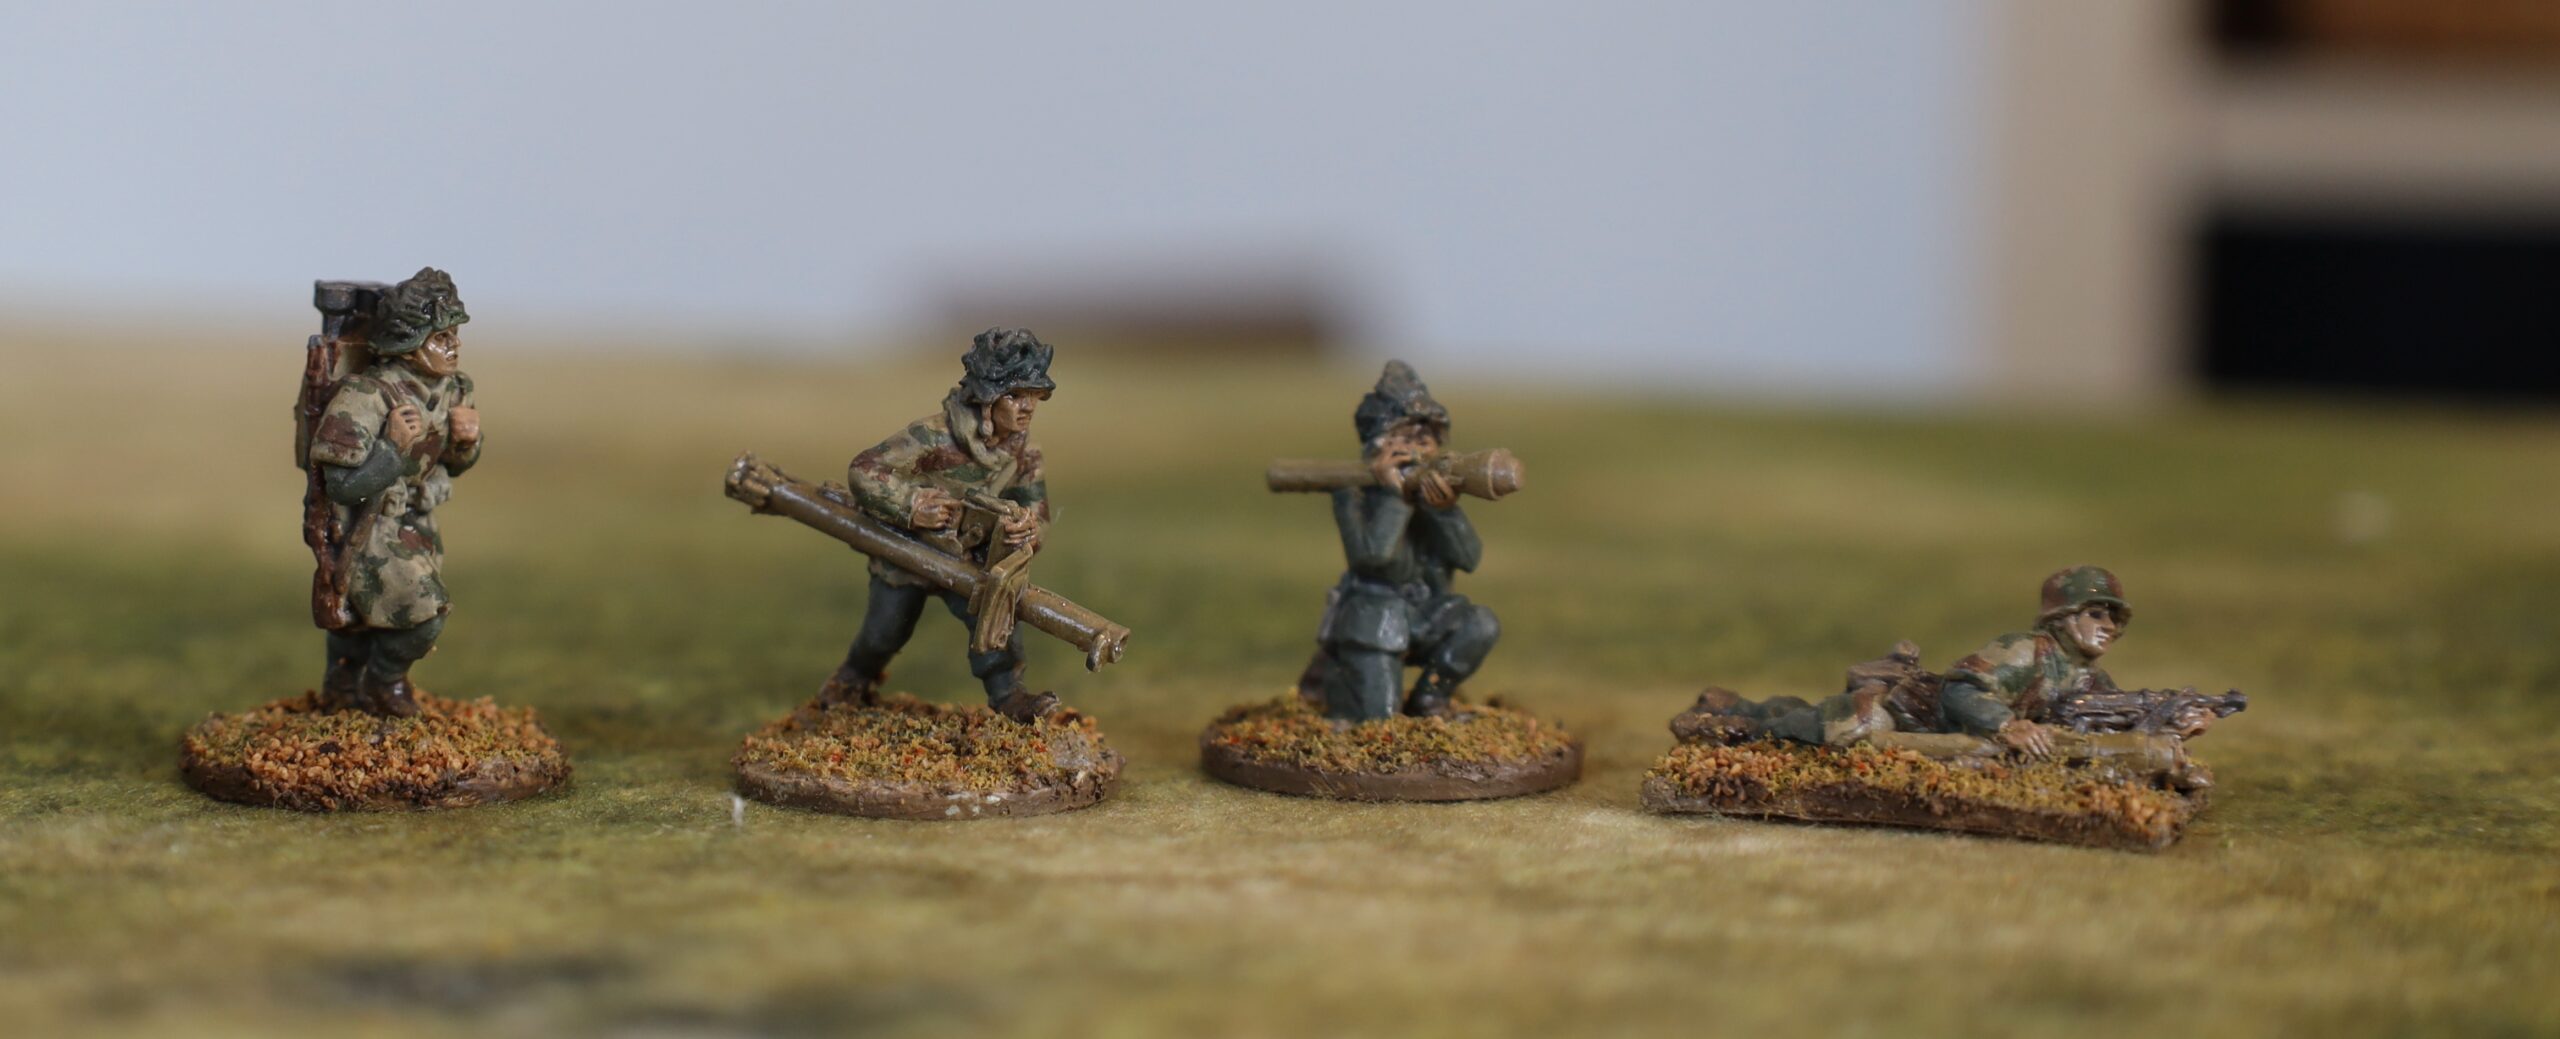
Alongside the vehicles and guns, I also painted 14 German infantry (in 20mm) for my 1943 project in my last batch of work. This was for bog-standard infantry, serving as either panzer grenadiers or ordinary infantry. Most of the German infantry in this theatre in 1943 were either panzer grenadiers or paratroops – with the exception of parts of the Tunisia campaign, where ordinary grenadiers, as well as ad-hoc units, were used extensively. I have not done any paras yet – though these played a big part in all the various campaigns. This smaller batch of infantry was put together so that the Germans have numerical parity with the British in my collection, giving me more gaming options. I painted one pack of AB infantry – the “section advancing cautiously”, which was ten men, including one MG34 and an NCO with an MP40. In addition I painted up one panzerschrek team and two figures with panzerfausts. These antitank weapons were only distributed to the German infantry late in 1943 – and after Salerno – so I hadn’t painted any up yet. But these will be needed to do later scenarios, especially if I push into 1944.
The panzershrek and panzerfaust figures
I did my original batch of German infantry back in October 2017. I wasn’t very happy with the end result, though I wasn’t able to articulate clearly why. The problem is that there are very few photographic sources for German infantry in Sicily or Salerno (and even these are mainly paras!). There is a little more for Tunisia. I think I was heavily influenced by pictures of prisoners in Tunisia, showing a huge variation in uniform colour, with quite a few people wearing very pale uniform items. So I depicted a lot of very pale kit. In fact the very few pictures from Italy show the German uniforms as being a bit darker than this, apart from some of the helmets. So I decided to go a bit darker this for this batch.
The panzer grenadier section
As before I decided to use the German infantry figures from AB depicted in standard uniform, rather than the tropical or summer uniform. The three uniforms were a very similar shape (the main difference was in the clot and dye), so they look pretty similar from a distance. In fact in Tunisia the weather was pretty cold and wet, so there wouldn’t have been call for rolled up sleeves etc. and other signs of a warm climate. I avoided Africa Korps figures because these tend to include figures in caps and shorts – which I didn’t want. In fact the in-combat DAK infantry figures from AB don’t have either – and not even rolled up sleeves. The only problem looks to be that a few of the figures have sand goggles on their helmets. I dare say that these can be cut off and filed down.
The figures were first mounted on steel washers, set in my usual mix of sand, acrylic paste with a bit of paint (white and raw umber). They were primed with gesso (I can’t remember if this was applied with airbrush, or darkened with some paint). For the main uniform for the most part I used a mix of Liquitex Yellow Oxide (aka yellow ochre) with varying amounts of black and white (sometimes using a neutral grey mix to speed things up). This gives a decent representation of the tropical uniform. This is exactly the same combination of pigments I used for the dunkelgelb on the vehicles, about which I post separately. The ratio of black to yellow is higher, giving a more olive finished result. There was not quite as much variation in colour as I had intended – the white seemed to fade on drying! some of the items were painted in field grey, which I mixed using a Viridian green mixed with neutral grey and tweaked a bit (I may have added some burnt siena to calm the green). The helmets were mainly painted in the dunkelgelb used for the vehicles, with one in dark field grey (as they would have left the factory) and one in olive green (as per the tank camouflage colours). As for the accoutrements and webbing, I had almost no guidance from photos, and conflicting advice from other sources. I ended up with a dull brown for the webbing and certain items, and greys mainly for the rest. The boots were brown.
The picture below shows three of the figures next to the same three from my original batch from 2017. They are much darker, but I’m happier with the overall appearance. Next time I might try to lighten the olive mix a tad though.
The panzershrek and panzerfaust figures
These depict figures from later in the campaign, when winter had struck, as well as the fighting moving further north. I therefore decided not to depict them in tropical gear. Three of them are wearing camouflage smocks. I am depicting them in sumpfmuster 43 pattern – though how well I have caught this I’m not sure. It’s probably a bit too chunky. The remaining figure is in field grey. Three of the helmets feature attached vegetation. I painted this quite dark – probably too dark, but I wanted to avoid the garish greens I so often see on miniatures – I may touch these up later. The prone figure features a painted camouflage pattern using panzer camouflage colours.
Luftwaffe uniforms
As a slight digression I will mention the AB 88 crew that I also painted as part of the batch. These are in Luftwaffe uniforms. The tropical colour was paler than the army one, apparently – so I used the same basic mix with more white. And in place of the field grey, the Luftwaffe had blue. This I got from black, white and Prussian Blue, a paler variation of the mix I used for the “panzer grey” gun and tractor. This is guesswork as I have few colour pictures to go on.
Finishing
After the paint I applied a glaze. As with my most recent Napoleonic figures, I used alkyl medium as the base, mixing in some oil paint – a mix of Payne’s Grey and Burnt Sienna to reach a sort of dull mauve, to complement the olives and yellows that predominate in the uniform. This dried quite glossy – which I can accept in Napoleonic figures (it adds depth to the colourful uniforms), but not for WW2. But I didn’t want to use aerosol varnish, as I didn’t want a uniform matt finish. So I used my old Winsor & Newton varnish in a bottle to apply to the uniforms. This is unreliable, depending on how much of solid gunge at the bottom of the bottle gets into the mix. My first batch, used on the vehicle tilts, was fine. The batch used on the figures, alas, still left a strong sheen, which can been seen on many of the figures. For the weapons, helmets and skin I wanted a slight sheen – and I used another brand of matt varnish, which is more reliable, but not very matt. The next time I mix up some really matt varnish, I will need to touch these figures up.
After that it was the bases. I applied My usual Woodlands Scenics flock mix with some sand using undiluted artists strong glue. I then added patches of sand to give a bit of variation. For some reason the adherence of the flock/sand on the larger weapon bases was much better than on the figures. I needed to seal the latter with diluted PVA glue, but not the former. I think I was more careful to press the flock in on the larger bases, which I did one bit at a time. Must remember to do this on all my bases next time, as the sealing is an extra step and a faff. I did not dry brush the figures; I though of dusting them, after the technique worked so well on the vehicles, but I decided not to. It is no necessary.
Overall I am happy with the result, apart from the sheen on the uniforms, which is easy enough to fix later. I am pleased that my painting technique is settling down – this will speed things up in future.
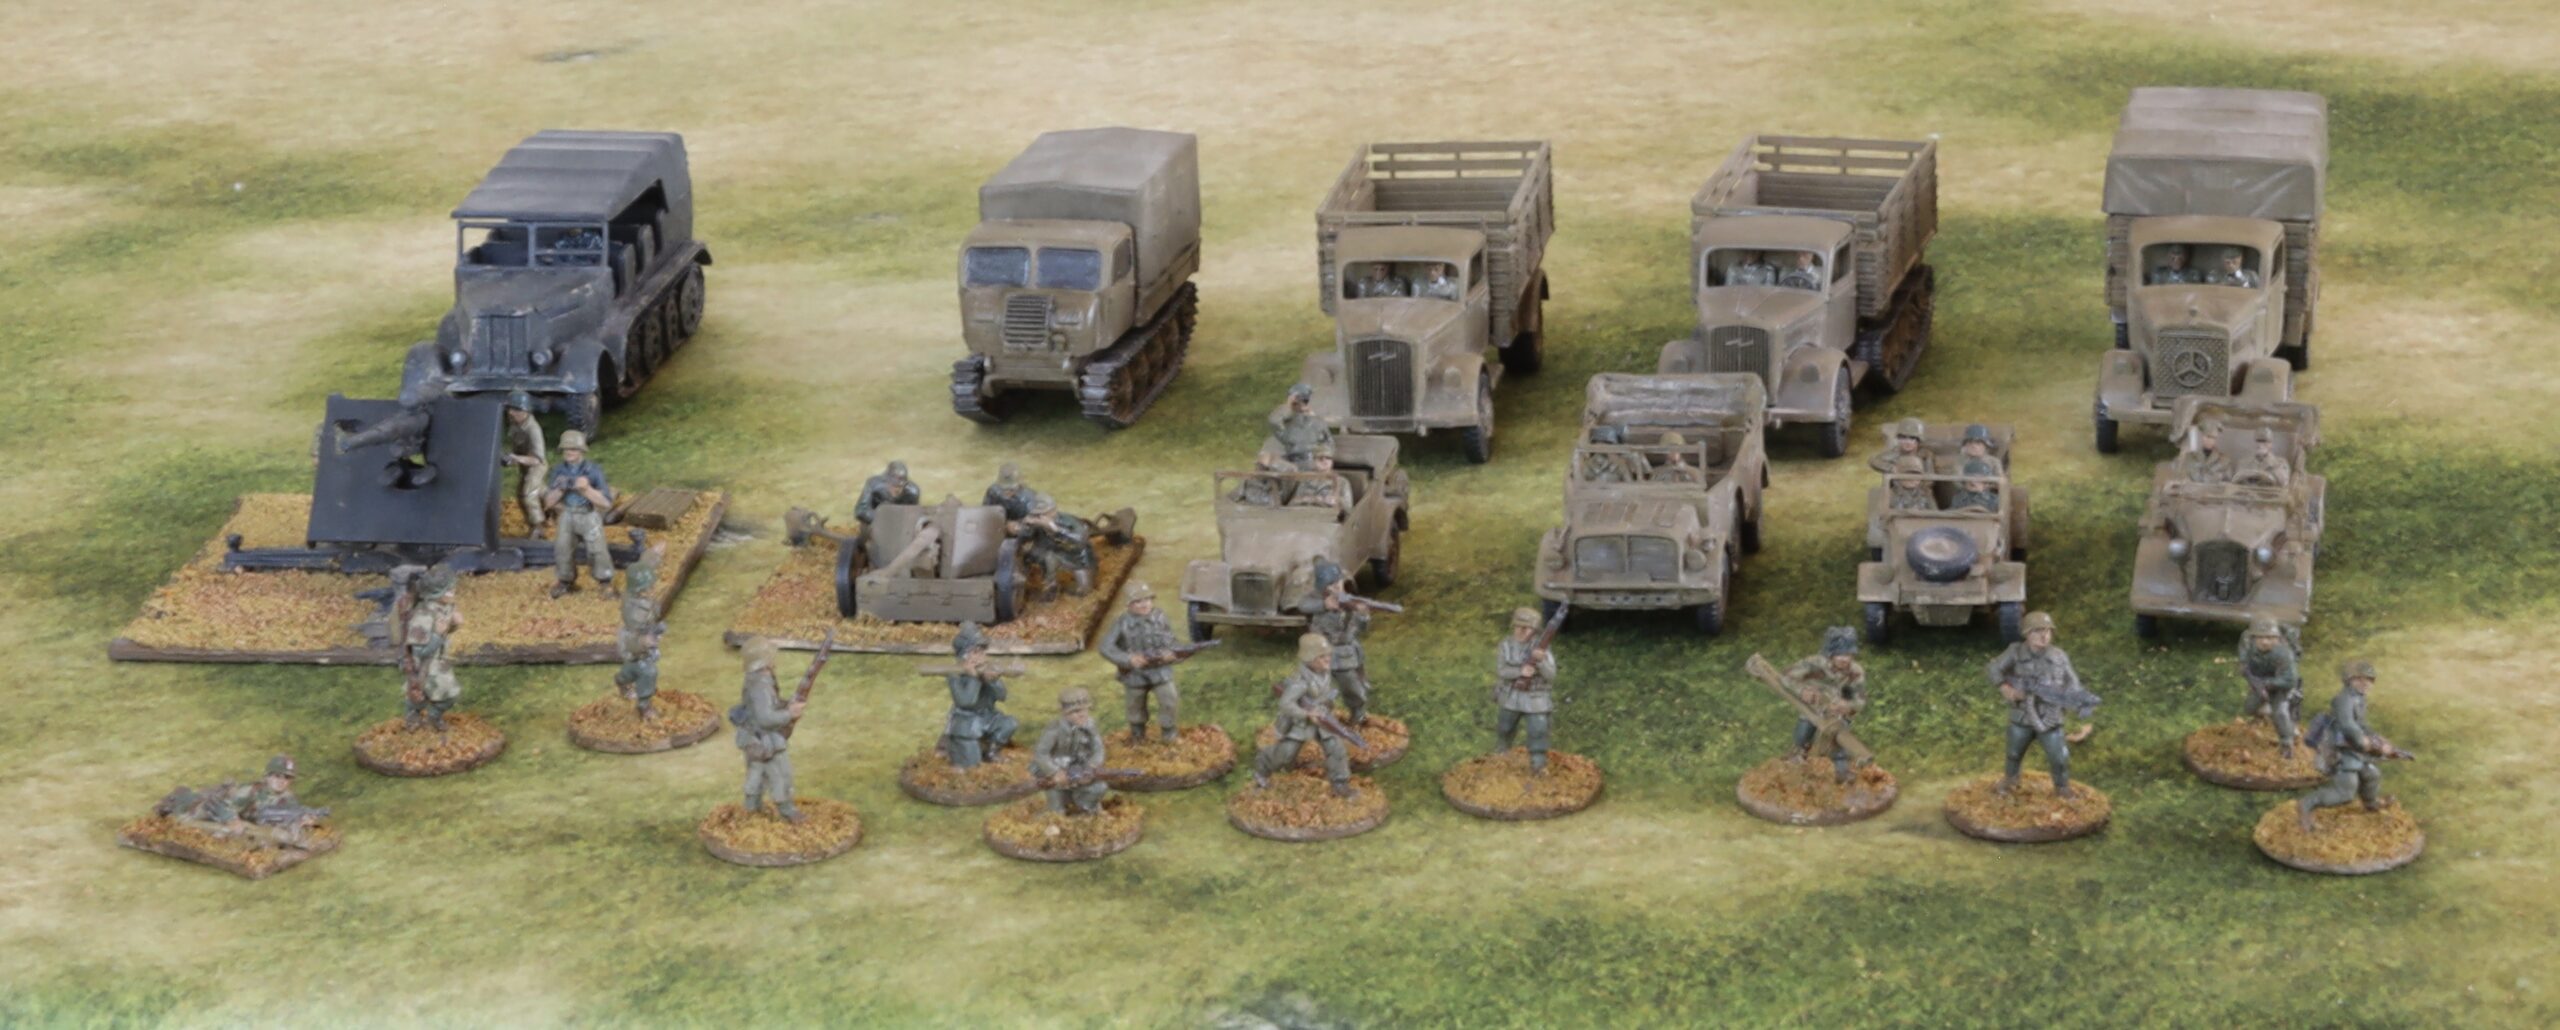
I’ve been off line here for nearly three months. At first I was pushing on with my Napoloenic rules project. I reached the point where it needed play testing – and then got distracted. I then moved on to my next project, which was to build more 20mm ground forces for the 1943 Mediterranean campaigns. These are 9 vehicles, two artillery pieces and 14 infantry figures, all German. At least twice I lost momentum as the project progressed, and I got distracted by other things. So the whole thing took quite a few weeks. I have been going for bigger projects to get more stuff done more quickly – but you can overdo it. This one was too big and complex, causing the fatal loss in momentum.
Looking back on it there were two main problems. First was combining infantry (AB metal figures) with model vehicles/guns. The processes between the two are too dissimilar, so for almost every session it was either on one or the other. Even though the models featured crew figures, these were much simpler than the infantry – and the artillery crews had different uniforms anyway. The second problem was that many of the models took far longer to assemble than I expected. The main culprit were the three Milicast cars, which are resin models with a number of fiddly parts and no assembly instructions. The Airfix Vintage Classics 88mm gun and tractor was also a nasty model to put together – mainly because the parts were ill-fitting. By contrast the Plastic Soldier Company (PSC) models (three medium trucks, a Raupenschlepper, and a Pak 40) were simple models that were quick to assemble. The S-Model Kubelwagen was somewhere in the middle. It was quite fiddly (more parts than then the Milicast ones), but in polystyrene, with well fitting parts and with clear instructions, so it was much easier to assemble. Painting and finishing a vehicle batch of this size was not a problem, however, even with two different colour schemes.
I will describe the project in three parts: the vehicles (and artillery) in this post, followed by the infantry, and a digression into dunkelgelb, principal vehicle colour.
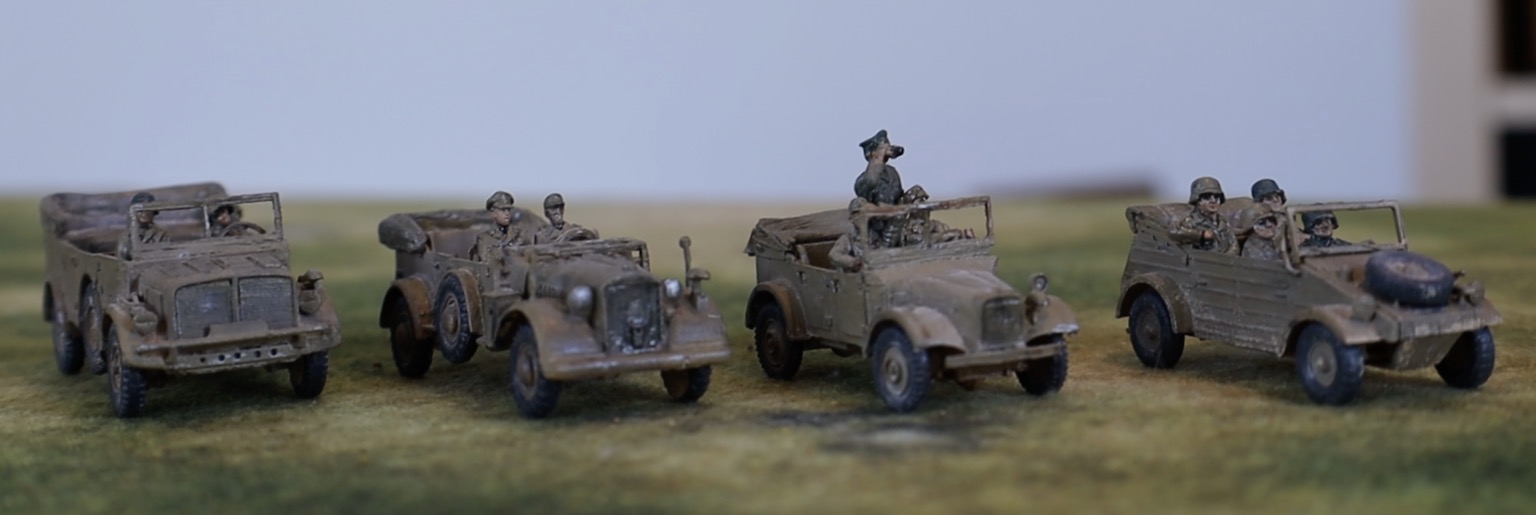
The four cars
L to R: Horch Kfz 69, Horch Kfz 15, Stoewer Kfz 1, Kubelwagen
These vehicles (Horch Kfz 15 and 69 heavy cars, Stoewer Kfz 1 and VW Kubelwagen field cars) will be used as transport for small command, comms and observer groups. The two Horch cars (especially the large Kfz 69, really a light truck) are also suitable as tows for lighter field weapons, such as the Pak 38. The 69 could transport a small infantry squad too. All except the Kubelwagen are from Milicast. This is one of the two suppliers I am using for slightly more obscure vehicles and equipment; the other is SHQ, who make metal models. Both are in 1/76, so on the small side. I’d prefer 1/72, as these work better with the AB metal figures I like to use, but there is quite limited availability at this scale. The Milicast models are in resin – which can produce very fine detail, but is a bit fragile. I fell in love with the pictures of these vehicles on the website and got a bit carried away. I bought three SHQ metal models at about the same time (back in 2019), but was a bit disappointed. I have assembled a jeep and a Loyd carrier (a Bedford truck is still awaiting assembly), and found them a bit crude. The parts weren’t especially well-fitting. The end result was more than acceptable though.
Another view!
What I discovered this time was just how difficult resin is to work with. It didn’t help that the crew figures were resin too (bought separately from Milicast), and often needed arms to be glued in place. For each of the vehicles, the body came in one piece, but wheels, windscreens, lights, mirrors, steering wheels and various other bits, depending on the model, had to be glued on. I faced four main problems. The parts were fragile; they were often tiny; there were no recesses to secure them; and gluing was a bit tricky. On the final point I used standard cyano superglue. It look longer than expected to harden; the (usually tiny) part often needed to be I held in place for few minutes, and wasn’t properly secure until the next session. By a miracle no parts were lost in assembly, though some did go awol for a bit. At least one of the of the front lamps broke off at later stage, and I did not even attempt to search for it. Trying to clean flash off the windscreens was a nightmare, given the fragility the material – and one of them broke into several fragments that had to be reassembled. The upshot of all this is that these three cars took several two -hour sessions to assemble. I was vowing “never again” at the end. Come back SHQ, all is forgiven! Alas I have two more Milicast models awaiting assembly: a 17pdr antitank gun, and a 2cm Flakvierling (with quad barrels) which looks a complete nightmare, though this time with some assembly instructions.
The fourth car is the classic Kubelwagen. I actually have no less then four models of this vehicle (only one assembled) from old 1970s Airfix reconnaissance sets – but these were so terrible as to be unusable. They are tiny, and you couldn’t fit 1/76 figures in, never mind ABs – they came with some very diminutive crew figures, so it would have been obviously wrong to the designers. Those were the days. Instead I bought an S-Model kit in 1/72 – there are two models in each box, and I am saving he second one for later. To my relief the model proved big enough to take an AB crew of four figures specifically designed for the Kubelwagen – which fitted quite nicely. This wasn’t a particular simple kit, but in plastic, and with well-fitting parts (mostly with recesses to aid fitting), it was much easier than the resin models.
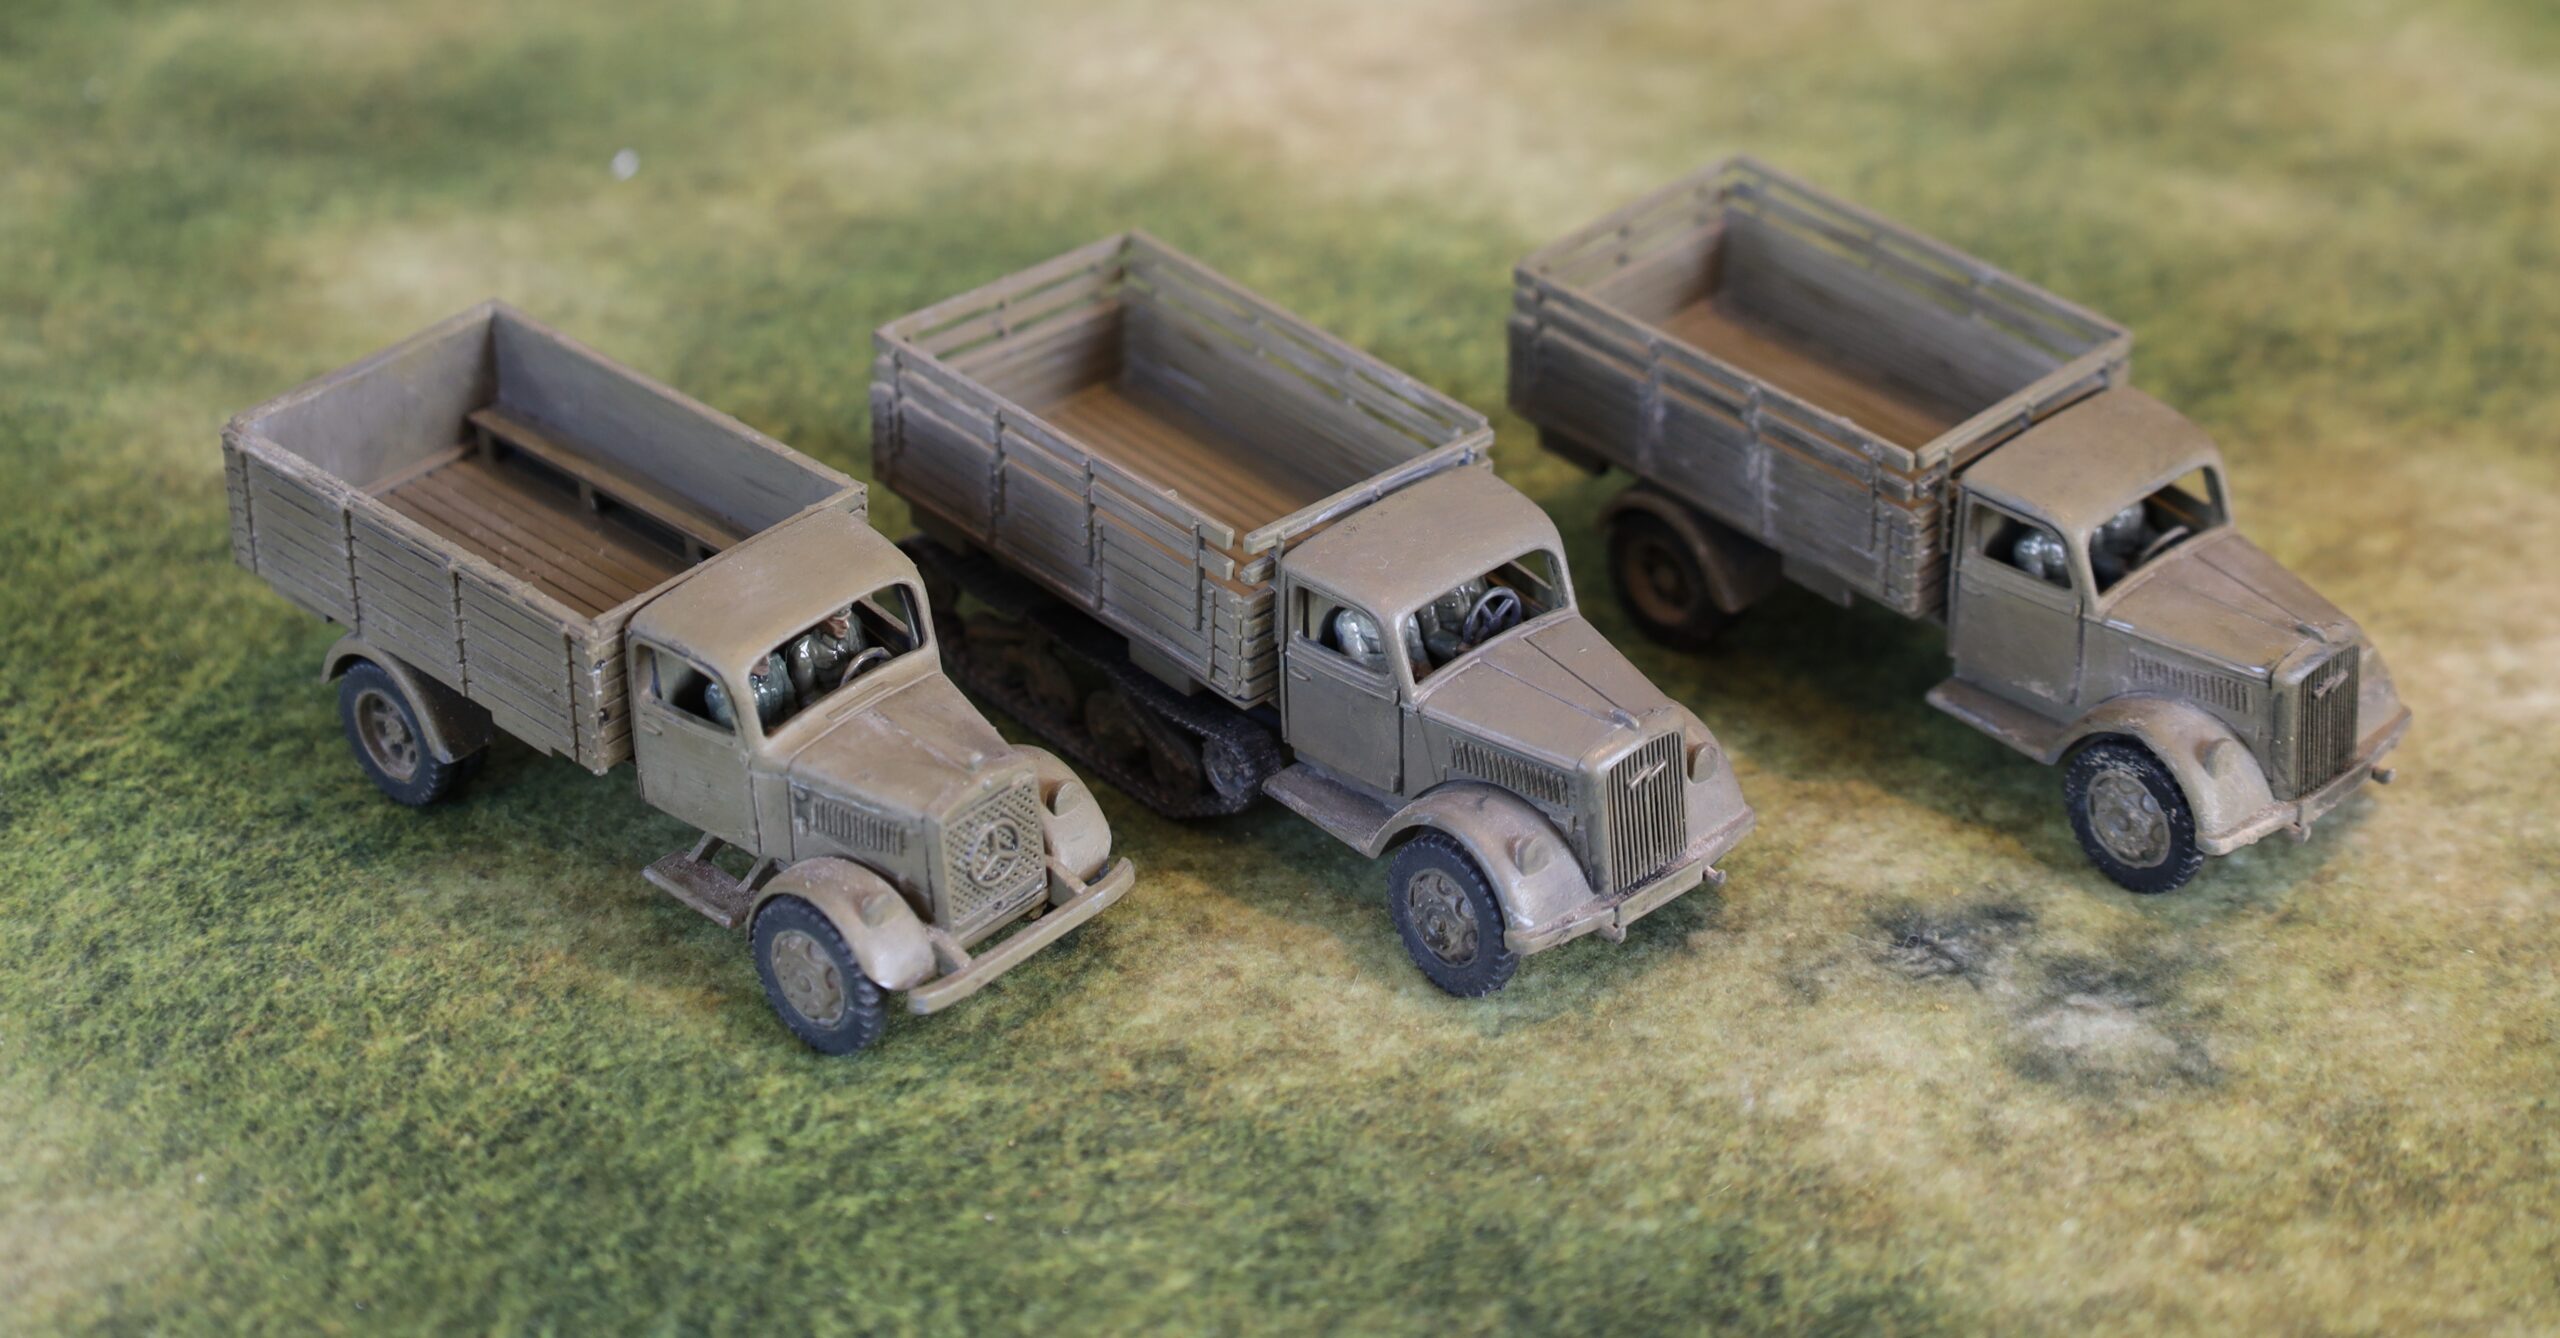
The medium trucks
The PSC trucks
From one extreme to another! These models came from a single box from PSC, designed with wargamers in mind. They are in 1/72, but originally engineered for 15mm scale (i.e. about 1/100), so they are quite chunky. There aren’t many parts, and no fiddly bits (no wing mirrors, and with headlamps crudely folded onto the mudguard, for example). They were very quick to assemble. The only complication was that I had to paint the interior of the cabs before assembly, which meant assembly of this bit was delayed. By the time I got there some of the parts had bent a bit out of shape, so the fit wasn’t as good as it should have been.
A different view in different lighting
As is generally the case with PSC, there were multiple options – leaving a lot of unused parts at the end. There were two choices each for cab (Mercedes or Opel), drive (wheeled or half-track) and bed (higher sided without tilt or lower with tilt). As you can see from the picture, I tried each of these variations out.
You can see the Mercedes truck without tilt here
These aren’t fine models, but work well enough for tabletop gaming, and I’m really pleased with them. On the strength of this I bought a second box (PSC models are often out of stock, so it’s best to buy while you can). I have an idea of converting one of them to take a Flak gun on the back. Otherwise these vehicles are versatile as troop transports (the German troops in this theatre were usually motorised), tows for medium-sized guns, or supply vehicles (although there is limited call for these on the tabletop).
Raupenschlepper and Pak 40
This is also a PSC kit. I needed Pak 40 75mm antitank guns, as these, according to some sources, were used in Tunisia (I’m not sure but Pak 36(r) converted from Russian 76mm guns, which used Pak 40 ammunition, definitely was in Tunisia), and by Salerno they seem to have been the standard antitank weapon in use by the Germans. The model comes with the Raupenschlepper Ost as a tow. I haven’t seen any pictures of this vehicle in use in this theatre, but Wikipedia has a picture of it in Albania in September 1943, so presumably it was around. It was designed for the Russian front, and used as a tow for medium weapons – it is usually pictured with the 10.5cm howitzer.
This isn’t such a good buy as the trucks. There are only two sets of models in the box. The Raupenschlepper has an alternative cab, with flat-panel construction used later in the war. There are also parts for a version used as a self-propelled Pak 40. Very few of these were actually built, so why all that plastic was used in a model designed for wargames use is a puzzle. I’m not especially a fan of the solid windows – though these looked much better in the end result than I feared. The tilt is moulded in two parts, and the join needed filing and puttying so as not to look too obvious. The crew figures for the Pak 40 aren’t very nice. These are standard PSC sprues, which I also had for the Pak 38s, with some figures requiring assembly. Somehow these are much harder to get looking lifelike than the AB cast figures, though these are quite expensive. They are depicted wearing smocks, which I painted up as early pattern German camouflage (though this is perfectly in keeping with the theatre).
Still the models were easy to assemble and the result is perfectly satisfactory. I’ll do the second models later.
From a different angle
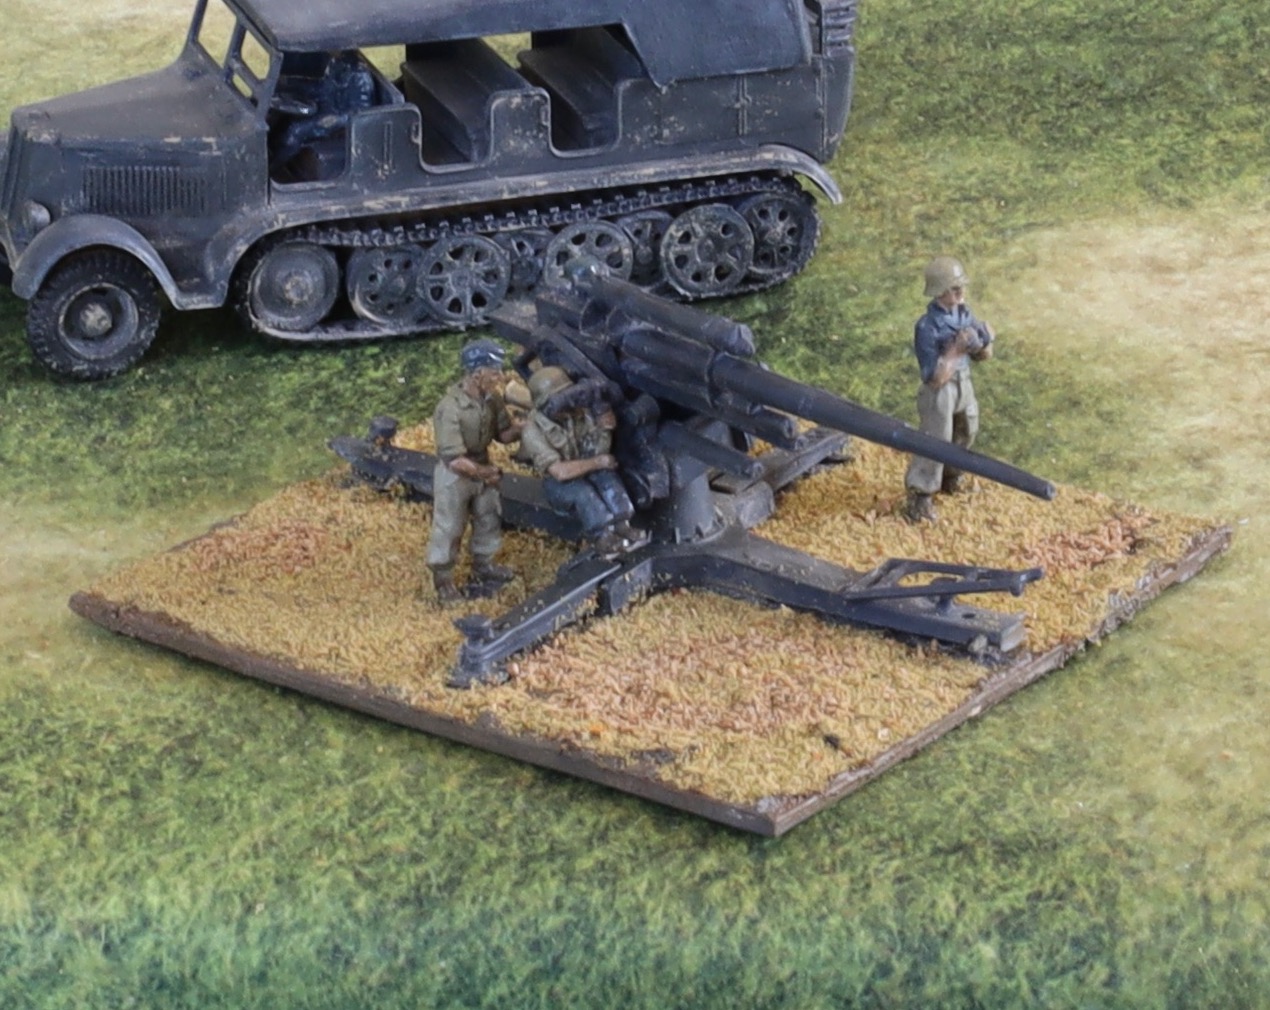
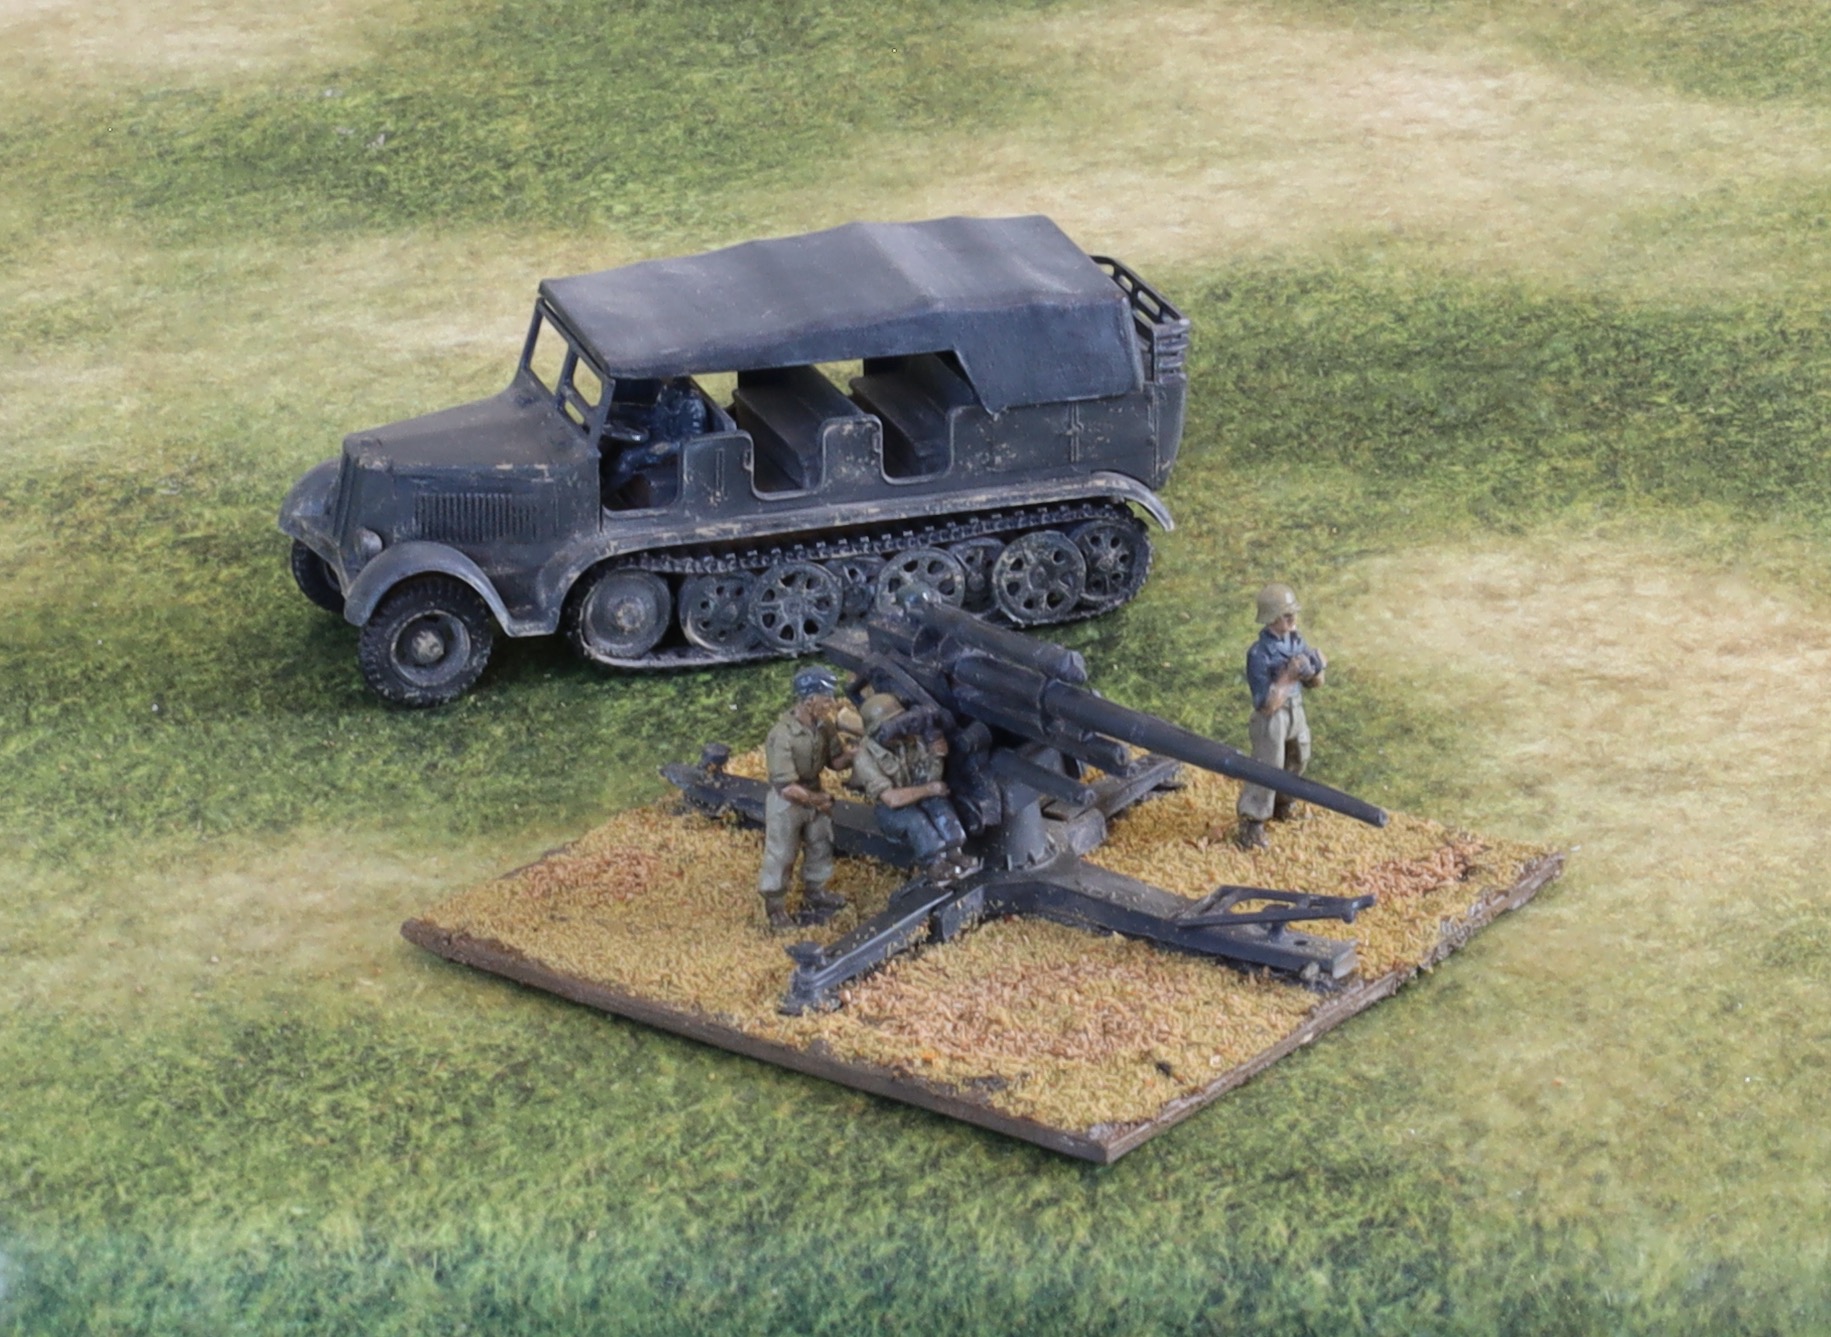
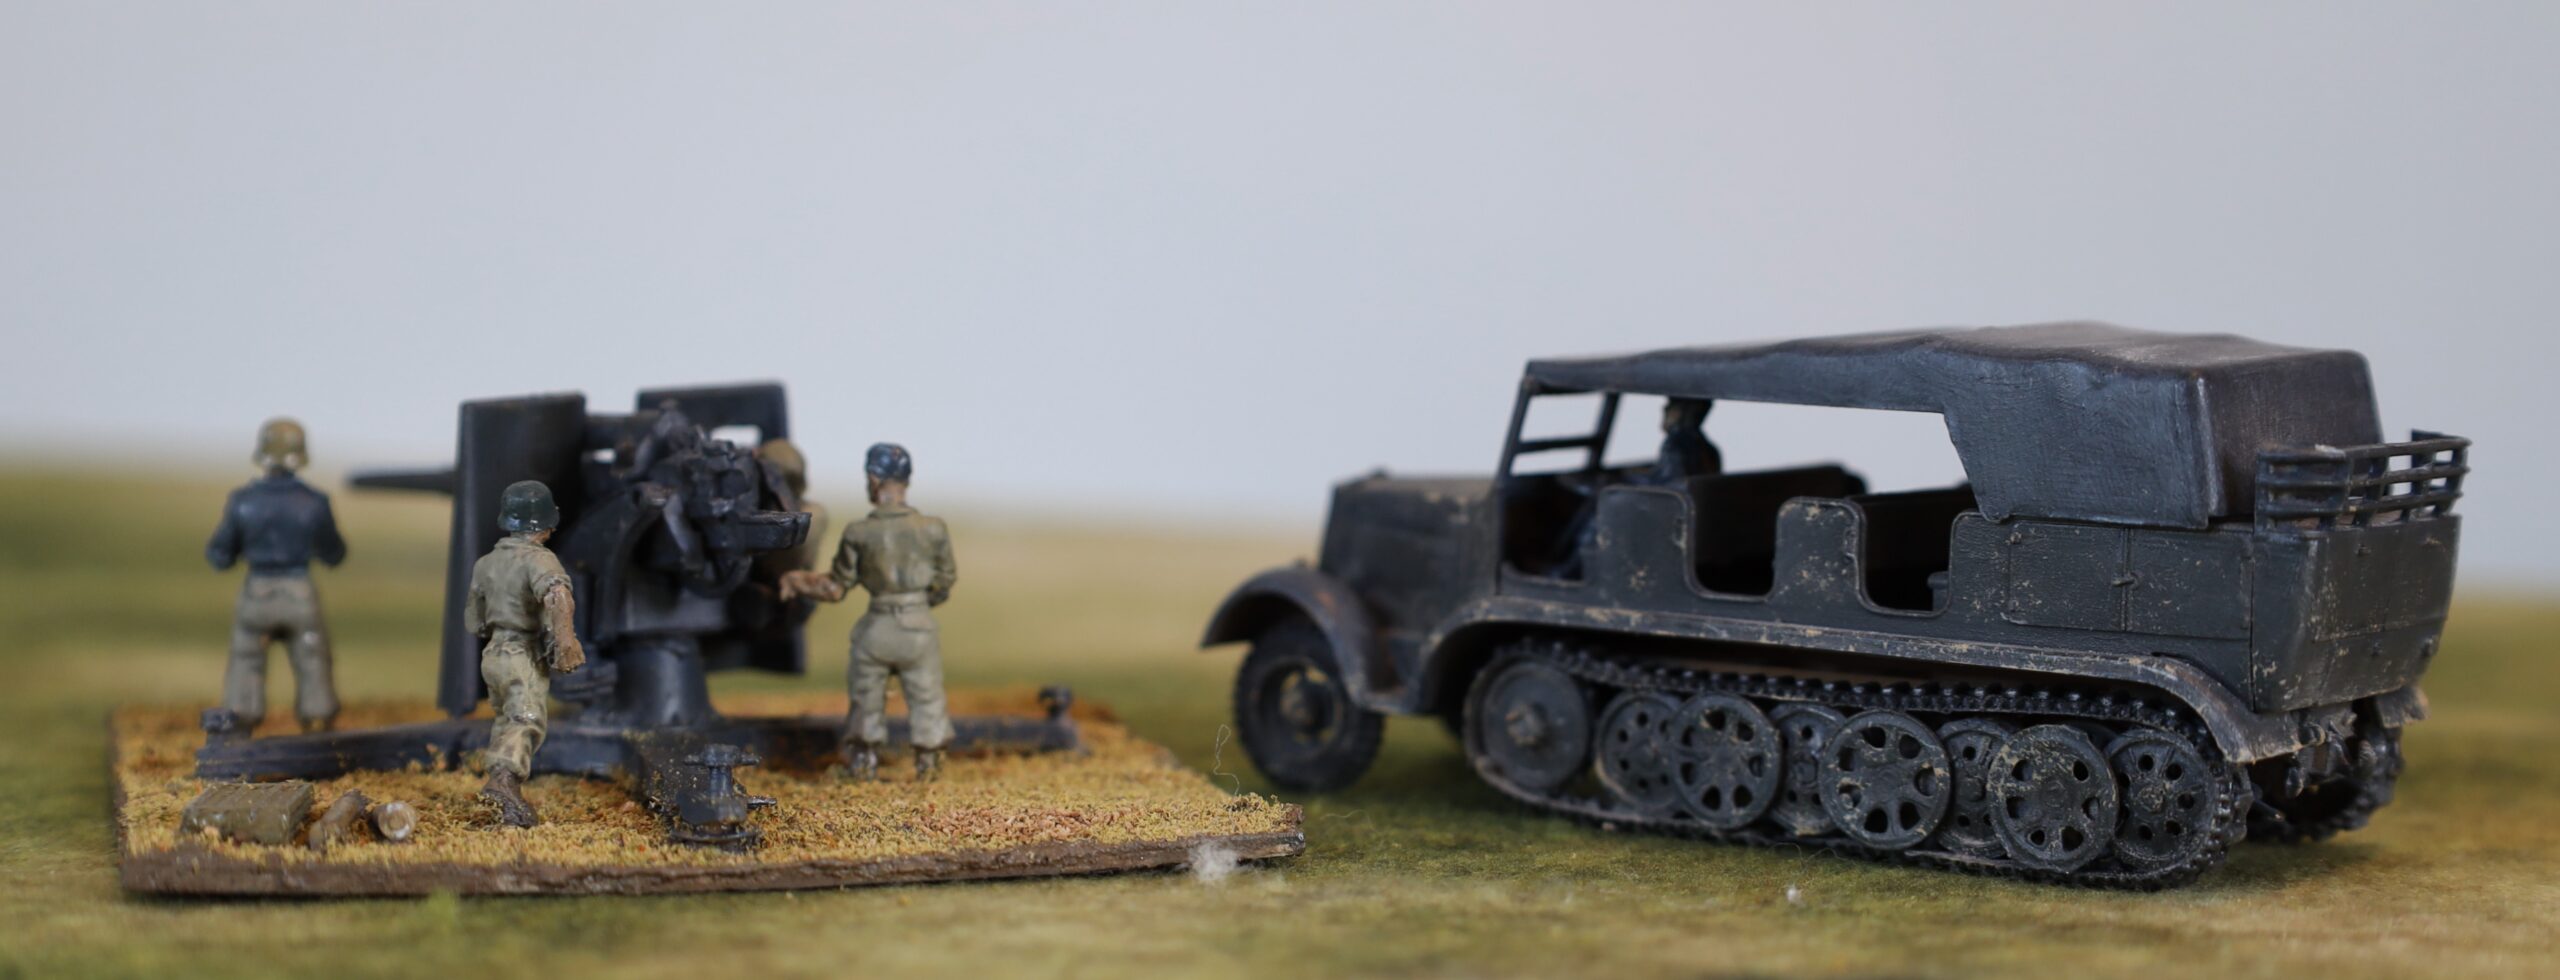
88mm Flak gun and Sdkfz 7
The 88 without shield
This was a bit of a disappointment. I bought the model from the Airfix Vintage classics range (see my 2018 post here) – in fact I bought two of them. They looked good value as I remembered them as being decent models back in the 1970s, though the track wheels on the tractor were a bit awkward to assemble. I also bought crew figures from AB. But the parts fitted badly, which made assembly harder than it should have been. Each of the running wheels comes in two parts, and the track is flexible polythene. The tractor was not particularly easy to put together as a result. But the gun was a bigger problem. Back in the day I could get the wheels on and off and the side-riggers up and down so that we could have it in both deployed and in transport mode – but for this model the fit was not tight enough. I did paint the wheels, but in fact none of my artillery is in towed mode, so I decided not to use them. The gun does not fit snuggly into the cradle. But worst of all the fit of the gun into the base was loose. This mattered because I attached a metal seated figure to it, which meant that the assembly tilted over to that side. In the end I had to feed plasticine into the hole in the base to help hold it in the upright position. The model comes with a shield, not shown the in picture here, as this was often not used. I had to cut a hole in it so that the seated crew figure and use his range-finder.
I decided to paint this in pre-1943 colours of “panzer grey”. Photos, even from the later war, often show 88s quite dark. The narrative here is that this is an old weapon brought forward from a rear area for front-line use, which nobody had repainted. The crew is Luftwaffe, who had slightly different ways of doing things. The AB crew figures are excellent, and the scale difference isn’t jarring. I painted them in slightly different colours to the infantry to reflect the Luftwaffe provenance.
I don’t think I will bother the second gun. I do have the crew for a second 88, but I will source this elsewhere – as a later variant of the weapon if I can get it. I will assemble the second tractor at some point, as it looks OK when finished. It can be used with any second 88, or with a towed 15cm howitzer if I get one.
With shield, from rear
Painting and finishing
Step one was primer, which I applied after assembly (except of the cabs of the trucks. I wanted something quite dark, so that it wouldn’t show if the later painting did not reach all the recesses. To get into those recesses I used the airbrush. I used white airbrush primer paint mixed with darker acrylic paint (and some medium to make it more fluid). I used a brown for most of the vehicles, except the 88 and tractor, where I mixed in black. I’m still working on airbrush technique – and I’m being a bit frustrated with the tendency of the nozzle to clog – so the phase took longer than expected. Getting into the recesses was a bit harder than expected too. In future I will try to doing this differently. I have bought some Vallejo primer, with some in German dark yellow (and olive drab) – I will use this directly out of the bottle. I will also prime the parts before assembly, while still on the sprue – though still with the airbrush.
After this I painted the interiors and crews, so that I could finish assembly of the cabs. That done I painted the rest. This was simply one layer of the base colour applied by old-fashioned brush. As usual I mixed the colour using artists’ pigments – I will explain more how in a later post. The tyres, tracks and other detailing was then done. There were no decals. 88 barrels often have rings, presumably signifying claimed kills – but I couldn’t find anything suitable to use. I decided not to bother with number plate – and second line German vehicles such as these did not carry other markings.
After this I used the oil paint patina technique that I have been using on model aircraft. I dabbed small dots of oil paint onto the model – white, yellow ochre, brown, Payne’s Grey, black – and brushed it into a very thin layer. This softens the flat finish, giving it a rather worn appearance. It also gives the models a slight sheen, like new paintwork. I applied matt varnish to the tllts and the clothes of the crew. I am using a very old bottle of Windsor & Newton varnish, which is not reliably matt, but it looked OK. I then applied a glaze of dark mauve-grey that I was using on the infantry figures, to the crews and radiator grills. This left a slightly glossy finish, that will need a bit of touching up with matt varnish.
After this I used a metallic pencil (silver and pewter) to simulate exposed metal. Since the theatre was mostly dry, rust would be less prominent than vehicles elsewhere. The pencil works quite well, but the impact of this was not great, and I don’t think this is really worth bothering with. The exception may be on the tracks, though even this wasn’t very visible in the end.
Finally the vehicles got a dusting in – another technique learnt from model aircraft. Previously I used a specialist textured paint to simulate dust. This is quite thick and easy to overdo. It looked pretty good on the last batch of British vehicles I did; less so on the previous German ones. I tried putting some on a couple of the vehicles – including the dark grey Sdfz 7. I thought it was a bit too strong, especially on the dark grey. This technique works better to simulate mud than dust (though there was a lot of mud in Tunisia – not really in Sicily or Salerno). I then created dust from ground down artist’s pastel – mixing white, pale yellow and grey mainly. I then applied this generously with a paintbrush. It worked pretty well, though the process created clouds of pastel dust. A mask would have been a good idea, but I just held my breath. I am pretty pleased with the result. In fact I think careful application of the paint product on the wheels and lower surfaces complements the effect quite well. But dabs on the upper surface, as per the Sdfz 7, don’t really work. The dusting did away with the need for dry brush highlighting.
After this came the question of whether so seal the models with a layer of matt varnish from an aerosol can – as I have done with my earlier land vehicles. This would serve to hold the dust layer in place and protect the model generally. I decided not to in the end. Aerosol matt varnish gives a very uniform flat finish. The dusting gave a generally matt finish, but with a bit unevenness that makes the models more interesting. Alas these models are unlikely to see much tabletop action, so protection isn’t a priority.
The aim with my modelling and figure painting is to achieve a strong impact from a medium distance (a foot or two), and to do this with as few steps as possible to simplify production. This contrasts with serious modellers, who like to use lots of different techniques together. I am now settling down to a pattern. Dark-ish primer (perhaps before assembly) applied by airbrush; base coat and detailing; decals if any; oil patination; dusting. There is not usually a need for washes, glazes, dry brushing or varnish.