 In my last post I tried out HFG rules with Rob in a cut-down Waterloo refight. That was successful enough to try the rules again. We wanted a less concentrated game, and I didn’t have long to set it up. I picked on Salamanca (or Arapiles as the Spanish and French have it), Wellington’s decisive victory over Marmont in 1812. We will be re-doing it!
I have avoided Salamanca to date as I thought to refight it as the battle happened would be a bit too one-sided to the British, and to refight it any other way would be historically false, as Wellington would not have started the battle. In fact, rereading the history (in Rory Muir’s seminal work), this is false on both counts. In the first instance Wellington was probably lucky to get the decisive initial success with Pakenham’s division slicing through Thomière’s, which then set up a chain reaction which rolled up the French left. In the second, Marmont was in the process of turning Wellington’s flank and threatening to capture Salamanca, and this was reason enough for Wellington to strike even without that decisive advantage. In fact I understand that in wargaming it is usually quite an even battle. And it presents some interesting challenges for simulators, and so a good one to study as I develop my own rules.
Meanwhile, I had been doing some homework on HFG, completing my own version of the rules on a simplified scope (by limiting it to Napoleonic land battles and cutting out the battle set-up, etc.). This cut 35 pages down to 12, with much greater clarity to boot, with a couple of really helpful tables on combat outcomes. I’m not how many games I’ll get, but it is instructive to pull apart a thoroughly thought-through but badly written set of rules and put it back together again.
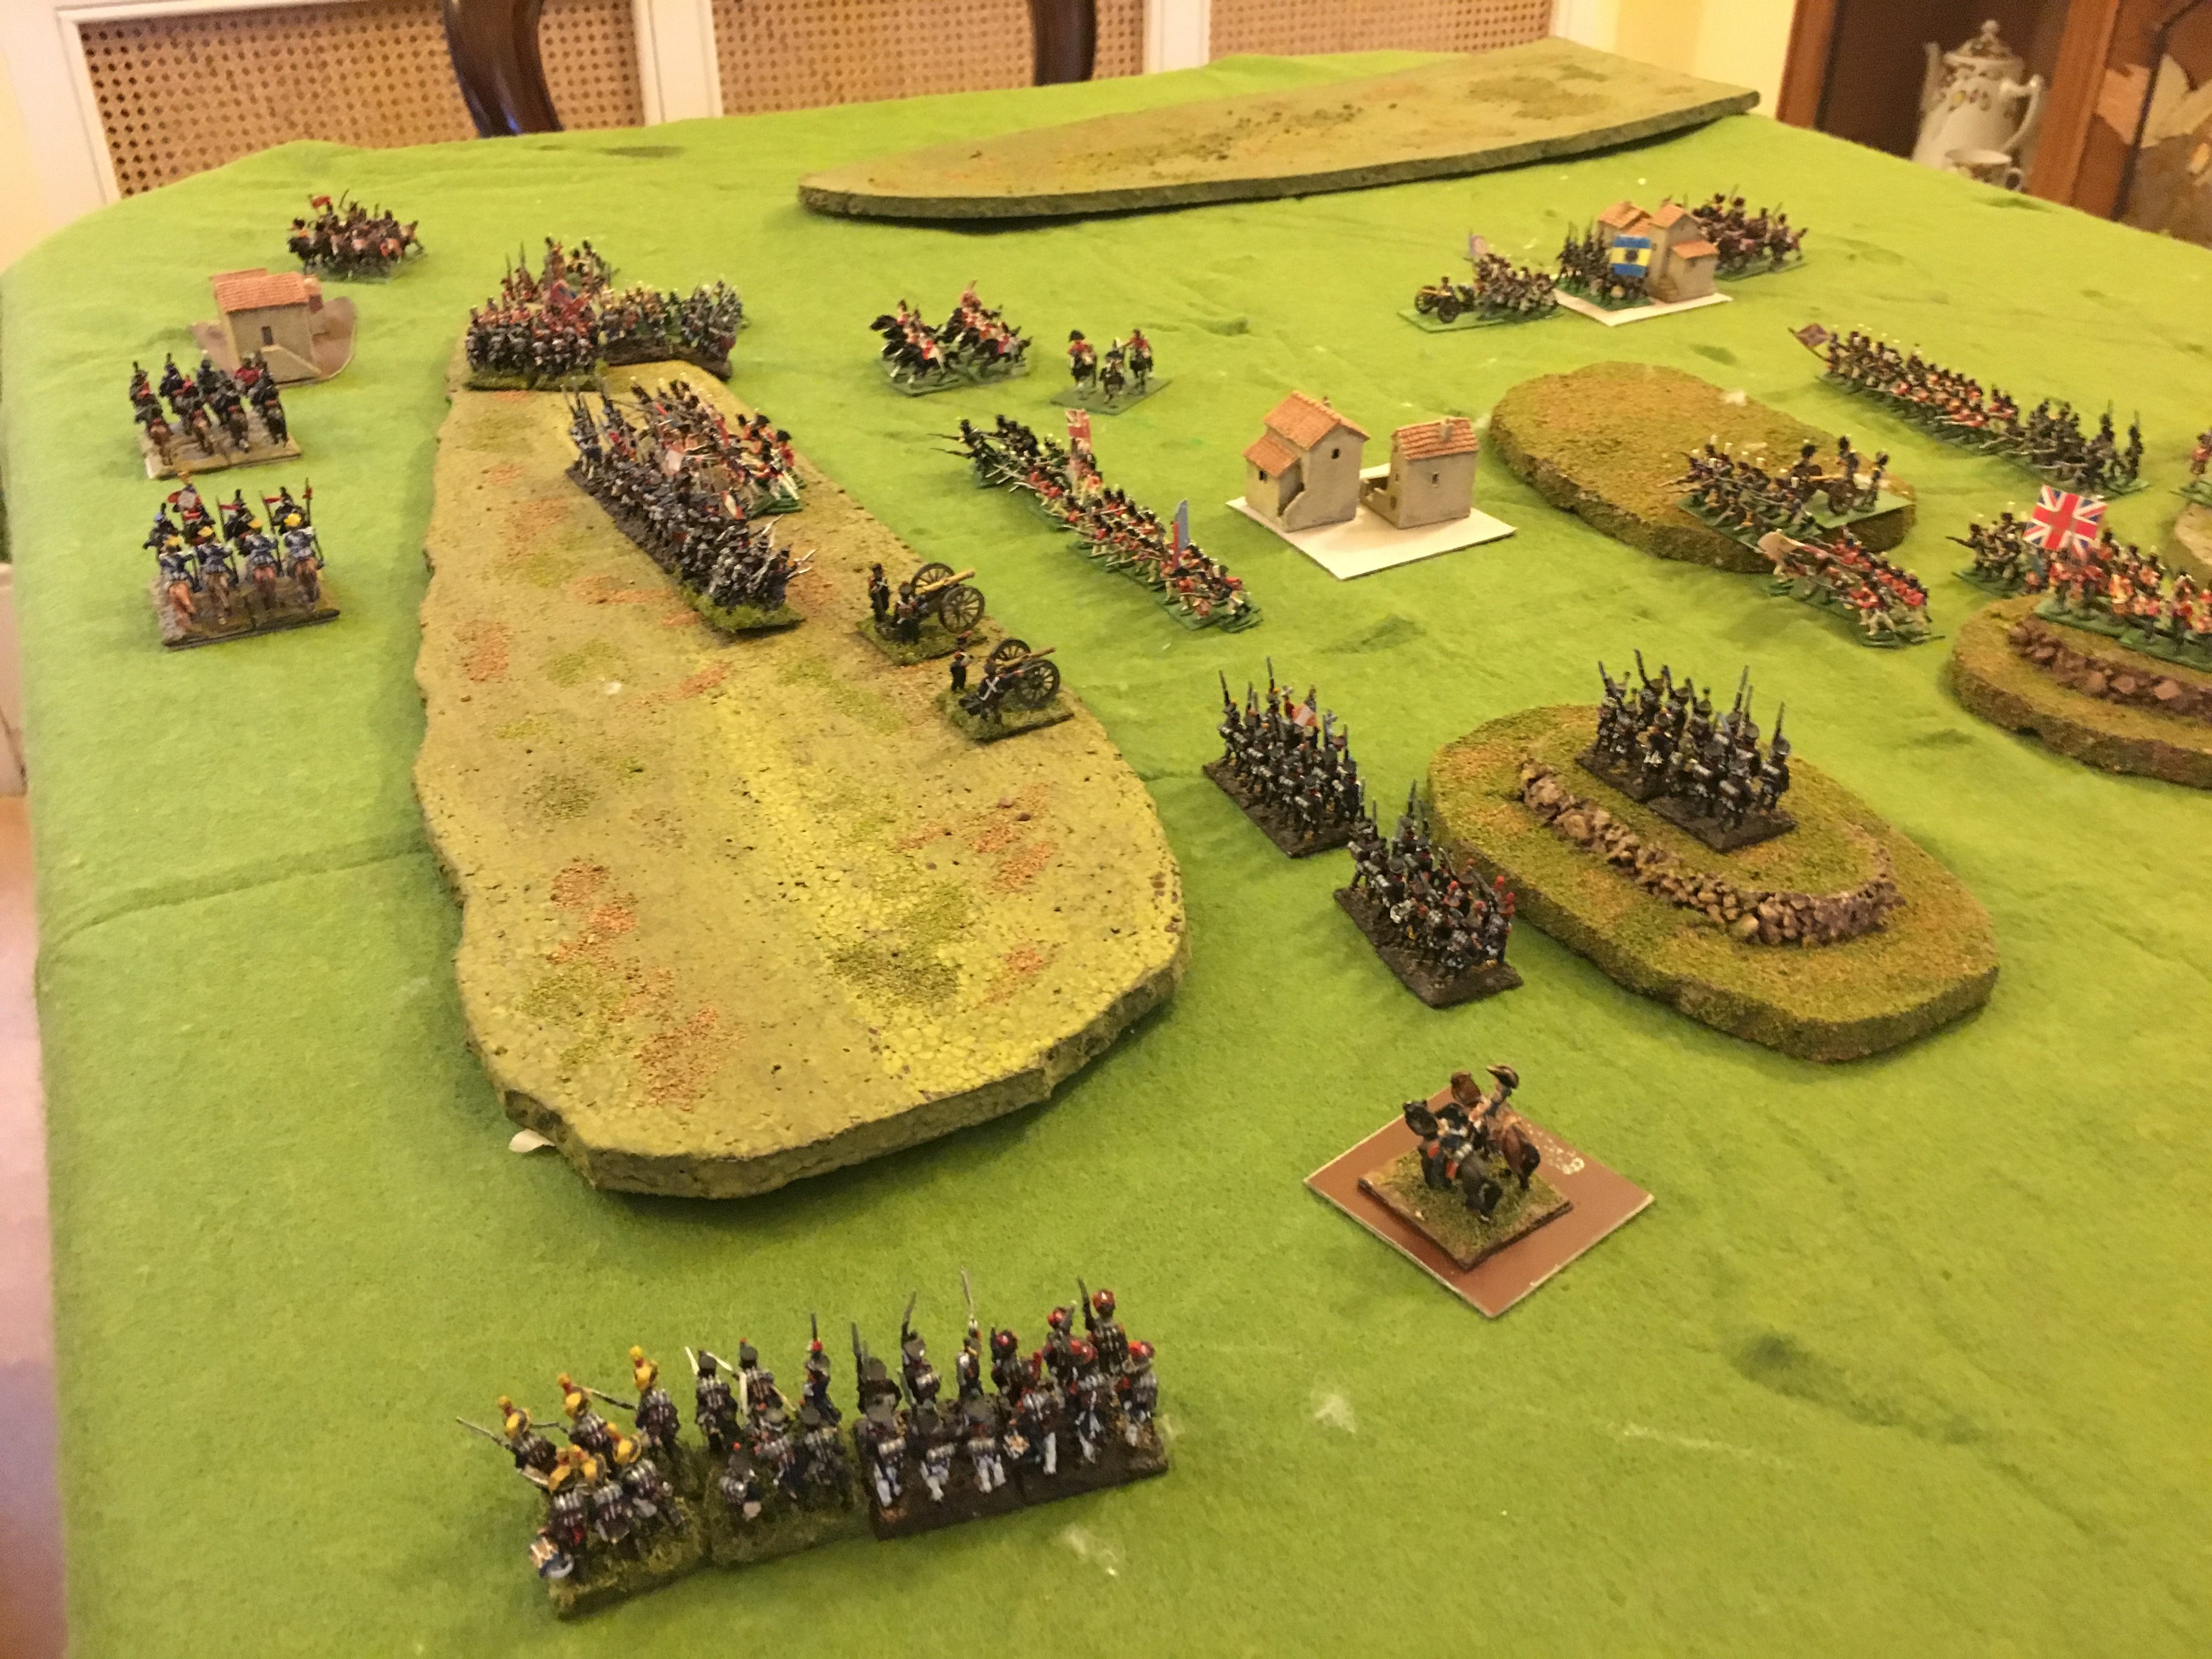
The next challenge was the table. This is significant sub-plot in my wargaming project, and I like to try out new ideas. The first problem is that I did not have a decent contour map of the area. I had to base it on Muir’s diagrammatic maps, supported by some other published maps. The area around the Arapiles is gently rolling, except in three or four points were the ground is high enough for a sandstone strata to survive, creating craggy slopes – no doubt the sandstone from which the lovely city of Salamanca is built. These heights include the Greater and Lesser Arapiles, which dominate the battle’s centre, and slopes near the village of Calvarisa de Ariba, which anchored the French right. It was easy enough to represent the essential features with two contours, the second one featuring the crags. There is a lesson in this; my Waterloo field is over-engineered and has too many contours. I made the contours from expanded polystyrene, but placed them on top of the base cloth, rather than underneath, as before. I did this because I did not have enough styrene for a base layer and so had nothing to pin the cloth into. In any case the cloth method is not good for crags. I used paint, flock and sand to cover the hills. I had to represent the areas of light wood and streams with dark green felt. Here’s another picture: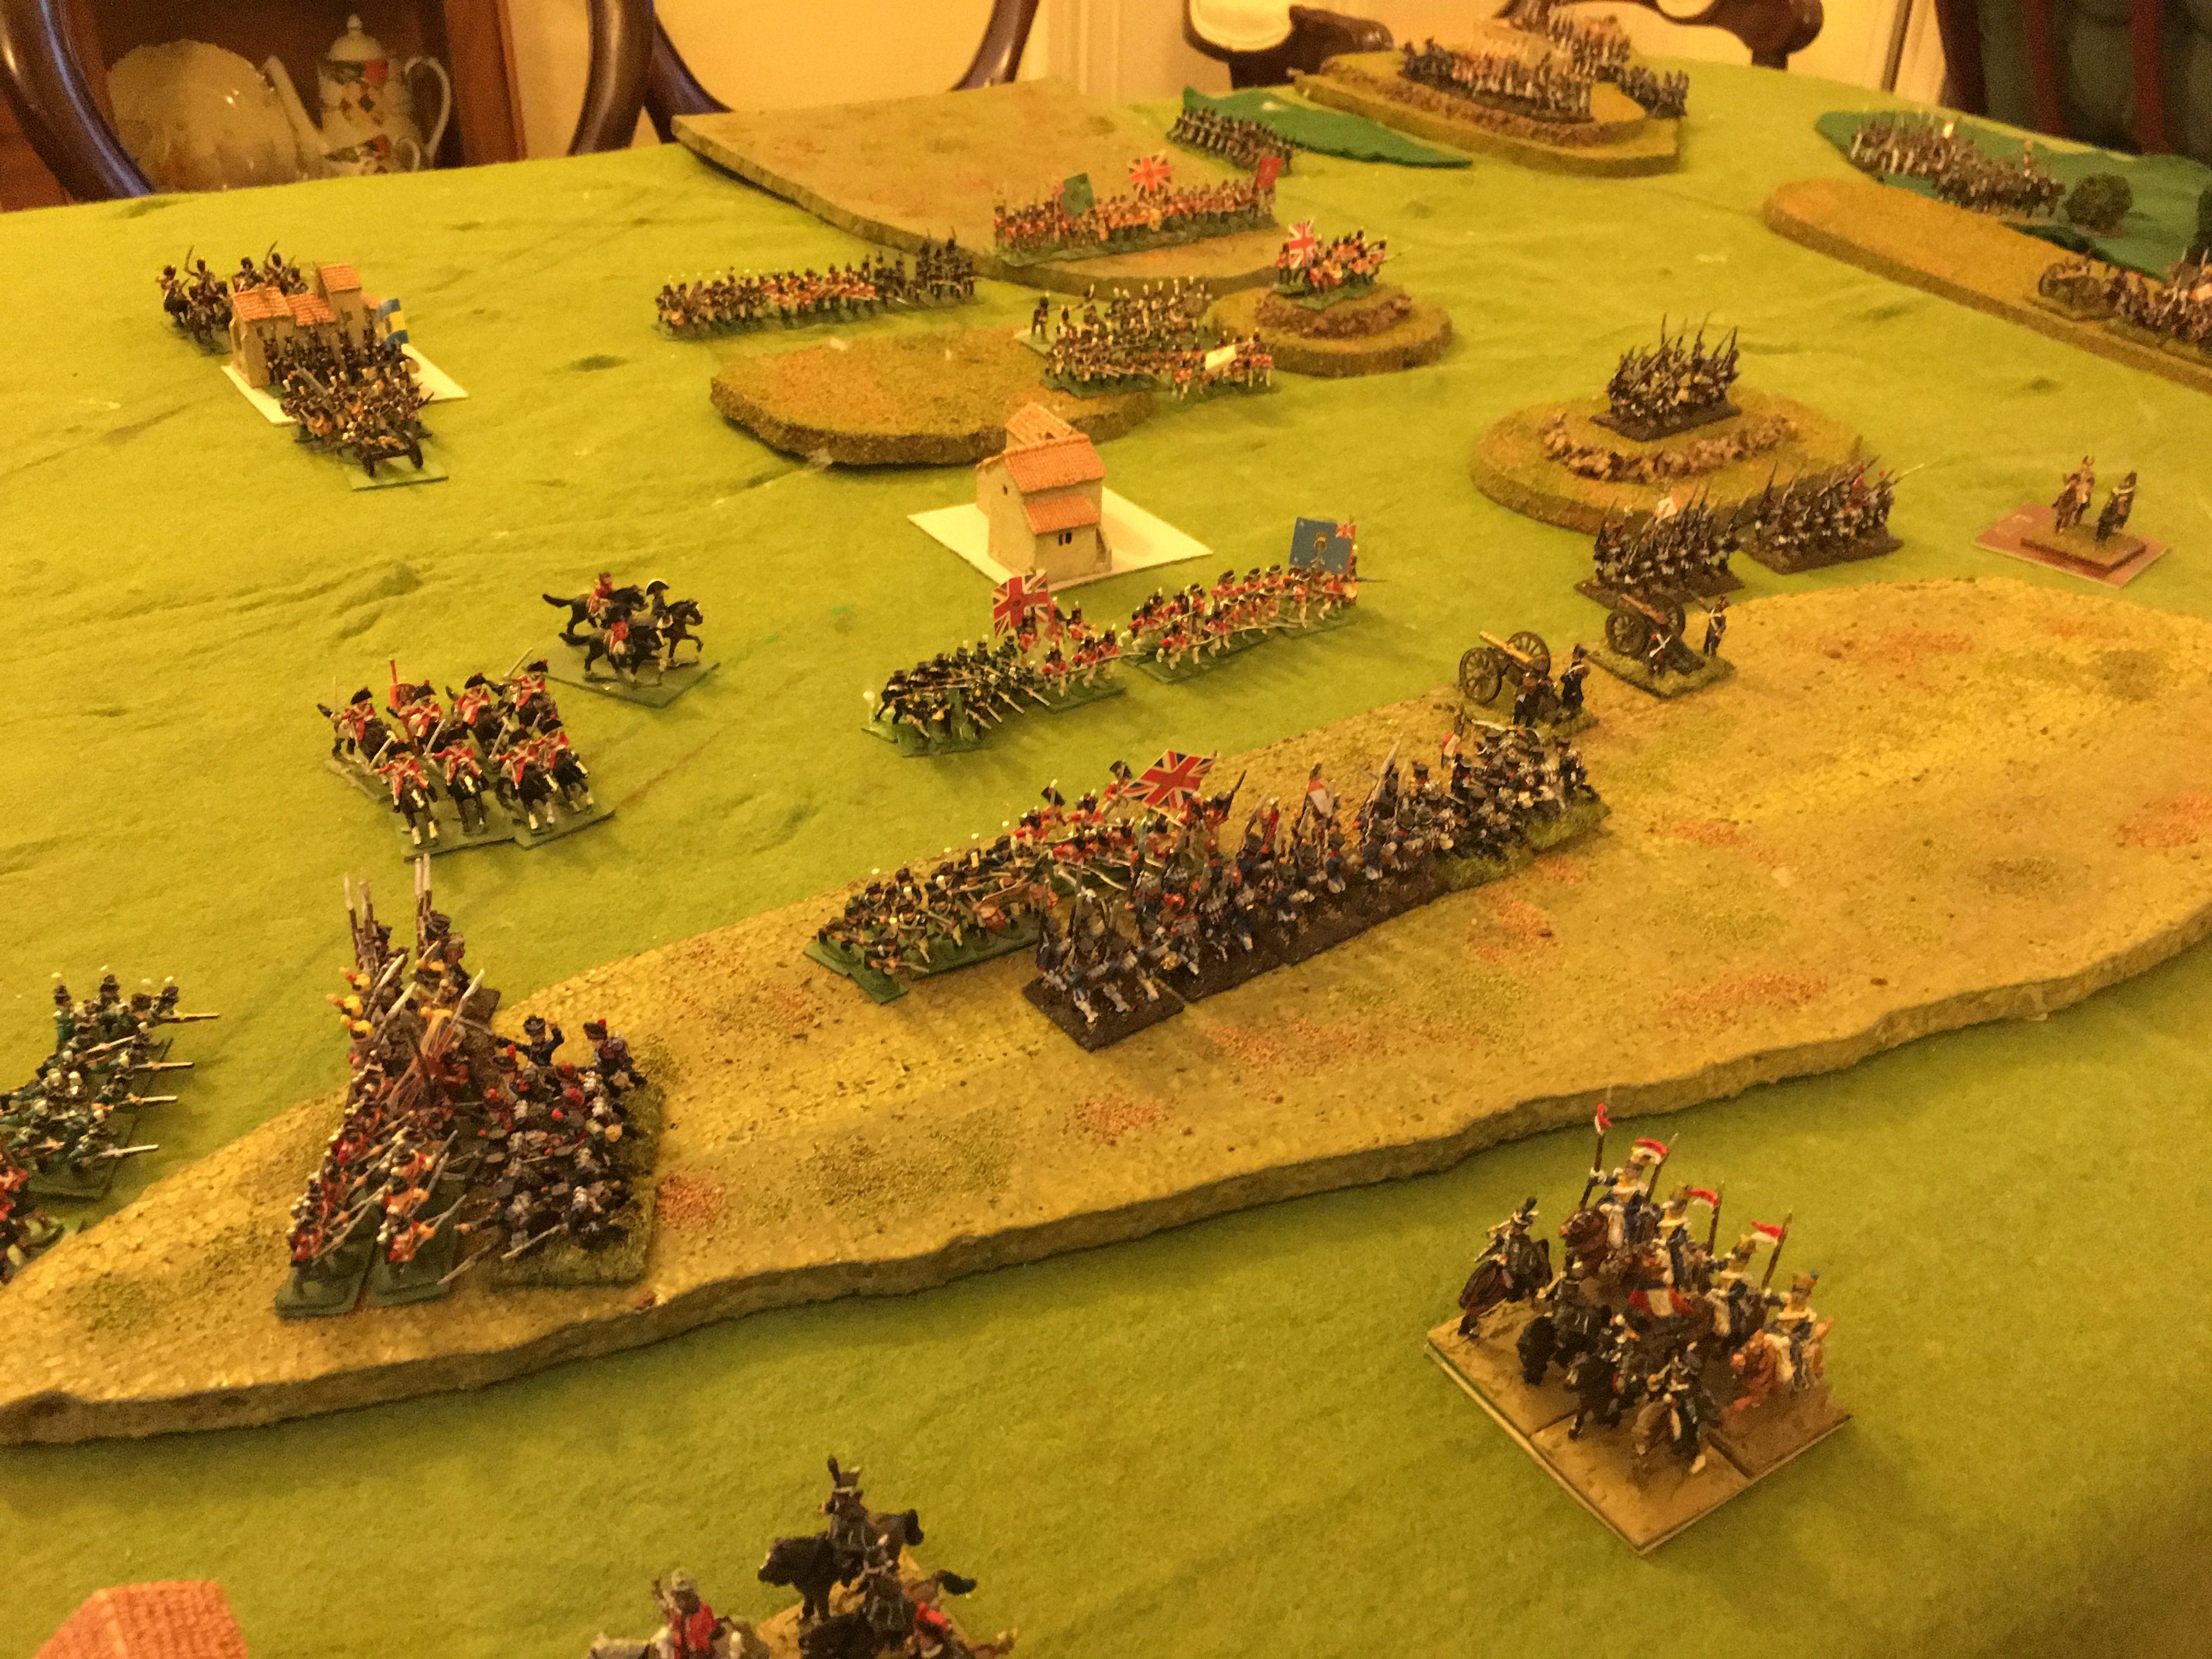 My verdict on this is distinctly mixed. The contours on top of the cloth certainly aided the movement of the troops, and the flock surface looks much better than bare cloth (as much from the texture as the variation in colour). The styrene warped a bit, and taping to the cloth did not resolve this entirely, as the cloth was lifted. I need a firmer base that I can pin the contours to. The table lacked coherence, though the contrast between the contours and the cloth was not as bad as I feared. The cloth is now a bit battered and stained, and this actually helps! But the base layer needs at least patches of flocked material that match with the contour layers, and it would probably help to mark in the more important tracks somehow – though that is trick at this scale. The villages need more work, and so do the stream and wooded areas. The most important requirement is a base layer (chip board or insulating foam) that I can pin things into. This will include trees.
And so to the battle. The scenario picks up from the point at which Pakenham is about to strike, while the French have already deployed a grand battery that is battering the Allied centre. There is an immediate problem with scenario design. Neither army used a corps system. They had commanders and then seven or eight divisions plus cavalry formations and (in the Allied case) a few independent brigades. In HFG (and following the published army lists) that means each army has only one general per side, which means a very small supply of pips (Player Initiative Points) to keep the battle flowing. This made it especially hard to move anything away from the centre of the action – though it also made the turns quite quick.
As a brilliant commander, Wellington was able to double his pips for two moves, which Rob (playing the Allies) used in the first two moves. Poor Marmont was away from the action and threw badly at first, so was able to do very little. This was not unlike how the historical battle started. But the Allies could not use this, and their flanking position, to gain a decisive early advantage. They needed some good combat throws, which were not forthcoming. Meanwhile the French artillery scored a lucky hit and took out one of Leith’s units in the first turn. The photos are taken early in the game, in about the third or fourth turn, when Leith was engaging with Maucune, and Pakenham grappling with Thomières – having beaten off le Marchant’s heavy cavalry. Eventually one of Thomière’s units was destroyed.
The French struggled to bring up reinforcements, while the British brought in Cole’s division. With this they gradually overwhelmed and pushed back Thomières and Maucune, now consolidated into a single formation. French units started going down. The tally reached five infantry units and an artillery unit as the British pushed forward, for the loss of only two more units themselves. The French had a break-point of 8 units (counting artillery as double), so one more and the game was lost. I was on the point of giving up. But by now the French had Taupin in play and the British hqd pushed past Bonnet’s division in the centre, exposing their flank. Clauzel and Sarrut were coming up too, blocking further Allied reinforcements. I counterattacked and quickly knocked out three Allied units. One unit was close to an unsupported British artillery unit. If it was able to take this out then the British would also be on a knife edge. But we were out of time. I was happy to concede, but Rob thought the momentum was with me – the game had become very close.
Elsewhere there was a rather ineffectual artillery dual. After that first lucky kill, the French artillery were able to disrupt the Qllied advance somewhat, but no more. A single British artillery unit troubled the French unit occupying the Greater Arapile, frequently pushing it off the top. The cavalry on the flank roughly neutralised each other and were not able to secure much influence.
We weren’t counting the turns, but we got through an awful lot. If we were counting 15 minutes per pair of moves, we would have been long into the night. And large parts of both armies were untouched – stuck in their starting positions. The pip famine was the main issue with the rules, and when we repeat the game we will have to do something about it – probably have each side throw two dice rather than one. Also there is not good way in the rules of replicating Pqkenham’s ambush of Thomières. In terms of the broad evolution of the battle, though, it was surprisingly close to the historical one. The battle did have a strong focus point, with little action elsewhere, which moved from the French left to the centre, wit little happening on the right.
I still don’t think the rules give a proper Napoleonic feel, and aren’t really strategic (or grand tactical, depending on your terminology). But they are very nicely crafted, and use the troop and distance scales that I want. We will keep using them until my own rules are ready – which won’t be for some time, I’m afraid. Meanwhile I’ll dig deeper into Salamanca, as it is an interesting battle to simulate.
Leave a Reply