 At long last this project is done. This has been my most complicated project to date, and I hope the most complex in my whole 1943 programme. And there has been a lot learning curve too. In spite of some mistakes, I’m pretty happy with how they’ve turned out.
My posts so far on this have covered the research, the build and finding the right colour. It remained for me to paint the things, apply decals and finish off. I covered the base colour, Light Mud, in my last post – and I’m very pleased with the end result on the finished model.
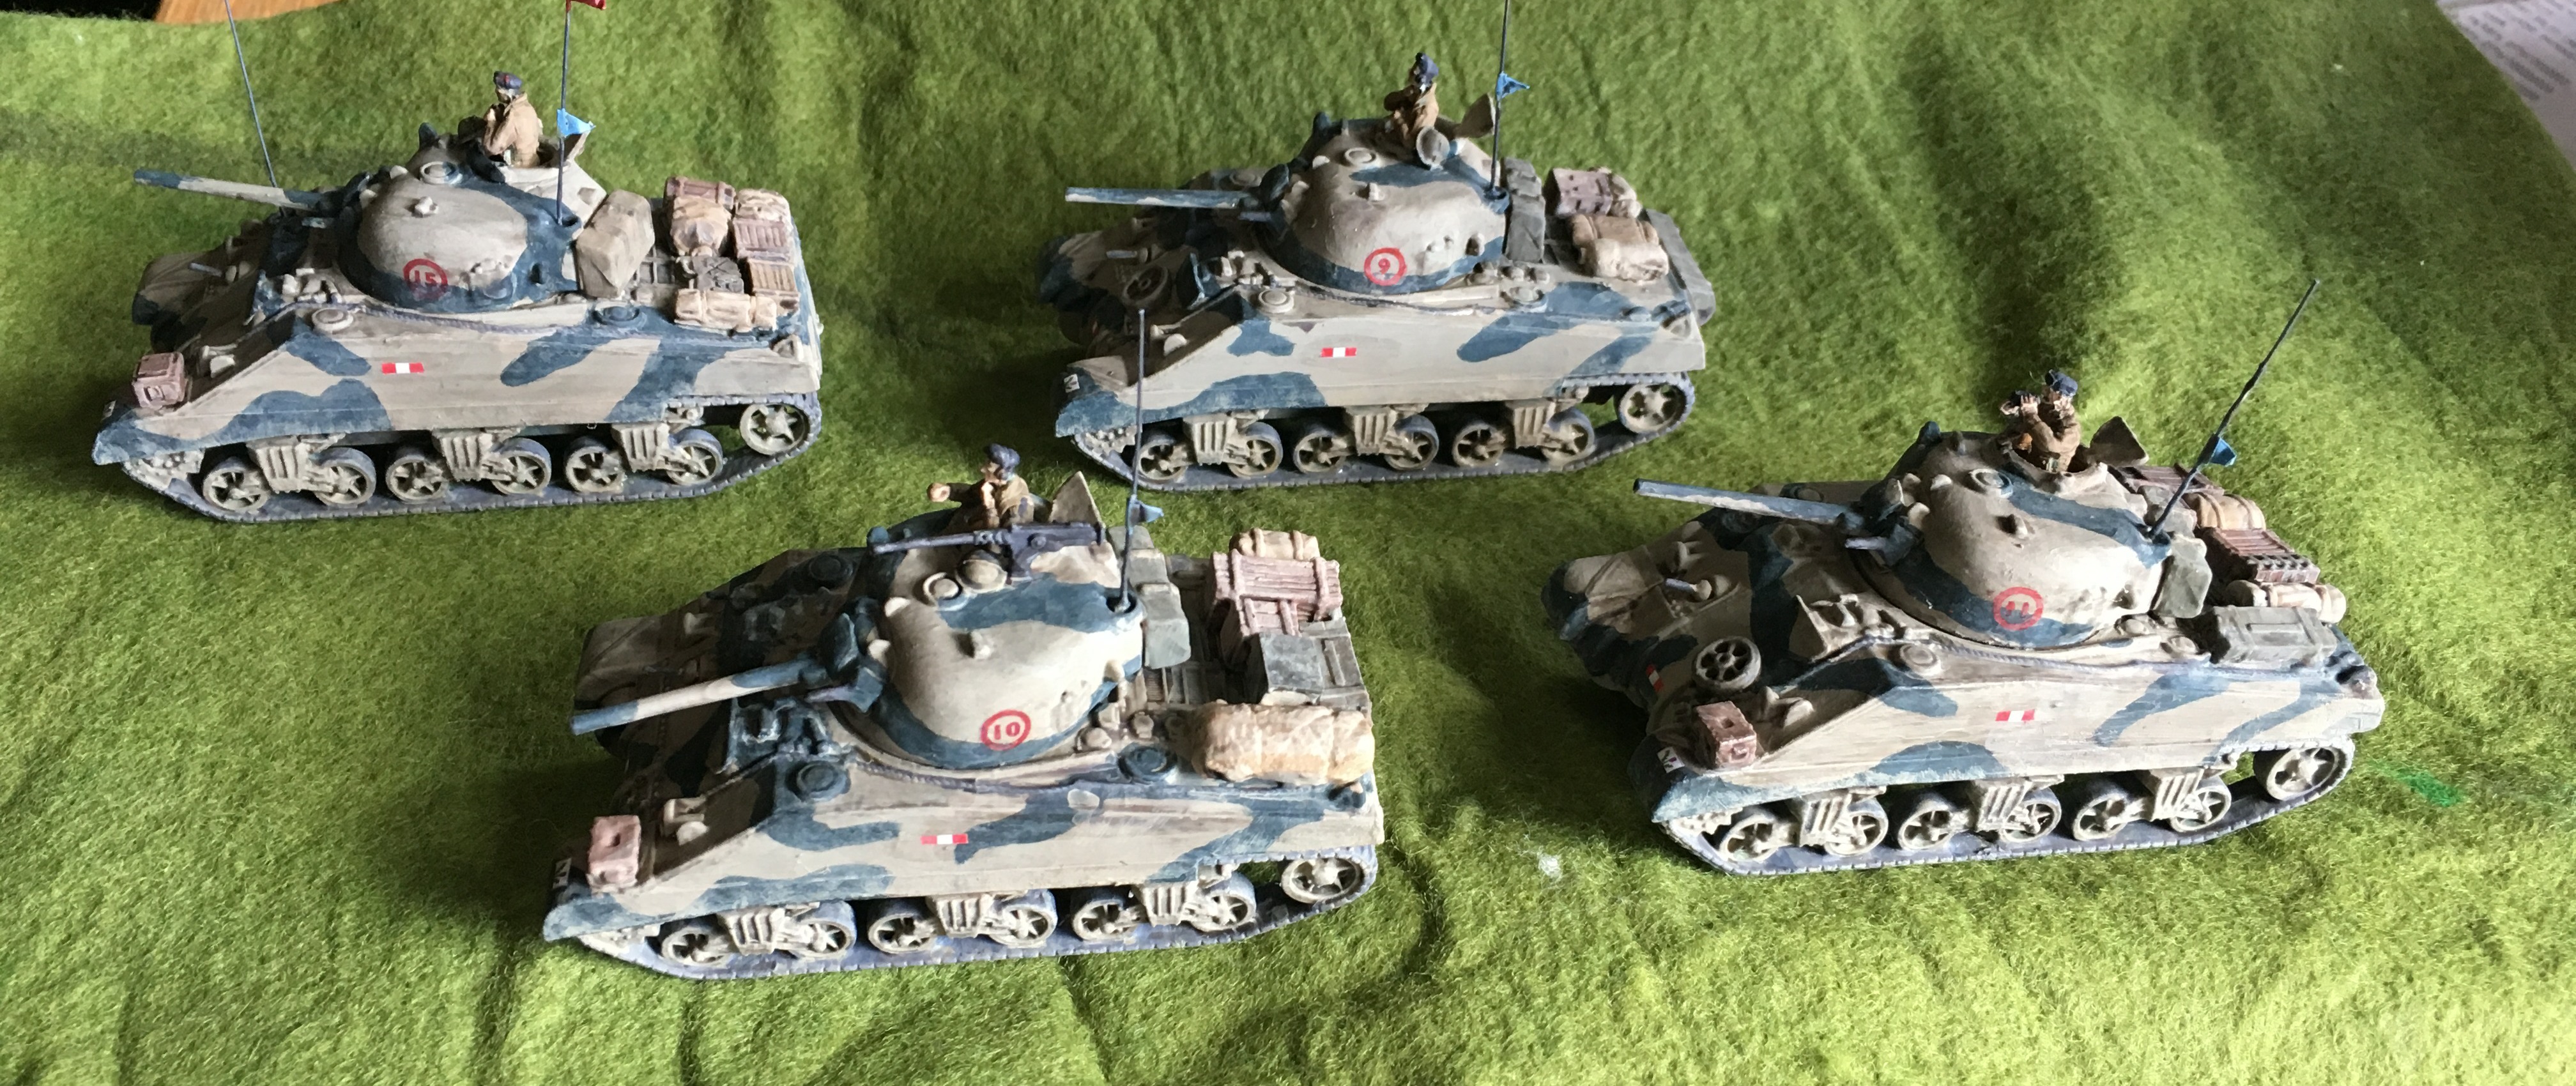
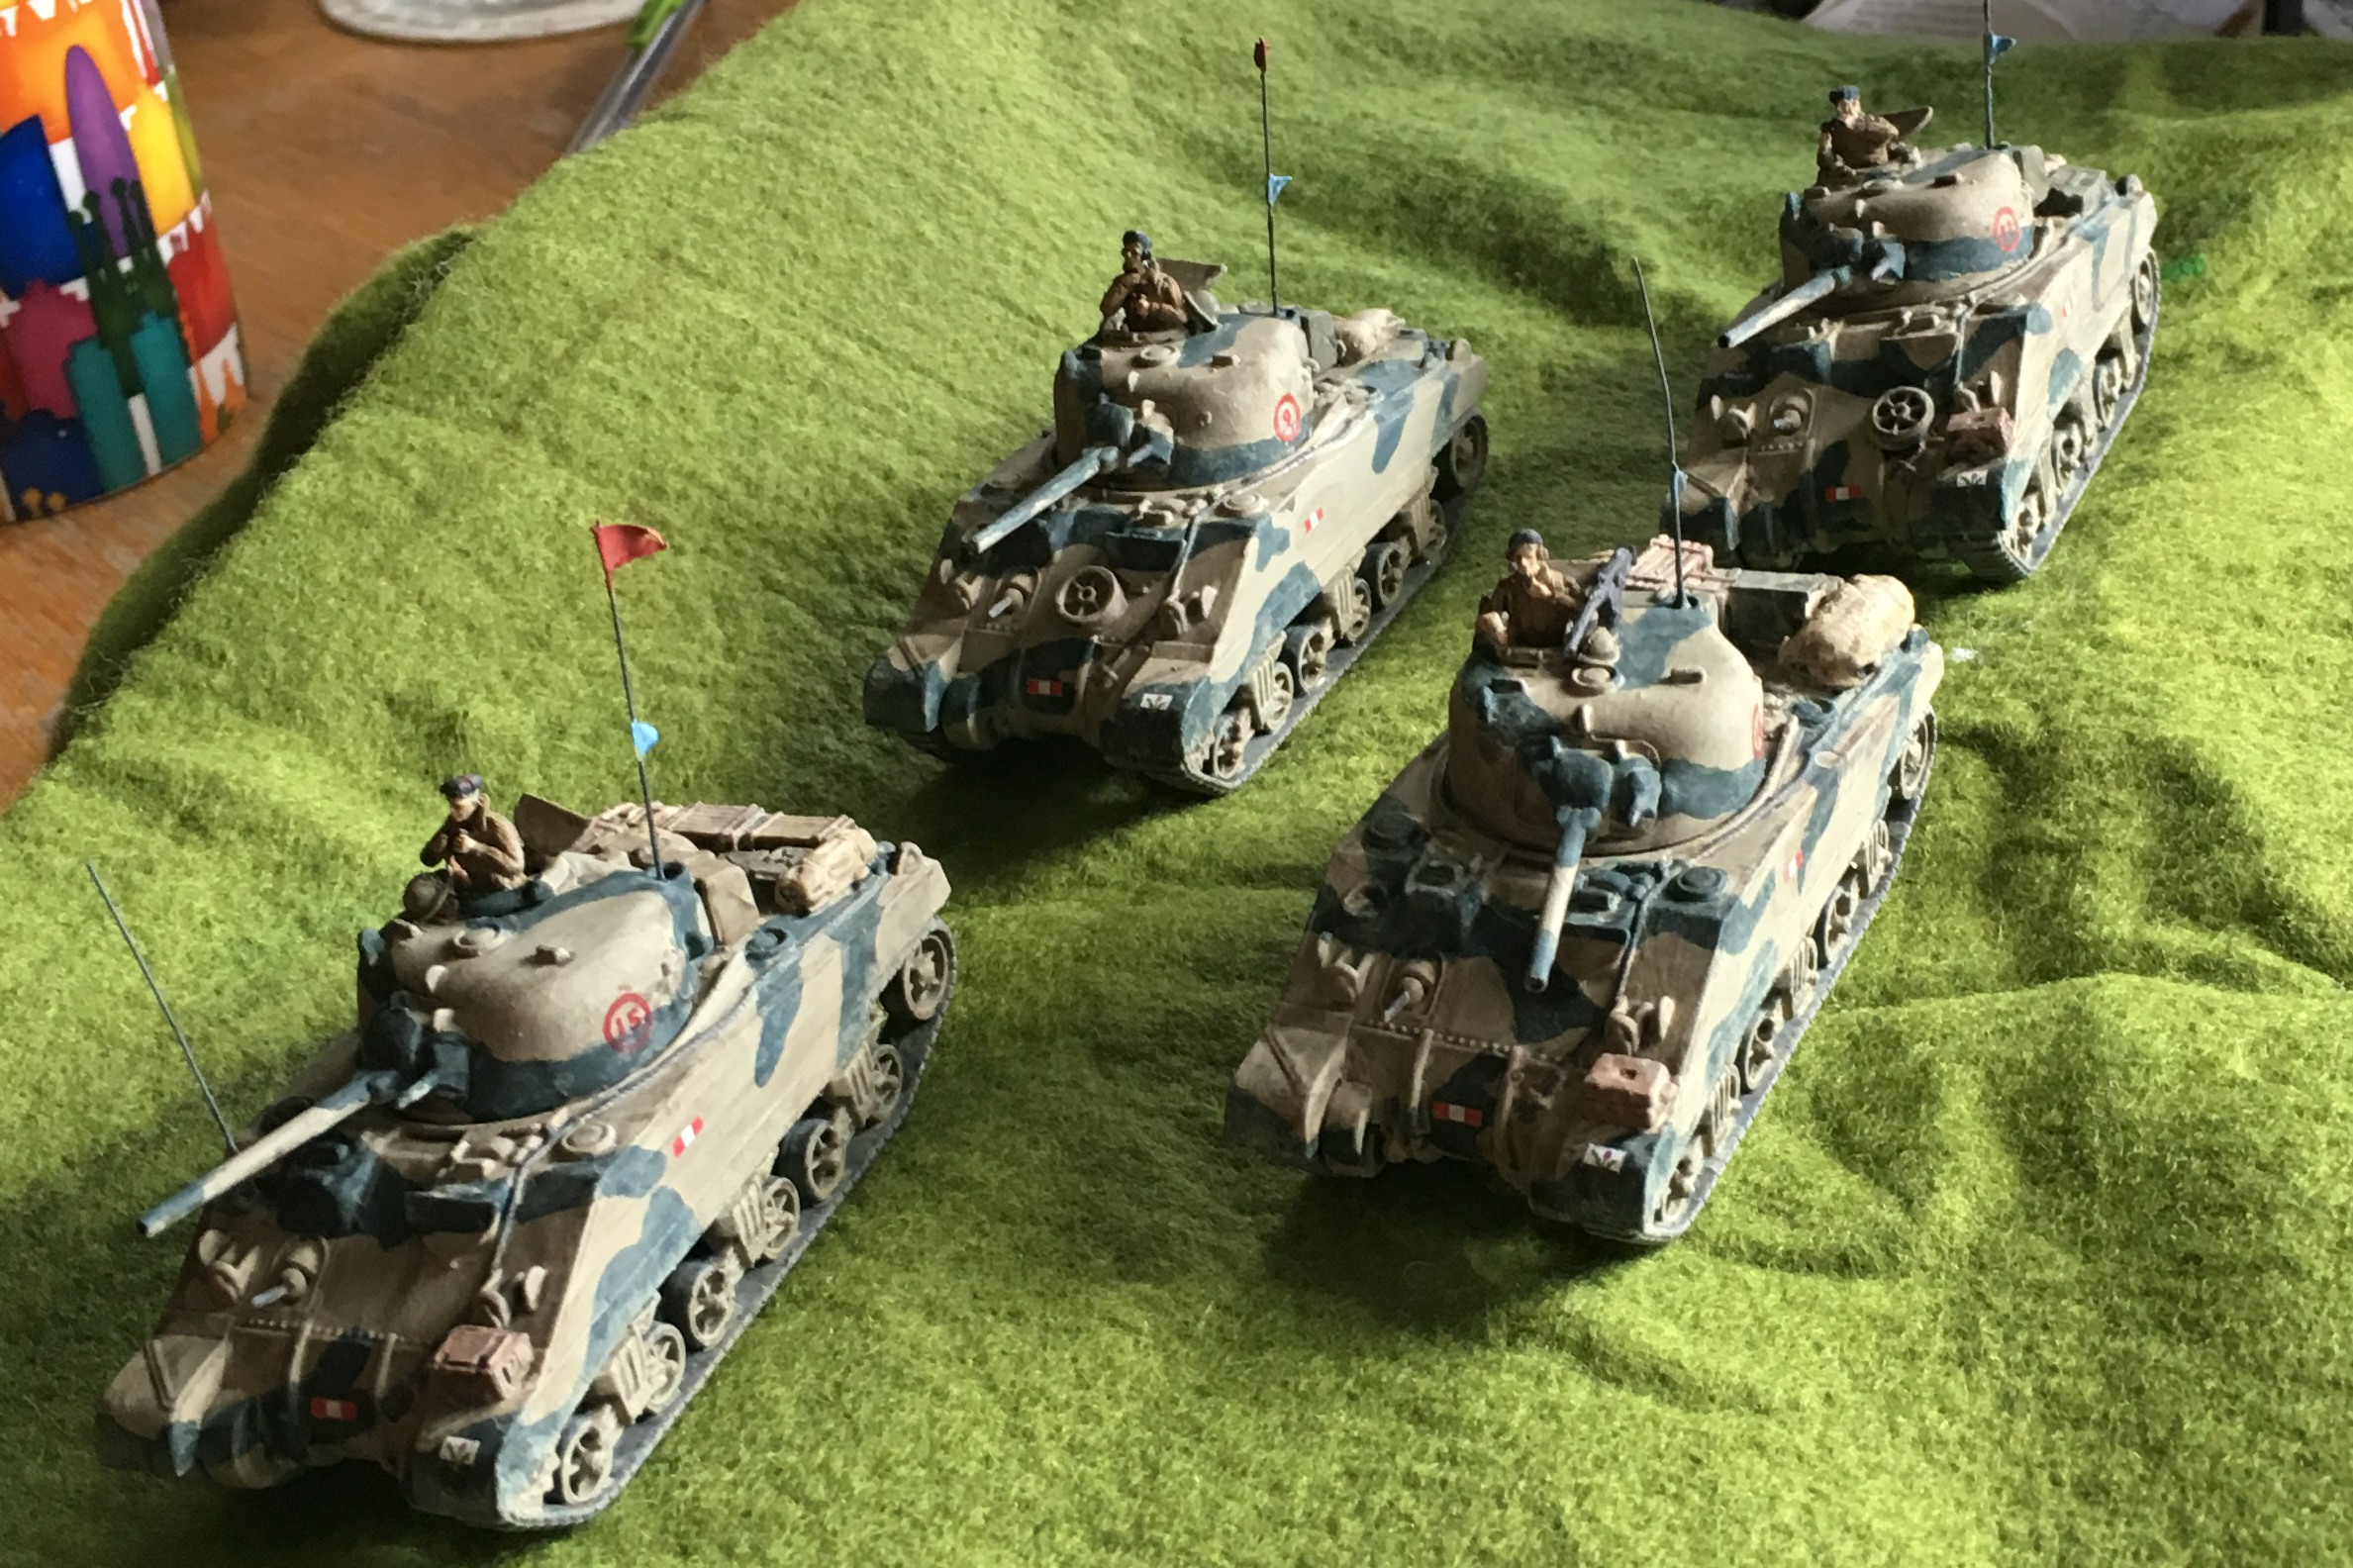
The next step was to apply the Blue-Black disruptive camouflage. The first problem was to identify the camouflage pattern. Here I managed to find Dick Taylor’s Warpaint Volume 2 which has copies of the official camouflage patterns. I then used photos of actual tanks from the RSGs and other regiments. The colour was a mix of the same three pigments used for the Light Mud: raw sienna, Prussian blue and white. Not very much white! This gave bluish grey. The actual colour may have been blacker, so maybe I needed a touch more raw sienna in the mix, but overall I think it looks OK.
The first model I decided to do following the official pattern for Sherman tanks quite closely – though this diagram was only loosely accurate for the Sherman’s shape. However, when looking at the photos it didn’t look quite right in a couple of places, especially on the upper surfaces. There was too much black. It seems as if the actual painters wanted to conserve the black paint, and so used rather thinner stripes (more like the desert disruptive patterns in fact). As I progressed through the other models referring to photos, I started to get the hang of it and became a lot quicker. I went back to the first model to paint over the excess black. The Blue Black required two coats. After that it was the tracks, stowage and crew. For the metallic bits I used a mix of black and silver with a bit of white and my Light Mud mix, highlighting with a mix stronger in the silver for the tracks. The stowage and crew required the same three pigments that I used for the rest of the model. I did not paint the blanket box at the back of the turret the same as the body of the tank, though this was usual. For the RSGs this box appears to have been fitted after the body had been painted. Instead I painted it a sort of greenish-khaki (a little oxide yellow got into the mix), based on one of the standard British equipment colours of the time. This was one of several oddities for the RSG. I have already talked about the turret hatch doors (with one half-door applied to front of the driver’s position). Also, thought it was common to remove the rear part of the sand guards for tanks in Italy, in other regiments these were welded to the rear deck to aid stowage. This doesn’t seem to have been done on the RSG tanks.
After detailing came a coat of dark tone Quickshade. I used Quickshade to act as “lowlights” and bring out the detailing – and dark because my mid tone has been drying up and my attempts to rescue it have turned it matt. I need a glossy surface for the decals. I also wanted a weathered, dirty look, so didn’t mind too much that it was dark. But it looked a bit messy on the smoother surfaces on the sides, front and turret. This was all fine after the later parts of the process, but I’m starting to think that there may be less sticky and easier to control methods of achieving the required effect. I can use polyurethane varnish as the base for the decals – or perhaps see if Micro Set decal fluid will do the same job – preventing the unsightly “flash” from appearing.
And so on to the decals. I decided to print my own, since I would be unable to find what I needed commercially. There is a problem when using a home printer for this: they don’t have white ink. So you either use transparent paper without any white in the design, or you print on white paper and cut out right up to the edge. This makes it useless for German markings. Turret numbers usually feature white edges; the balkenkreuz is too tricky to cut out at this scale. But British markings tend to be rectangular, and so feasible to cut out. The turret tactical markings don’t feature white (which does make them harder to see!). You don’t need white stars for British vehicles in 1943 Italy or earlier. So I bought packs of both sorts of decal paper, and drew up designs for that I hope will supply the whole project not just these models. This included a crude but adequate version of the thistle on a white over black square that the RSGs used in this period.
I started with the transparent paper and the turret markings. I set the printer to high quality but for normal paper. The quality of the output wasn’t as good as I hoped, but I pressed ahead. The next step was to seal the printed designs with gloss varnish: otherwise the water just washes the ink away (matt varnish is apparently toxic for decals). Unfortunately my spray-on gloss varnish was dead, and it is taking days to get a new supply (the stuff on Amazon is quite pricey). However, polyurethane with a brush was OK, provided the ink was dry (which took a bit longer than expected in the hot, humid weather we were experiencing). And so on to the models. Quite straightforward in principle (I used Micro Set to prepare the model, but I don’t know whether this helped). But the effect was very disappointing. The design was translucent and lost a lot its colour. The ink wasn’t strong enough without a white background. I tried, unsuccessfully, to use a bit of red paint to beef it up – tricky since it features numbers as well as a circle. By this time I had printed the white sheet, and discovered that if I set the printer to one of photo glossy papers it looked a lot better. I decided to take the decals off and reprint.
The white paper decals went on next. Three discrete red-white-red flashes and the RSG unit badge. This was a bit painstaking, but went OK. The decals were quite liable to damage in the process, so there were odd unsightly bits of white. I touched these up with a fine paintbrush after they were dry. With the white paper backing, the colours were wonderfully strong and not a good contrast to the one printed on transparent paper. Back to the reprinted turret markings. This weren’t much better than the first time, especially the bits laid over the black disruptive pattern. But I had lots of spares, so I decided to put a second decal on top to strengthen it. This was not quite as hard as I feared – lining them up was a bit like focusing. But the overall result was still a bit disappointing on the dark background. I put a little red paint on top, but this risked messing things up so that you couldn’t read the numbers.I decided to cut my losses and make do. The final step was to seal with polyurethane on the transparent ones, and Quickshade on the others, to dull them down a bit.
The next step went much better. This was the weathering. I needed to give the vehicles the dusty look so characteristic of vehicles in action. I was inspired by some of the illustrations in books, and especially one of a Light Mud/Blue Black Polish tank in Real Colors of WWII. With my previous German vehicles I had dry-brushed them with a dusty colour – but this wasn’t really very satisfactory. It helped highlight detail, but inclined to be a bit messy. After experimenting on some old models I developed a new technique. I applied diluted dust-coloured paint (Light Mud with a bit more white and some oxide yellow), and then dabbed it off with a cotton bud. This covered the whole vehicle with a fine patina, and left a bit of a bit of texture. The “dust” tended to gather in the recesses – but real dust does that too. I then put semi-dry brushed further dust colour on the tops of the sand guards and other bits near the tracks. This also served to give the models a matt finish over the Quickshade. I still gave them a spray of matt varnish to deal with the bits of gloss showing through, and to add a bit of protection.
I’m pretty happy in the end. These aren’t display models, but good quality wargames ones. Having learnt a lot from these project, my next ones should be much quicker. Next is my British infantry platoon.

Leave a Reply