My lockdown madness has drawn my into 1/72 model aircraft. This is nominally part of my 1943 wargames project – but mainly a rekindling of my love of warplanes, especially from WW2. Somehow, and only my fellow hobbyists will understand how this has happened, I have acquired no less than 14 kits to make. My plan was to build them in batches of three, or even four, starting with the three US planes (an A-36 Apache, a P-38 Lightning and a B-26 Marauder) because their simpler colour scheme would be a good place to start. I then realised that aircraft modelling involved so many new techniques that it was best to start out n a single low-cost model that I didn’t mind mucking up. So I bought the Hobby Boss P-47 Thunderbolt. I have just finished it (more or less).
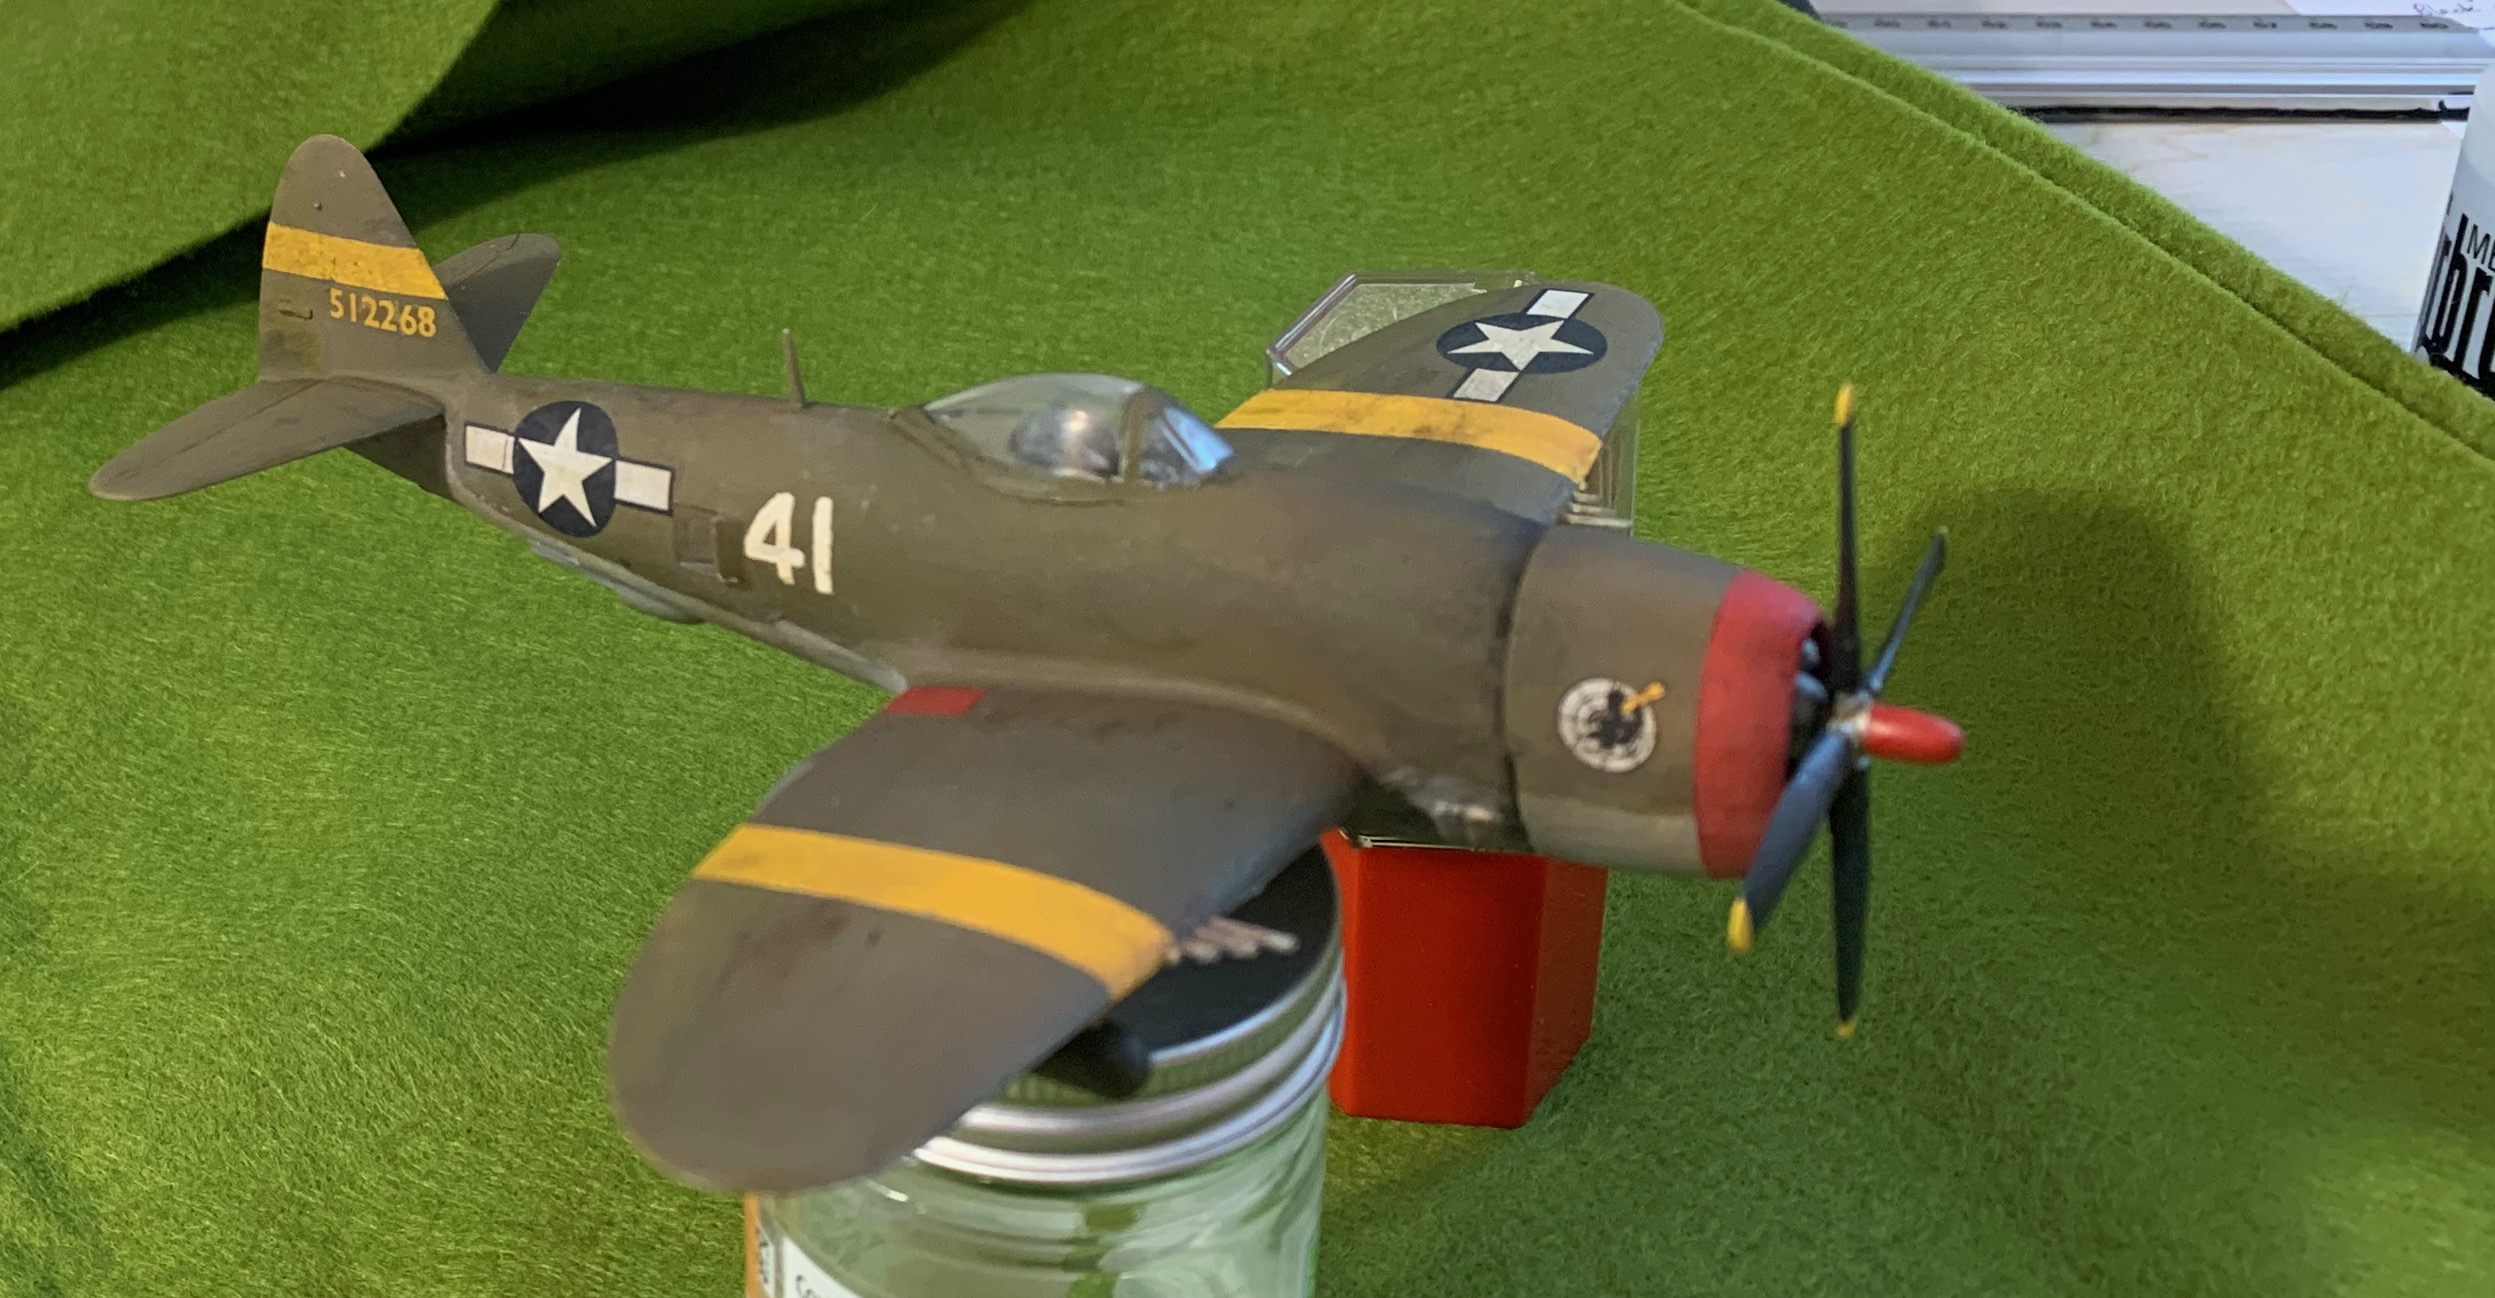
This aircraft does not belong in the scope of my 1943 project. The first P-47s were deployed in 1943, but these were of the ridgeback variety. There was only limited availability of cheap kits though – the three makes that seemed to be in scope were Airfix, Zvesda and Hobby Boss. I was looking for a US aircraft. The only available Airfix model was an early P-40, well before my period. Hobby Boss did the P-47, but only the bubble-top variety was available at short notice (they have done a razorback as well). I have a soft spot for the Jug, since a made a model an old Airfix one (a ridgeback as it happens, with moulded raised rivets – yuck) as a boy, which I didn’t even paint. The bubble-tops weren’t operational until well into 1944 – but they are handsome aircraft.
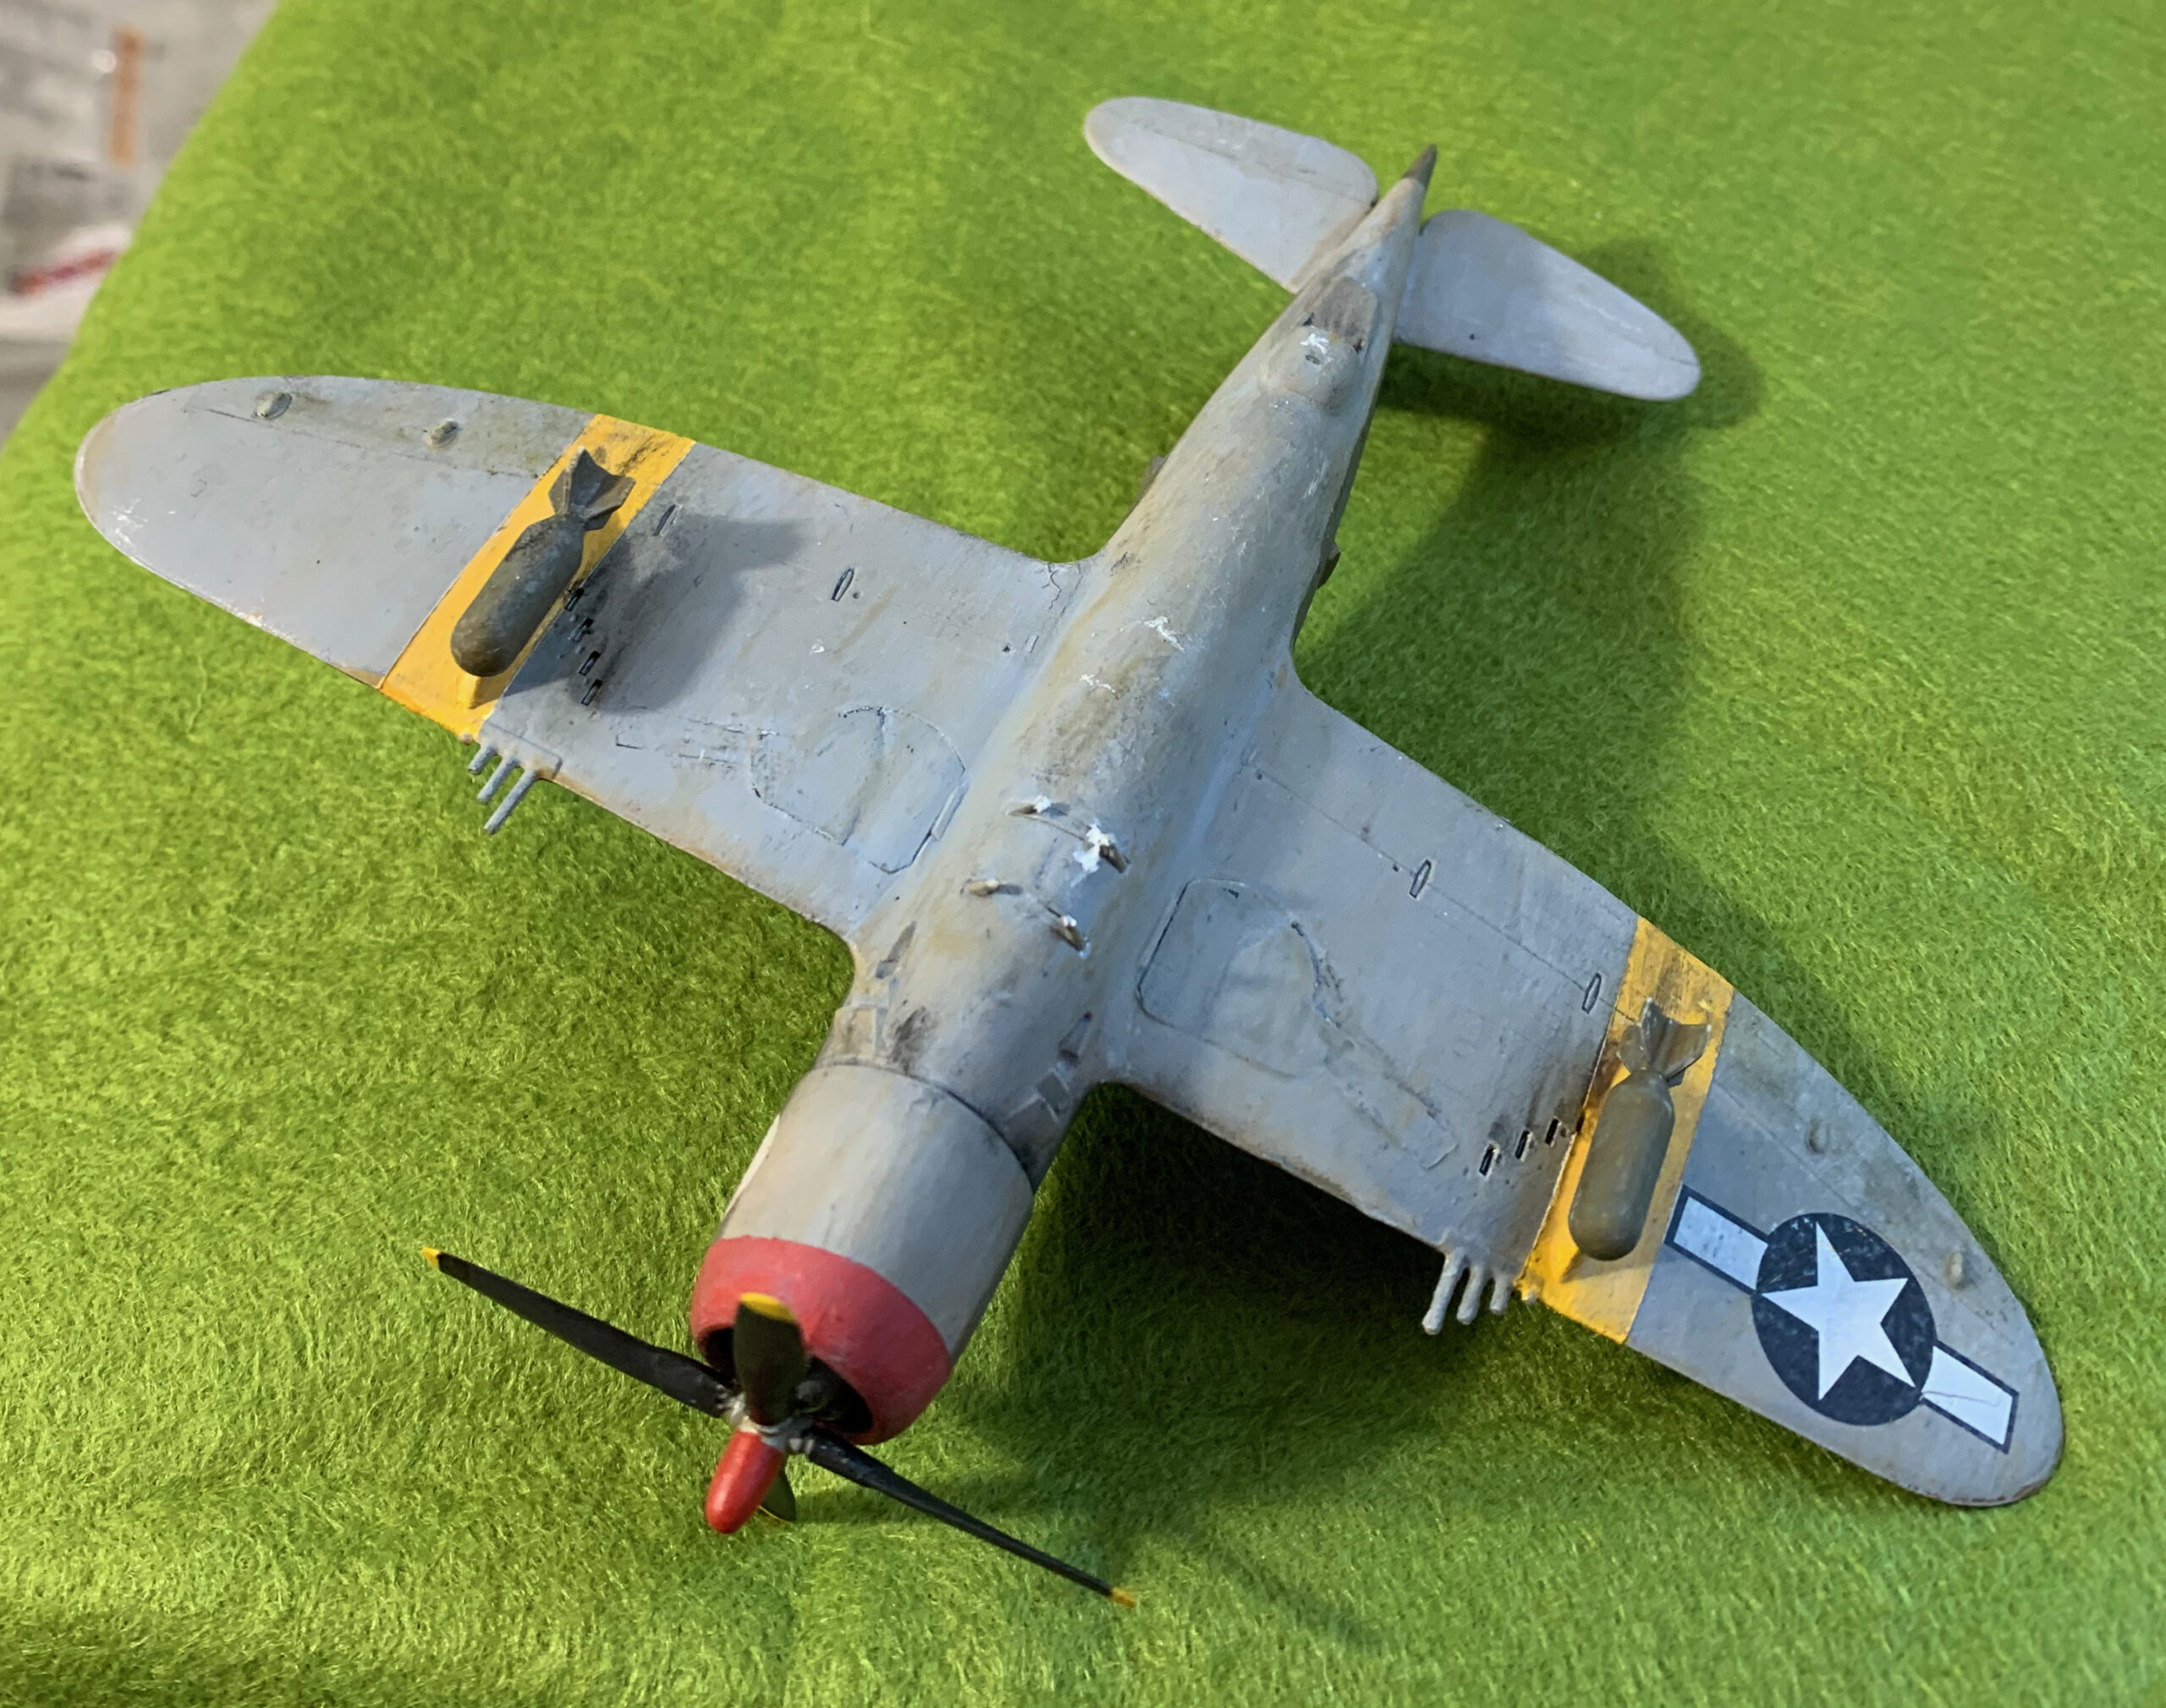
Hobby Boss models are simple and cheap, with only a small number of parts. But there was a big snag. They follow the modern convention of making planes with undercarriage down and no pilot. This is how all upmarket aircraft kits are presented these days – but you would have thought cheaper models would appeal to youngsters and wargamers, who would like to make them up as in flight. The box artwork shows the plane in flight – and it even appears to be a photo of the model. Airfix and Zvesda both give this option. The Hobby Boss had the tail wheel door moulded open. And the P-47 main undercarriage doors were in three parts, with the upper two moving to overlapping position when downed; these are moulded as a single piece in the kit, which had to be separated. All this involved some pretty tricky conversion work to model as retracted. The main doors did not fit into the holes exactly and had to be filed down. And fitting them flush was more than tricky, until (on the last door to be fitted) I discovered the use of plasticine. The tail doors I gave up entirely on. I just filled in the hole and filed it flush, and tried to score some doors in. The results of all this were very far from satisfactory, especially the tail door. I won’t have another set of tail doors to model until the Spitfire VIII, though, which I plan to do last, and which has properly moulded separate doors in the model. But modelling the doors as closed for the main undercarriage is going to be tricky for the one further Hobby Boss model (a Bf-109), and the seven “up-market” models I have now acquired. At least these usually have upper and lower wings in separate parts (Hobby Boss has the wings in a sing piece), making the doors much easier to fit flush.

Apart from this major problem, the Hobby Boss model fitted the brief perfectly. The interior detail of the cockpit is poor; the bombs are crude and inaccurate; not fitting the central fuel tank leaves an unsightly hole in the bottom centre of the fuselage; the panel lines are very shallow; the engine detail is derisory. But none of this really matters for the sort of model I was trying to make. You can’t really see into the cockpit; the bombs aren’t particularly visible; the fuel tank hole is where the flight stand attachment will go; overdoing the panel lines would be a worse error; and you have to look closely to see into the engine. What I got was a simple and robust model, much like my PSC tanks and APCs.
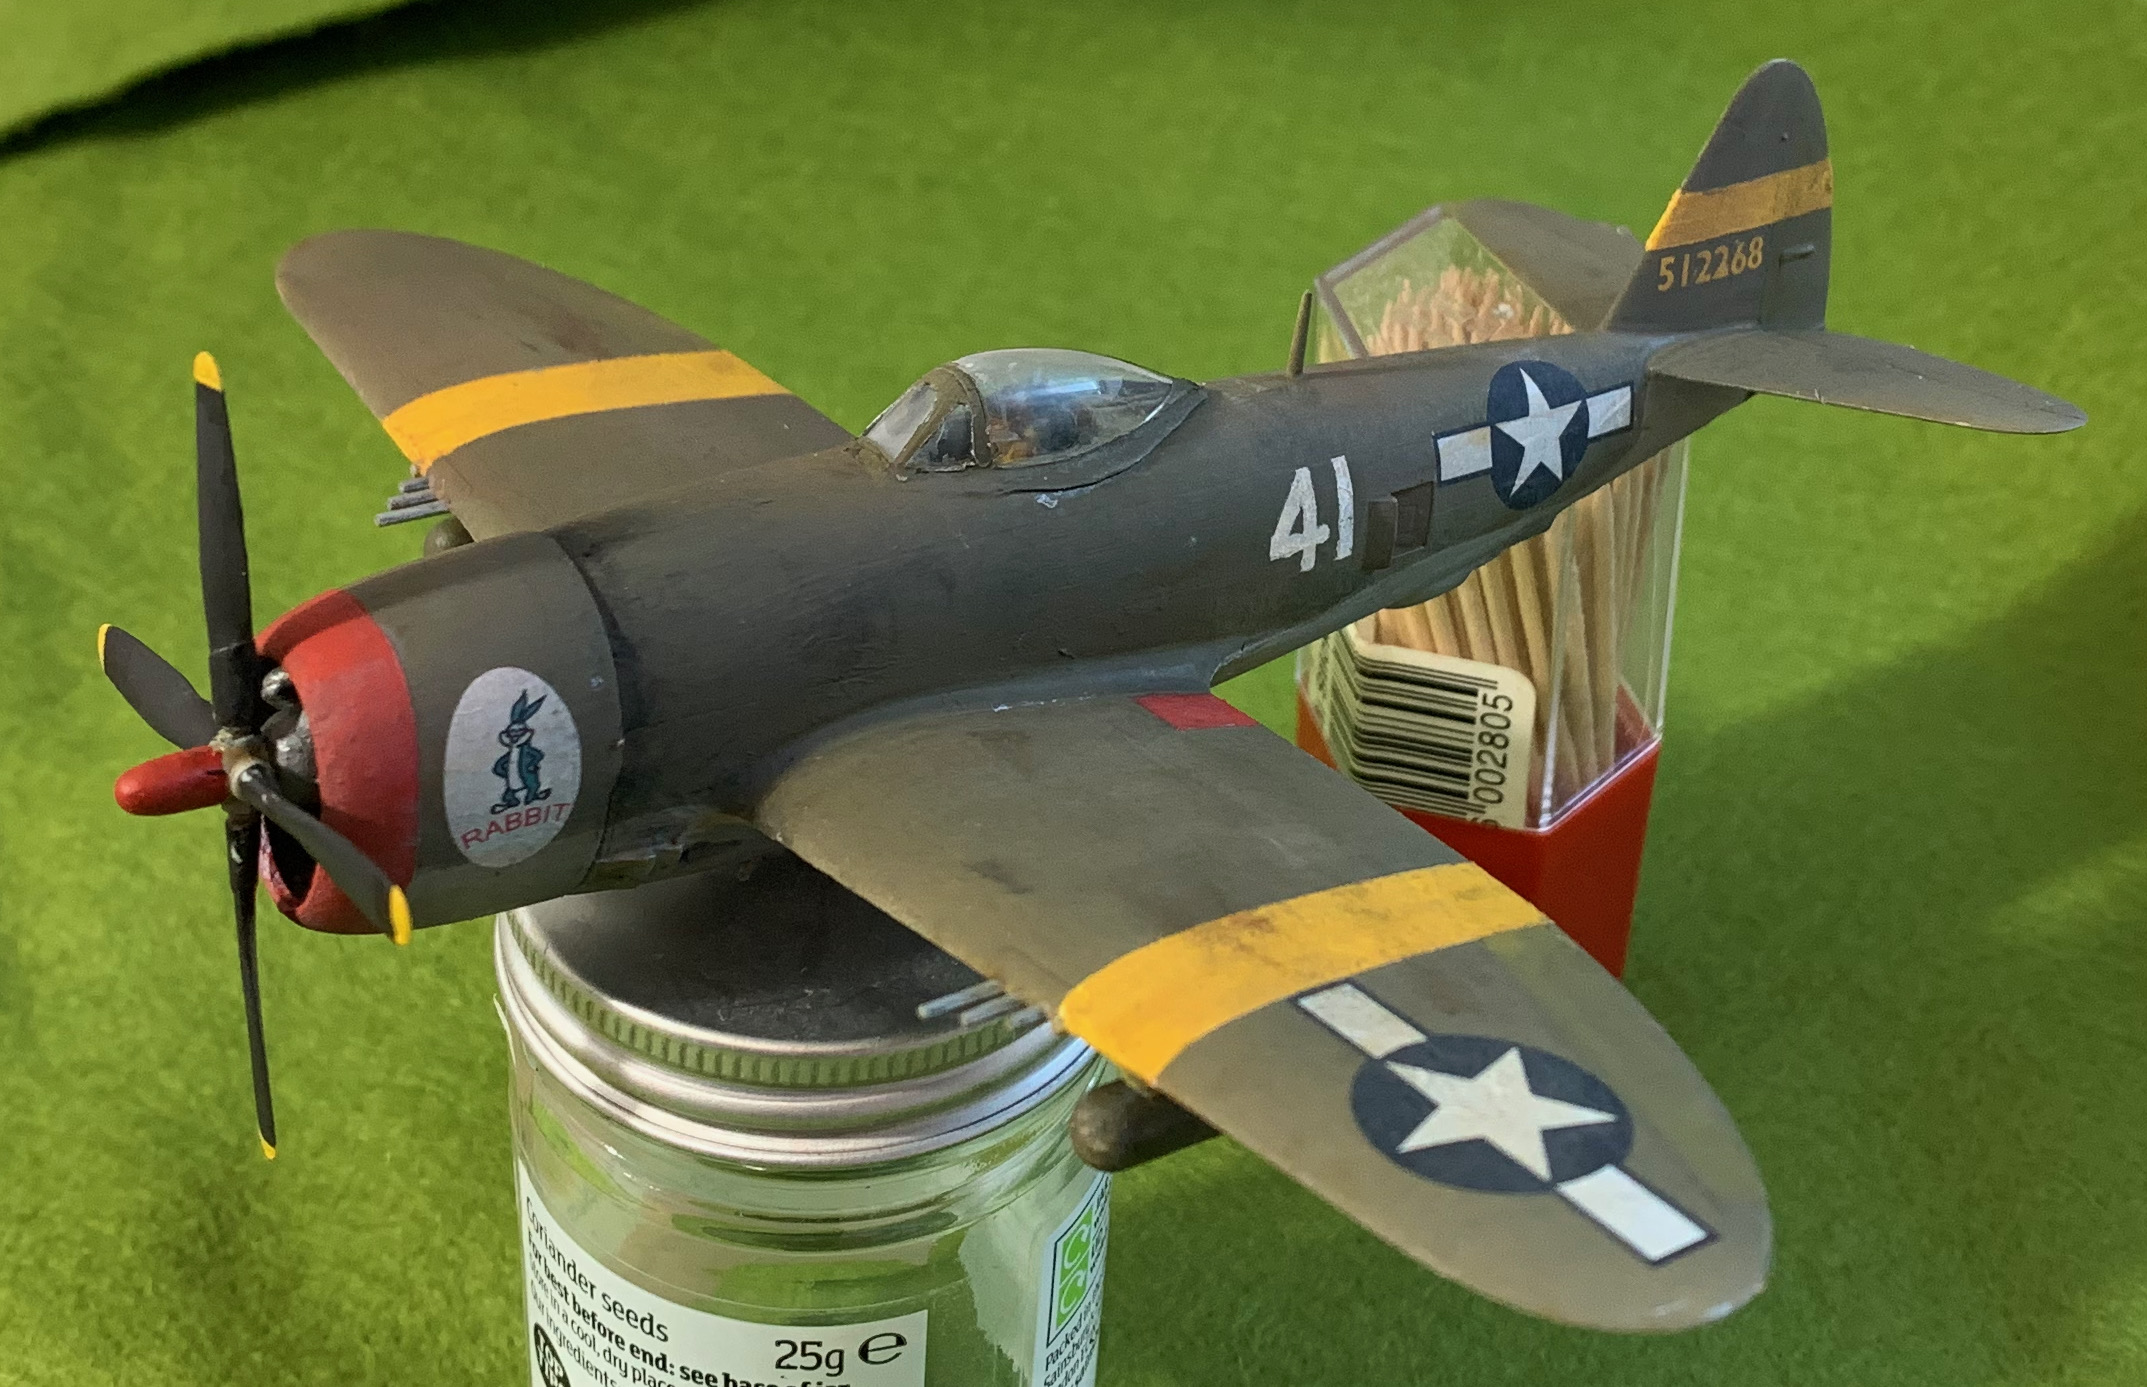
There was a problem with the decals though. By the time the bubble-top came into operation, US aircraft were no longer being painted at the factory, and almost all of them flew in bare metal. Both decal schemes were for such bare-metal aircraft. This is not a problem for the star and stripe insignia, but it is for the lettering, which is black on bare-metal aircraft, and yellow or white on painted ones. In the Mediterranean, however, aircraft were often left out in the open when on the ground, so many aircraft were painted by the service crews to make them less visible, using traditional olive drab and neutral grey. I found an example of such an aircraft in the Eduard “Jugs over Italy” kit (in 1/48), with the schemes and made models readily visible on the Internet. My scheme is based on this but with made-up serial number (the smaller yellow figures on the tail) and battle number (large white ones on the fuselage). I had an audacious plan to solve this, I actually had the unused decals from my old Airfix P-47 kit, getting on for 50 years old, which included a scheme for for a painted plane. Unfortunately these were damaged, and broke up when I tried to use them. My next solution was to try and cut out a 1 and 7 from the white decal printing sheet for the battle numbers. But these proved much too delicate. Apparently for decal paper to work this need to have a hefty layer of varnish on them. For the battle numbers my next plan was to overpaint some of the black numbers that came with the kit, of which the simplest was a “41” (actually converted from “4P”). This was hard going, and it was impossible to get either properly straight edges or an even paint coverage. To my surprise it worked. The imperfections are much less noticeable on the weather-beaten look I was going for. It looked as if the ground crew didn’t have the stencils or spray gun when they had to apply the numbers; I expect such things happened. For the serials wanted to print some numbers on transparent decal paper; I was bit concerned because my last attempt at this turned out to be rather transparent; standard printer ink doesn’t have a great deal of body. In fact my inkjet printer heads were completely messed up and unable to print much colour at all. but I found some old British Railway locomotive decals from a model one of my brothers must have bought, which would have been even older than my P-47. They were the right size and colour, but in Gill Sans script rather than USAAF stencils. Actually from a distance these aren’t too dissimilar, except for the zero, which is a big round “O” in Gill Sans. This featured in the numbers, but I cut the zeros out, and assembled the numbers from three pairs each. Apart from taking quite a while to loosen up from the backing paper, these decals worked fine. They evidently aged much better than my old P-47 ones. Finally on the engine cowl I simply used nose art from the Hobby boss decals, one for the plane “rabbit” and the other presumably for the unit. This was all part of the P-47 look.
There were two really scary things about this project for me. The first was use of the airbrush for the first time, and the second was weathering. The first issue was primer. I had bought some artists’ gesso to use for primer, but I found this didn’t bond well to plastic (though works fine on metal). Instead I used standard white acrylic paint that came with the airbrush. Initially this didn’t bond all that well either (even though I had washed the kit first), but with a bit of help from a paintbrush I got started. That first session with the airbrush was a bit nightmarish. I kept on getting it wrong, with the paint pooling up, which I then had to thin out with a paintbrush. After the white I tried putting on a layer of neutral grey (over the whole model, though only needed for the underside), but I ended the session with the model looking a real mess. Next session, after watching a couple of videos on airbrushing models, it went much better. And each time since my confidence has improved. A number of factors have to be balanced (air pressure, thickness of paint, openness of nozzle and distance from subject), and this clearly takes a while to come together. The big surprise to me is just how thin the paint is when it goes on properly. This is quite unlike an aerosol can. The flip side to this is that the spray is pretty controllable, and paint doesn’t go everywhere, like the aerosol. This thinness is what gives airbrushed paint such a lovely finish, of course. But it does mean the layers shine through each other. Using a white undercoat made a big difference. In one place (the lower rudder) I used a brush to correct an error: it came out much darker. Underpainting in dark colours to bring out individual panels is quite the fashion for serious aircraft modellers. I did try this with black for the undercarriage doors, but not very successfully (the underpainting needed to graded). One aspect of the thinness I hadn’t counted on is that the paint is very easy to damage. I quite often chipped paint off right down the plastic. This may suggest that a proper primer is advisable, and I have bought some from the airbrush company for future projects. But it also explains why modellers seem to be so keen on layers of varnish.
After the basic paint job I applied the decals. As with my vehicle models I applied to a layer of polyurethane gloss varnish (from a very old Humbrol pot), put on with a brush. I forgot to do this on the tail, though, but the decals (and these were the very old ones) went on fine with the help of decal fluid, with no flash showing. The smoothness of the airbrush finish probably means that this step is superfluous – except that it is an excuse to put on a layer of protective varnish. The decal application didn’t go that well, as I managed to spill almost a whole bottle of decal fluid. As a result of being a bit stressed by this, some of the decals were damaged and there was a little (and unforgivable) creasing. After this I wondered whether I could go straight on to the weathering without sealing the decals in varnish, as the finish looked quite good. But by then I was starting to understand that layers of varnish were a good thing. At that point though the only airbushable varnish I has was matt – and that was a bad idea at this stage. Decals are allergic to modern matt varnish; back in the day matt varnish was really satin, and I used it to set the decals (with the glue washed off the back) as a way of eliminating flash – a job the decal fluid now seems to do. I had some old Humbrol satin varnish, and I used this with a paint brush. This produced a very good finish on the top, but it has a slight orange colour to it, which discoloured the underside where it was a bit thicker. It also filled in some of the engraved lines, making them impossible to bring out in a wash. Unlike proper aeromodellers, I’m not that fussed about bringing out the panels – but I do like to show up the moving parts, like the control surfaces and the flaps on the engine cowling (which are completely lost on this model now). I now have airbrushable colourless gloss varnish. My idea is to use this before and after decals, with a wash to bring out the engraving before either or both coats.
Weathering is a multi-stage process for serious modellers (more than a dozen steps on one blog). I was looking for something much simpler. My plan was to use two main techniques: the “dot filter” method, applying oil paint, and pastel dust. I also did a little “chipping”, as well as a largely unsuccessful wash. The dot filter requires quite a bit of courage. You put small dots of oil paint of different colours on the surface, and then keep brushing into a very thin layer with subtle variations that bring out the direction of the brush strokes (generally fore-and aft to simulate the effect of air flow). Oil paint dries slowly, so you have time to brush it down very thin (and you can also clean it off with white spirit and tissue). The paint I used was white, Payne’s Grey, Raw Sienna and a little bit of Van Dyck Brown (being very sparing with the browns on the underside). I had bought these colours to paint horses, so the choice was a bit constrained (Yellow Ochre and Raw Umber would be good choices ordinarily). I did it after decals, rather than before (as advised by the blog I was following), because I wanted to integrate the decals into the overall finish. When I first pulled the brush over the spots, it looked like a disaster (it helps to see a video of this first to prepare you for the shock), but eventually the paint spread so thin that the effect was very pleasing. The red band on the nose was the only real problem; it did not respond well to the white, and so I had to use a bit of white spirit to thin it. The overall effect is to patinate the model and soften the paintwork and decals (the white is especially effective). There should be elements of unevenness too, to reflect where the different coloured spots went. It all helps to bring life to the model.
The use of artists’ pastels was an idea I got from another blog, as a substitute for weathering powders that are popular with modellers. I actually have a decent stock of pastels, which I had bought for use on terrain (not particularly successfully so far). You scrape off some powder with a craft knife and apply with a paint brush. At first I tried it directly after the oil patina had been applied. The oil immediately dissolved the powder, turning it into a liquid smear. This is potentially quite useful, but not the effect I was looking for, so I waited for a day for the oil paint to dry. I can’t say that I have mastered this technique. I tried to use it to provide a bit of contrast on the control surfaces, where the engraving couldn’t be brought out with a wash. In particular the ailerons merged with the flaps (though at least both were delineated from the wing). This wasn’t very successful; in fact it would have been better to try this while the oil was still wet, as the dry powder doesn’t do sharp edges. I was more successful in applying dark smudges to suggest exhaust stains by the engine cowling, and areas of dirt on the wing to suggest mud from ground crew boots, etc.
I also used a little silver paint to suggest places where the paintwork had been chipped back to the metal. Some modellers go to town on this, but I’m not sure how realistic this is. Japanese aircraft were notorious for paintwork being in terrible condition, but not other nations. The artist in the Osprey publication on B-26s in the Med delights in showing these planes with paintwork being in a very poor way, though I don’t think this is clear from the photos. But these bombers were exposed to airburst shells from heavy AA in the way fighter planes weren’t. The popular way for modellers to do this is using silver artist’s pencil, but I was reluctant to splash out. You can see my efforts the wing route in the picture. there are one or two spots elsewhere. I don’t think I have this quite right yet, but I’m not sure what is wrong.
The final step was a layer of matt varnish. I have lots of this in aerosol cans (a long story…), and I wasn’t bothered about it being quite heavy-handed, so I used this rather than airbrush. I wasn’t sure about this step. After the satin varnish, and the oil patina, with contrasting matt pastel I thought the model looked pretty decent as was. Aero modellers insist that a high matt look is authentic for this era, and in the Med, with all its dust and outdoors exposure, this makes more sense than elsewhere. But high matt isn’t great for aerodynamics, so I thought planes were quite often polished to a satin type finish – and this is how I used to present my models, using the satin “matt” varnish. Still this model is a learning experience, so I thought I had better try it. I think it does work, and it does recall contemporary photos of combat planes in this era, especially the US olive drab planes.The propellor was left off the for this phase, though, and I gave it a coat of satin varnish.
This model isn’t quite finished. First is the canopy. I attached it before the airbrushing, as I wanted to cover the joins for the static part in modelling putty. I used masking tape to cover the transparent bits, leaving the frame exposed to the airbrush. The masking tape came off after the matt varnish. The result on the canopy from was OK-ish after a bit of touching up, but the tape left marks on the canopy. Unfortunately the polish I had specially acquired to clean the canopy up has gone walkabout, so I’m waiting for it to re-emerge. Second the plane needs a stand. This has been a been a bit of a problem. Commercial stands are for much smaller models. For larger ones it is popular to make your own, either using an acetate stick or an extendable metal aerial. In the end I bought one made for an extendable aerial from Debris of War – but with a 3in base it is meant for smaller models (15mm scale single-engined aircraft max). I hope to be able to modify it to work for larger models, up to my planned B-26. A magnet is attached o the model to attach it to the stand. It would be a good idea to integrate this with the model building process, rather than it being an afterthought, as it would be useful to have somewhere to leave the model while paint is drying, etc. The stand is in the post.
Overall the model comes up to an acceptable wargames standard, and meets my needs. The underside is a bit of a mess, partly because of the botching of the undercarriage doors, and partly because the varnish was a bit thick and discoloured it. The weathering is a bit heavy-handed too, but that’s less of a issue – it doesn’t look implausible. Actually I’m very pleased with how this model has turned out. There may be a bit of a fine line between a model looking botched (I had lots of those in my youth), and one that looks realistically weathered, but on the topside at least, the model is on the right side of the line.
I have greatly enjoyed my return to aero modelling, even if it is a bit of a distraction from other hobby projects. It has given me a fresh understanding about how close hobby projects are to art, and how much they can be informed by art (I leave to one side whether the hobby actually is art). I am no artist, but I do take a close interest in art. What I have learnt from art is how to understand and deal with the series of subjective choices that any form of representation presents. You need to develop a clear idea of what it is you are trying to do. Serious aero-modellers want to present you with model you feel you can jump into and fly away in. The model needs to be coherent, but they like to overwhelm the viewer with tiny details to give you that feeling that you can are in the presence of a real plane. 1/72 o is a bit small for this (I can see the attraction of 1/48; I did make a couple of 1/32 models in my time, and they’re too big). I think they overdo things sometimes though, especially an obsession with panels. My aim is much more impressionistic. I want to convey an impression of a plane in action with a job to do; viewing is typically meant to be at a greater distance – and I do want to convey the idea of a purposeful and menacing machine. This allows me to adopt a much simpler approach and still produce something with its own impact. The weathering step is particularly interesting here; apart from serving to give the model a used appearance, reminiscent of wartime photographs, it helps unify the model, for example by integrating the decals and ID stripes. It may also help to show up moving parts, conveying that this is a working machine – though no so much on my model.
It was certainly right to get started on a single model. Some key learnings are as follows:
- The airbrush produces a beautiful finish, and is ideal for this type of model, allowing the fine detail of the mouldings to come out. This is quite different from painting much hunkier metal miniatures. But the paint finish is quite delicate, and it can be a bit too smooth, requiring the weathering phase to bring the model to life.
- The workflow is very different from painting miniatures with an ordinary, or even the vehicle models that I have done to date. There aremore gaps between steps to wait for things to dry out – leading to a larger number of shorter sessions. For miniatures I could conceivably finish a project in a single, long, session (though maybe without primer). It makes sense to do the models in batches for this reason, though I suspect more than three at a time would give me real problems until I’m more experienced.
- I need to mount the models on stands pretty much from the assembly stage.
- No more brush-delivered old Humbrol varnish except for small highlights.
- A wash to bring out moving parts is a good idea, but needs to be done quite early, depending on how deep the scoring is on the model. Underpainting may also be a good way bringing out moving parts.
- I can use my artists paints in the airbrush, but it is helpful to have the same paint mix available throughout the model production for the main colours. The Stay-Wet palette helps here, but it may be an idea to mix pots of more liquid paint at the start so that there is a reserve. The colour-by-numbers approach of hobbyists who buy ready-mixed paints makes more sense for airbrush projects than it does on miniatures. But I’m sticking to my guns – I find mixology way more fun.
My next project on aircraft modelling will be three German planes from early 1943, in desert colours. These feature two simple models – an Me Bf-109G from Hobby Boss and an FW-190A from Zvesda, and an old model, a Stuka from Fujima. But before that it’s back to Napoleonic miniatures.
