
So this is my first post of 2022! I have spent a lot of time refining my Napoleonic big battle rules, but that is a hard thing to blog about while you are doing it. But earlier this month I returned to my modelling project on WW2 aircraft, based around my 1943 theme, featuring the Tunisia, Sicily and Italian campaigns. This is a return to aircraft modelling after a break of 35 years or so. I started with a single American P-47 Thunderbolt, a bit after 1943, but in Med colours. I then did a batch of three German aircraft for Tunisia. My next batch was three British Aircraft: – a spitfire VC, a hurricane IID and a Kittyhawk IA. Alas on a number of counts the results are rather flawed.
The idea is that I complete the models up to wargames standard. They need to look good from a distance, and have undercarriage up and pilots in place. They would not pass muster for keen aero-modellers, who would include much more close-up detailing. For this batch of aircraft I wanted to focus on the model-making and painting, so I decided to use the decals in the box, rather than the palaver of creating something different (which I did for the P-47 and two of the German planes).
Why are the results flawed? The biggest problem is that I got the colours wrong. The planes look as if they are carrying the early north European scheme of Dark Earth and Dark Green; only the blue underside (not very visible from the picture) gives the game away.. This is a sorry saga with a clear moral. Do your research first! I thought I had understood what was required as I mixed the colours for the airbrush. First I mixed the Azure Blue for the underside. I started with Azure Blue Rowney artist’s paint, dulled down with a bit of white and brown. Too much white: while this is consistent with what some artists show, photos show it to be quite dark. And then I thought it also looked too green – that may be as a result of the white, which causes a bit of a clockwise shift on the colour wheel for some reason (blue to turquoise, red to magenta, etc.). By then the Mid Stone had already gone on. I based this on the brown colour in the German tropical scheme, which I based on Raw Sienna. It should have been yellower, and actually lighter than the Azure Blue. Next I put on the Dark Earth, which I though should come out a bit redder than the Mid Stone. I mixed this based on Burnt Umber. I then looked at this colour photo of a plane in theatre:
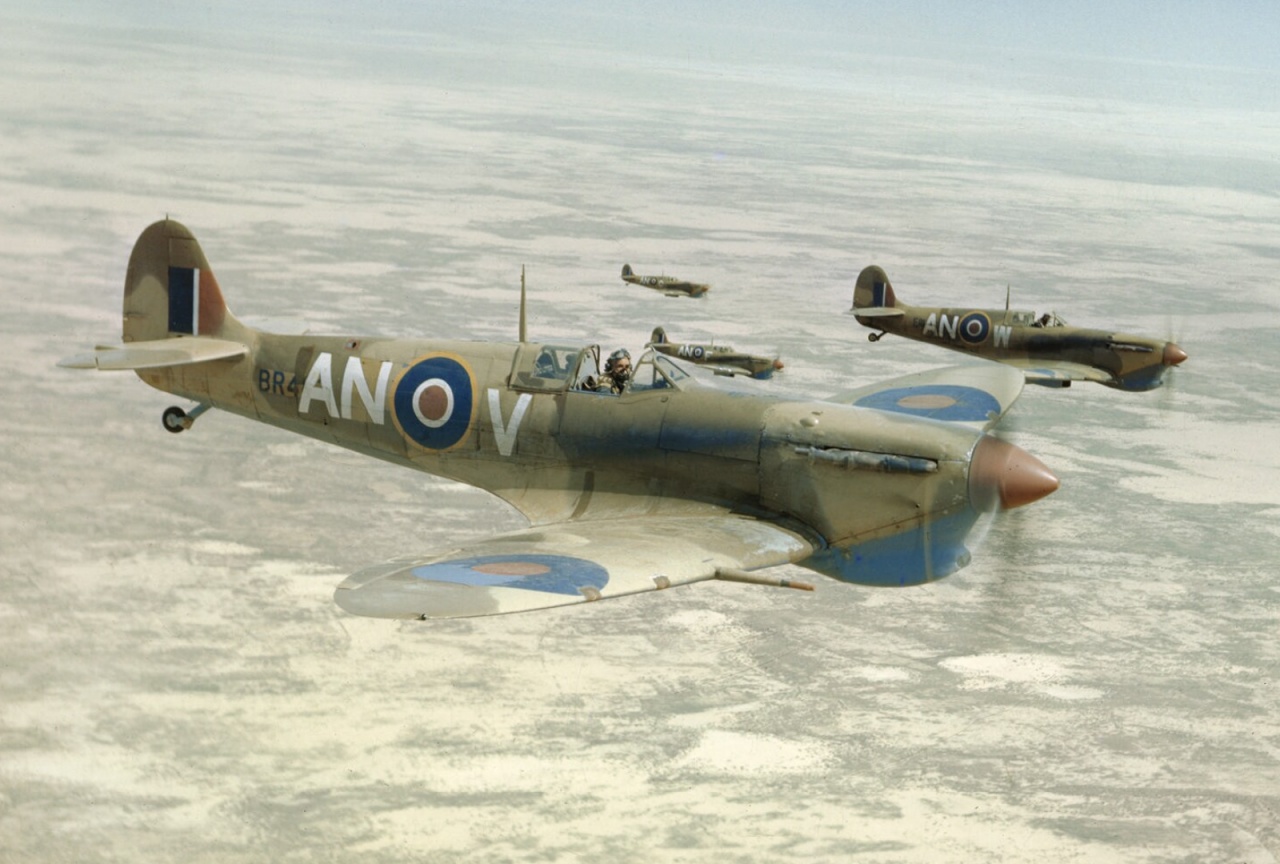
This shows a distinctly greenish hue to the Dark Earth (which intros picture is generally quite weathered – it fades in the sun quite quickly) and not the reddish one I had. I remixed, using adding in some green, and overpainted. Too much green – though I was probably being led astray by the Mid Stone being wrong. When done I actually thought it didn’t look too bad (it is easy to misjudge colours out of context). But I thought I would tweak with some glazes mixed from oil paints and linseed oil – to make the underside darker and bluer, and the topside paler and less red (which means a bit greener). It took a few days to be dry enough for decals. At this point I just pressed ahead. Alas the Mid Stone looks more like Dark Earth, and the dark Earth looks more like Dark Green! And the Azure is still too pale.
I will profile each individual model separately. But here are some notes on the general technique. I first assembled and painted the interiors and pilots. I then assembled the models apart from the cockpit canopies. I filed, fillered and sanded to smooth over the worst cracks while trying avoid damage to the panel detailing. Then I added the canopies and masked them. I did think about leaving this to later, but thought it was better this way. Apart from the Spitifire I did not attempt to leave the canopy struts unmasked – I would paint them later. But I struggled a little with this, and applied a bit too much superglue on the Hurricane and Kittyhawk – this meant that the canopy fuzzed bit on the inside. And by the time I discovered it the canopies were so secure that I didn’t dare to try and remove them.
After this I airbrushed with white primer. The plastic really needs this step. Then the saga with the paint started. This was my first attempt with RAF camouflage. I sprayed the all the upper surfaces Mid Stone. And then I used Blu Tac and magic putty to mask the Stone areas. This took literally hours to form the rather complicated shapes, and even then I made several mistakes. The magic putty is easier to apply and remove, but it flows – so can’t be left for long, and I needed it to last for days. So I couldn’t use it for the edges – just infill. I won’t do this masking again. After the masking came off and I realised my mistake on the colour, I decided to overpaint with a good old paint brush. I did this with many thin layers – not too hard as the acrylic paint dries fast, so I could do it all in one session. That worked fine – so in future I’m going to use the paint brush for the overpainting. After the paint I put on the oil glaze. the idea was to correct a colour imbalance. It did improve things, but it’s much better to take a bit of trouble to get the colour right in the first place. Ideally all the main colours need to be mixed at the same time and tested before application. I have relished the challenge of mixing my own colours – but my experiences shows how difficult this is – and I don’t think I’d recommend it to anybody isn’t an artist (and I’m not!).
I am making slow progress with airbrush technique – the critical thing being to get the paint consistency right. I have also learnt how to clean the brush more quickly, so I can do it more often. It produces a lovely, delicate finish, which looks really good on aircraft. But good conventional brush technique is just as fast and the results are pretty good. Actually I think the airbrush might come into its own on vehicles, where the smooth finish is not as important, but the nooks and crannies take forever to paint with a brush – and aren’t good for brush health either. So far I have not learned how to do fine work with the brush – so I have to mask – which is clearly an issue! This is partly because of the brush – which isn’t designed for fine work, but mainly its because I don’t think I have set the brush up properly. As for masking, Tamiya standard tape is lovely. I also have 2mm tape which is meant to do bends, but it’s no good for RAF camouflage patterns, and it doesn’t stick all that well after a few months.
After the glazing and detailing the canopies, I went on to the decals. I didn’t think the decal softener was working properly as they weren’t melding properly with the surface. But as they dried, it mostly worked very nicely. Unfortunately I managed to dislodge some of the carefully positioned decals on the Kittyhawk, which required some corrective action – which I’ll describe on my piece on that model. The only surface prep on the decals was using decal fluid, which blobbed a bit on the glazed surface. I didn’t seal the decals afterwards either, as I did on my first model.
After the decals were dry I used the oil paint patination technique of putting small blobs of paint on the surface, and brushing them in. This caused a near-death experience with my German aircraft – but I did not make the mistake of doing this on top of a layer of matt varnish this time. My technique is improving and this step was quick. It really helps integrate the decals, which can be a bit saturated and stark, as well s giving the aircraft a bit of a used look. The glaze left quite a glossy surface, so I applied layer of matt varnish after this. I used the LifeColor airbrush varnish for this, but applied it by conventional brush. This is quick on the smooth surfaces of an aircraft – and I did not want to mask the canopies again. I did not want a deep matt finish, so I didn’t think of using the Winsor and Newton aerosol. The varnish blobbed a bit, so it was a bit trickier than I thought it would be – just as well I didn’t try the airbrush, as the standard brush would have been needed anyway!
Finally I finished with a bit of powder scraped from pastels. This was mainly to create the exhaust stains. But I applied small quantities more generally to give a slightly dusty look. You can’t really tell from my picture above – but closer up pictures will be come with my later posts.
So disappointing. The RAF tropical scheme is hard to get right. I have seen many horrible-looking jobs on restored aircraft, models and artwork. There’s usually an error somewhere. The pre-mixed paints often don’t get it right either. Still my first attempt doesn’t measure up. I plan another batch of models in this scheme later – and I promise they will look much more like the picture above. I may also do another Spitfire V and Kittyhawk anyway, as these models aren’t quite right for other reasons – more later!
Leave a Reply