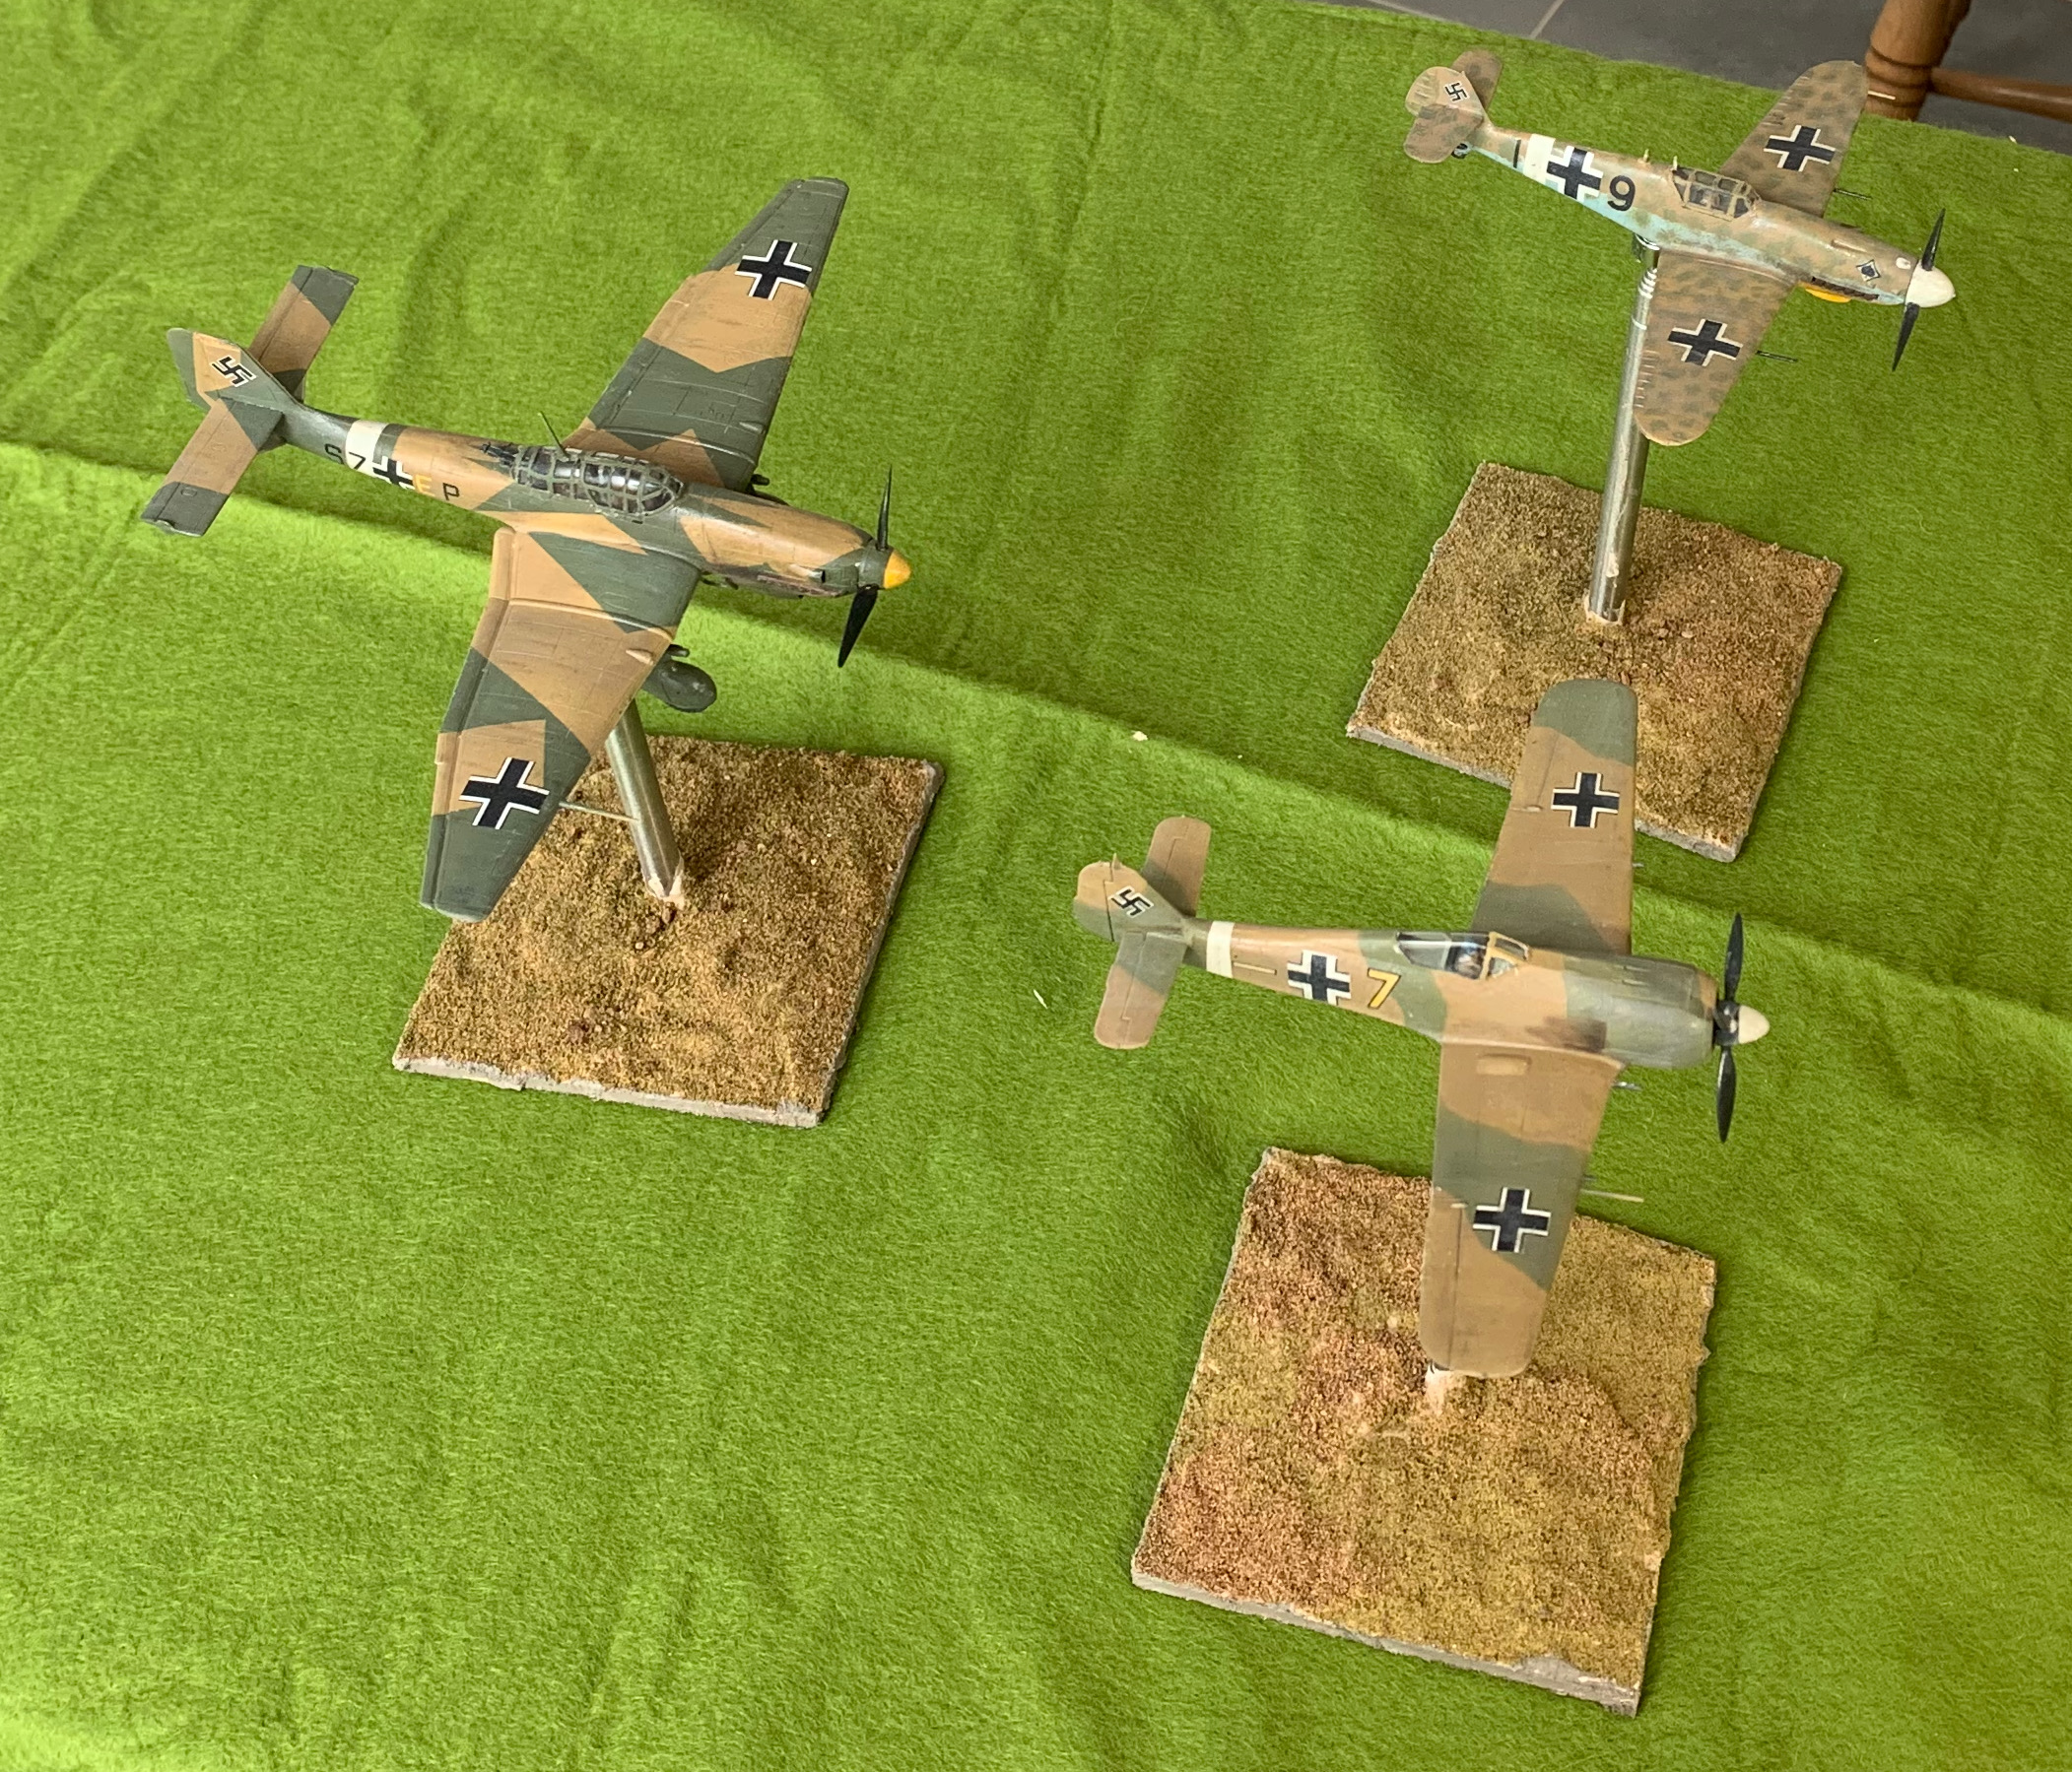
So at last I have finished my latest project. These are three German planes from Tunisia at the winter of 1942/43: a Messerschmitt Bf-109G2, a Focke-Wulf Fw-190A4 and a Junkers Ju-87D1 Stuka. I want to describe each of these planes individually in separate posts, but before that there are a few things I want to say about the project as a whole.
The project was quite a late idea in my plans for an aircraft collection based on my 1943 theme. The P-47 was an interesting trial run, but I thought it would be a good idea to do some more practice on cheap models, before launching into some of the more sophisticated (and expensive) kits that I had bought. I was also a bit short of German aircraft (three from the original ten). This wasn’t so inappropriate given that the Germans rapidly lost air superiority in this period, but at the start air superiority was fully contested. Also I had planned to do the three German aircraft in the standard European grey scheme. But in the early period, in Tunisia, they used their desert colours as well, adding some more interest. And they also used Stukas, which I wanted to model, though increasing Allied air strength quickly drove them into a very minor role. So I bought cheap models of the early versions of Bf-109G and Fw-190A in use at this time, the former from Hobby Boss (£6.25), and the latter from Zvesda (£8.50). For the Stuka I went to Hobby 2000, which was substantially the 1990s model from Fukashima; this was a bit pricier (£11.80), but not in the same bracket as modern hobby models.
The project took a lot longer than I expected, and I had some more learning to do. This was mainly due to my daily routine, which only allows 2-3 hours in the afternoons for the hobby, and very often it proved not possible on that day. To improve my work rate I will have to do some morning time too – fortunately my other commitments are easing, so that should be doable (though there’s more to be done in the garden…). But there were other issues. I had the same problem with raised undercarriage with the Bf-109 as I did with the Hobby Boss P-47, and only the Zvesda model came with a pilot. The Stuka proved quite tricky to assemble. There were some fiddly parts, some of which I gave up on, but a bigger issue was that the fit of the parts wasn’t that great, especially when compared to the lovely fit of the Zvesda. Manufacturing standards have clearly improved. But the real problems came with painting and finishing.
I am still learning with the airbrush; it feels like one step back for every two forward. Partly this is because I mix my own colours. I quickly found this easiest with artists’ colours, rather than using hobby paints (a few Lifecolor ones came with the airbrush). But that gives quite a thick paint that needs to be thinned. Getting the consistency and pressure right was quite hard, especially as things seemed to change as the job progressed. It took longer than expected, and a lot of the green on the Fw-190 turned out to be too thin, and I had to top it up with an old fashioned brush. I would not advise people to take up an airbrush for aero-modelling unless they are quite happy to learn new skills. For wargames purpose I’m, sure you can get satisfactory results with a paint brush, provided the paint isn’t too thick, which may mean you use more than one coat.
The real problems came when I tried the oil paint patina technique for weathering the model – referred to as “dot filtering” in the blog I picked it up from, which isn’t very informative. This means putting small dots of oil paint on the model (such as white, brown and blue-grey) and then brushing them into a very thin patina, which I did after the decals in order to integrate these better. It softens contrasts, creates subtle changes of tone, and simulates some of the effects of fading and dirt. I found this not to hard on the P-47, especially as I could correct over enthusiasm with a bit of white spirit. On that model I applied the oils to a surface on old Humbrol enamel satin varnish. This time I thought it would be clever to to apply a coat of matt varnish first – using Winsor & Newton in an aerosol can. Bad idea. I tried with the Fw-190 first, and I found that the spreading of the paint on the matt surface was much harder and it was not possible to spread the paint thinly enough, which left heavy streaking. So I put a bit of white spirit on. That didn’t help because it reacted with the matt varnish to created a horrid claggy mess. By this time the disease had spread to the 109, as I tried a more restrained application of paint, but without success. This was getting desperate. The models were cheap but I’d invested quite a bit of time in them! I then tried oil paint medium (mainly linseed oil) to thin the paint, and this at last started to shift the streaks and help lift some of the clag off. On the 109, on the unrated areas I applied a layer of medium first, and put the dots onto this, with reasonable results. With a bit of work I got to a generally acceptable result on the two fighters, though close examination reveals areas of mess, especially on the 190. The big problem with this approach came later. The medium took days to dry, and finished in high gloss, rather than the rather nice faint sheen I got on the P-47, before putting on the matt varnish. I had been aiming for that light sheen rather than the heavy matt of the P-47. I had to apply matt varnish, but I didn’t want to use the W&N aerosol, partly because it meant re-masking the cockpits, and partly because I wasn’t looking for the extreme matt finish that this product gives. Instead I used Lifecolor varnish applied with a paint brush. Some of the medium clearly hadn’t quite dried, though, and the gloss finish kept bursting through. After this I had very little patience for further weathering, though I did apply pastel powder for some exhaust stains.
With this disaster unfolding on the 190 and 109, I realised I needed to do something different on the Stuka. I put a layer of Lifecolor gloss varnish onto the matt surface, and applied the oil paint to this. This worked much better, but in places I was still a little heavy-handed, so I put on a little oil medium to thin out. This worked, but I had the issue with it taking a long time to dry. I didn’t dare use the white spirit as the Lifecolor product wasn’t polyurethane (or that old Humbrol product), and I thought it might react in the same way as the matt varnish. Judging by how effective white spirit was on shifting dried varnish on a brush I forgot to clean, this was probably a good call. The patina effect on the Stuka was much more restrained, on the top surfaces anyway, than on the other models (including the P-47), as by this time my confidence had been badly dented.
Other points to note? The white fuselage stripes, and the yellow under the nose on the fighters, was painted on directly after the primer and then masked. On the P-47 I painted the yellow stripes over the main paint. Yellow and white are tricky to overpaint (it took several coats on the P-47), and I think this approach was better. I tried three different strategies for the cockpits. I bought a tailor made mask for the Stuka; frustratingly the model actually came with a mask so I didn’t have to do this – and I used the mask that came with the model. On the 190 I cut masking tape for each of the transparent panels leaving the frame exposed. On the 109 I masked the whole cockpit except the edges and painted the frames afterwards. Some modellers swear by masks, but I’m not sure – I don’t think the end result was any better than painting on, though on the Stuka it would have been much too hard to mask the panels by cutting tape. This is only practical on a much simpler canopy, such as that for the 190 (and P-47), where I was pleased with the result. The results on the 109 were fine for my purposes, though the acrylic surface doesn’t take paint that easily and needs a bit of priming (and the white primer needs toning down as it is visible from underneath). The canopy on the Bf 110 is going to be a real challenge, but I think I’ll take the same route as I did with the 109.
Overall I’m very pleased with these models, except on the undersides, which won’t be all that visible in use. I got away with the botching of the patination. A key learning is that, unlike a true aero-modeller, I am aiming for a good effect from a distance, and not to impress with close -up detailing. These models would be a bit of a disaster by the latter standards, especially the fighters, but they work very well for my purposes, as I think the photo shows. They do a good job of evoking Luftwaffe aircraft of that time and place. In particular fussing around with minor bits of detail, like bringing out panel lines, or showing scuffed paint, isn’t worth it. More comments when I review each model individually.
Leave a Reply